Connect to Data
As of 14 October 2025, Data Cloud has been rebranded to Data 360. During this transition, you may see references to Data Cloud in our application and documentation. While the name is new, the functionality and content remains unchanged.
Tableau Prep helps you clean and shape your data for analysis. The first step in this process is to identify the data you'll work with.
Information in this topic applies to all platforms, unless specifically noted. For more information about authoring flows on the web, see Tableau Prep on the Web(Link opens in a new window) in the Tableau Server help.
You can connect to your data using any of the following:
- Built-in connectors for popular data types
- Custom connectors for other data types
- Published data sources
- Tableau data extracts
- Tableau Catalog
Connect via built-in connectors for popular data types
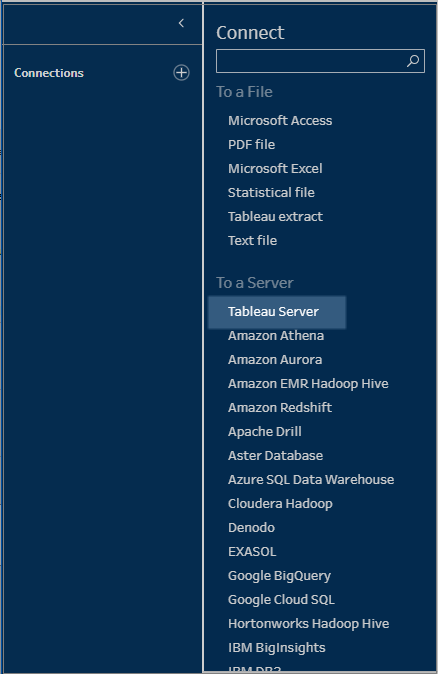
The most common way to connect to data is to use the built-in connectors in Tableau Prep Builder. These are available for most popular data types, and new connectors are added frequently with new versions of Tableau Prep Builder. For a list of available connectors, open Tableau Prep Builder or start a flow on the web, then click the Add connection  button to see available connectors listed under Connect in the left pane.
Most built-in connectors work the same across all of our platforms and are described in the Supported Connectors(Link opens in a new window) topic in the Tableau Desktop Help.
Note: When connecting to a data source, don't use the reserved name ‘Number of Records’ for a field name or a calculated field. Using this reserved name will result in a permission-related error.
Considerations when using built-in connectors
If you open a flow in a version where the connector isn't supported, the flow may open but might have errors or won't run unless the data connections are removed.
- When using a MySQL-based connector, the default behaviour is that the connection is secure when SSL is enabled. However, Tableau Prep Builder does not support custom certificate-based SSL connections for MySQL-based connectors.
Starting in version 2025.1, you can connect to on-premises data sources, publish your flow to Tableau Cloud and run it on a schedule. This requires a Tableau Bridge client configured in a Bridge Client pool, with the domain added to the Private Network Allowlist. In Tableau Prep Builder and on the web, when you connect to your data source, make sure that the server URL matches the domain in the bridge pool. For more information, see the Databases section in the "Publish a Flow to Tableau Server or Tableau Cloud" topic.
Running Tableau Prep Conductor to refresh Tableau Prep flows that connect to flat files via Bridge isn’t supported. To enable successful Prep Conductor flow refreshes, move the flat file to a location that is accessible by Tableau Cloud directly (Google Drive, Box, Dropbox, etc.)
Connecting to Snowflake via Bridge is not supported.
Some connectors, detailed in the sections below, have different requirements when using them with Tableau Prep Builder.
Starting in version 2025.3 when connecting to Tableau Server or Tableau Cloud from Tableau Prep Builder, you can now select whether to authenticate using the embedded browser packaged with Tableau Prep or use the default browser for your machine. For more information, see Publish a flow to Tableau Server or Tableau Cloud(Link opens in a new window).
You can connect to cloud data sources in Tableau Prep just like Tableau Desktop, but if you plan to publish flows that connect to cloud data sources and run them on a schedule in your server, you'll need to configure your credentials in Tableau Server or Tableau Cloud.
You set up your credentials in the Settings tab in the My Account Settings page and connect to your cloud connector input using these same credentials.
Tableau Prep Builder
When publishing the flow, on the Publish dialog, click Edit to edit the connection, then in the Authentication drop-down, select Embed <your credentials>.
You can also add credentials right from the publish dialog (Tableau Prep Builder version 2020.1.1 and later) when publishing your flow and then automatically embed them in your flow when you publish. For more information, see Publish a flow from Tableau Prep Builder.
If you don't have saved credentials set up, and you select Prompt user in the Authentication drop-down, after you publish the flow, you must edit the connection and enter your credentials in the Connections tab in Tableau Server or Tableau Cloud or the flow will fail when run.
Tableau Prep on the web
In web authoring, you can embed credentials from the top menu under File > Connection Credentials. For more information, see Publishing flows(Link opens in a new window) in the Tableau Server help.

In Tableau Prep Builder version 2019.4.1, the following cloud connectors were added and are also available when creating or editing flows on the web:
- Box
- Dropbox
- Google Drive
- OneDrive
For more information about how to connect to your data using these connectors, see the connector-specific(Link opens in a new window) help topic in the Tableau Desktop help.
Supported in Tableau Prep Builder version 2020.2.1 and later and when authoring flows on the web starting in Tableau Server and Tableau Cloud version 2020.4.
Tableau Prep Builder supports connecting to data using the Salesforce connector, just like Tableau Desktop, but with a few differences.
- Tableau Prep Builder supports any join type you want to do.
- Custom SQL can be created in Tableau Prep Builder 2022.1.1 or later. Flows that use custom SQL can be run and existing steps can be edited in 2020.2.1 or later.
- Using a standard connection to create your own custom connection isn't currently supported.
- You can't change the default data source name to be something unique or custom.
- If you plan to publish flows on Tableau Server and want to use saved credentials, the server administrator must configure Tableau Server with an OAuth client ID and secret on the connector. For more information, see Change Salesforce.com OAuth to Saved Credentials(Link opens in a new window) in the Tableau Server help.
- To run incremental refresh on flow inputs that use the Salesforce connector, you must be using Tableau Prep Builder version 2021.1.2 or later. For more information about using incremental refresh, seeRefresh Flow Data Using Incremental Refresh.
Tableau Prep imports the data by creating an extract. Only extracts are currently supported for Salesforce. The initial extract may take some time to load, depending on the amount of data that is included. You will see a timer in the Input step while the data loads.
For general information about using the Salesforce connector, see Salesforce(Link opens in a new window) in the Tableau Desktop and Web Authoring help.
You can connect to data that uses Salesforce Data Cloud by using the Salesforce Data Cloud connector (released in Tableau Cloud October 2023). For more information, see Connect Tableau Cloud Web Authoring to Salesforce Data Cloud(Link opens in a new window).
To connect to Salesforce Data Cloud data, use the Salesforce Data Cloud connector. The Salesforce Data Cloud connector recognises Data Spaces, presents clearer object labels and is powered by accelerated queries.
- In the Connections pane select Salesforce Data Cloud from the Server connector list.
- In the Salesforce Data Cloud dialog, click Sign In.
- Sign in to Salesforce with your user name and password.
- Select Allow.
- Close the browser pane.
- In Tableau Prep, select a Data Space to see tables.
- Select a table.
Tableau Prep Builder supports connecting to data using Google BigQuery, just like Tableau Desktop.
You must configure credentials to enable Tableau Prep to communicate with Google BigQuery. If you plan to publish flows to Tableau Server or Tableau Cloud, OAuth connections must also be configured for those applications.
Note: Tableau Prep doesn't currently support using Google BigQuery customisation attributes.
- Set up OAuth for Google(Link opens in a new window) – Configuring OAuth connections for Tableau Server.
- OAuth Connections(Link opens in a new window) - Configure OAuth connections for Tableau Cloud.
Configure SSL to connect to Google BigQuery (MacOS only)
If you are using Tableau Prep Builder on Mac and you are using a proxy to connect to Big Query, you may need to modify the SSL configuration to connect to Google BigQuery
Note: No extra steps are required for Windows users.
To configure SSL for OAuth connections to Google BigQuery, complete the following steps:
- Export the SSL certificate for your proxy to a file, for example proxy.cer. You can find your certificate in
Applications > Utilities > Keychain Access >System > Certificates (under Category). Locate the version of java that you are using to run Tableau Prep Builder. For example:
/Applications/Tableau Prep Builder 2020.4.app/Plugins/jre/lib/security/cacertsOpen the Terminal command prompt and run the following command for your Tableau Prep Builder version:
Note: The keytool command must be run from the directory that contains the version of java that you are using to run Tableau Prep Builder. You may have to change directories before running this command. For example
cd /Users/tableau_user/Desktop/SSL.cer -keystore Tableau Prep Builder 2020.1.1/Plugins/jre/bin. Then run the keytool command.keytool –import –trustcacerts –file /Users/tableau_user/Desktop/SSL.cer -keystore Tableau Prep Builder <version>/Plugins/jre/lib/security/cacerts -storepass changeitExample:
keytool –import –trustcacerts –file /Users/tableau_user/Desktop/SSL.cer -keystore Tableau Prep Builder 2020.4.1/Plugins/jre/lib/security/cacerts -storepass changeit
If you get a FileNotFoundException (Access denied) when running the keytool command, try running the command with elevated permissions. For example: sudo keytool –import –trustcacerts –file /Users/tableau_user/Desktop/SSL.cer -keystore Tableau Prep Builder 2020.4.1/Plugins/jre/lib/security/cacerts -storepass changeit.
Set up and manage your Google BigQuery credentials
The credentials that you use to connect to Google BigQuery in your Input step must match the credentials that are set up in the Settings tab in the My Account Settings page for Google BigQuery in Tableau Server or Tableau Cloud.
If you select different credentials or no credentials in your authentication settings when publishing your flow, the flow will fail with an authentication error until you edit the connection for the flow in Tableau Server or Tableau Cloud.
To edit your credentials, do the following:
- In Tableau Server or Tableau Cloud, on the Connections tab, on the Google BigQuery connection, click More actions
 .
. - Select Edit Connection.
- Select the saved credentials that are set up in the Settings tab in the My Account Settings page.
Sign In using Service Account (JSON) file
Supported in Tableau Prep Builder version 2021.3.1 and later. Service Account access is not available when authoring flows on the web.
- Add a Service Account as a saved credential. For more information, see Change Google OAuth to Saved Credentials(Link opens in a new window).
- Sign in to Google BigQuery using your email or phone number, then select Next.
- In Authentication, select Sign In using Service Account (JSON) file.
- Enter the file path or use the Browse button to search for it.
- Click Sign In.
- Enter your password to continue.
- Select Accept to allow Tableau to access your Google BigQuery data. You will be prompted to close the browser.
Sign In using OAuth
Supported in Tableau Prep Builder version 2020.2.1 and later and when authoring flows on the web starting in Tableau Server and Tableau Cloud version 2020.4.
- Sign in to Google BigQuery using your email or phone number, and then select Next.
- In Authentication, select Sign In using OAuth.
- Click Sign In.
- Enter your password to continue.
- Select Accept to allow Tableau to access your Google BigQuery data. You will be prompted to close the browser.
For more information about setting and managing your credentials, see the following topics:
Manage Your Account Settings(Link opens in a new window) in the Tableau Desktop and Web Authoring help.
Publish a flow from Tableau Prep Builder(Link opens in a new window) for information about setting authentication options when publishing a flow.
View and resolve errors(Link opens in a new window) for information about resolving connection errors in Tableau Server or Tableau Cloud.
Supported in Tableau Prep Builder version 2019.2.1 and later and when authoring flows on the web starting in Tableau Server and Tableau Cloud version 2020.4.
Tableau Prep Builder, Tableau Server and Tableau Cloud support connecting to data using SAP HANA, just like Tableau Desktop but with a few differences.
Connect to the database using the same procedure you would use in Tableau Desktop. For more information see SAP HANA(Link opens in a new window). After you connect and search for your table, drag the table to the canvas to begin building your flow.
Note: This connector requires Tableau Server version 2019.2 and later to run the flow on a schedule. If you are using an earlier server version, you can refresh the flow data using the command line interface. For more information about running flows from the command line see Refresh flow output files from the command line(Link opens in a new window).
If your SAP HANA database includes variables and parameters, you’ll need to enter that data in the Variables and Parameters section on the Settings tab in the Input step to set these values. For older Tableau Prep versions (2026.1 and earlier) navigate to the Variable and Parameters tab in the Input step.
Connecting to SAP HANA data sources that use variable and parameter values is only supported for live data sources. This option is not supported for SAP HANA published data sources.
Starting in Tableau Cloud version 2026.2, you can connect to on-premises SAP HANA data sources that include variables and parameters via Tableau Bridge.
Starting in Tableau Prep Builder version 2019.2.2 and on the web starting in version 2020.4.1, you can use Initial SQL to query your connection. If you have multiple values for a variable, you can select the value you need from a drop-down list.
Enter variables and parameters
Connect to your SAP HANA data source.
In the Input pane, on the Settings tab, select the variables and operands you want to use.
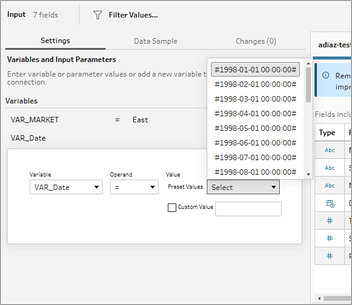
In prior versions (2026.1 and earlier), select the Variables and Parameters tab, then select the variables and operands you want to use.
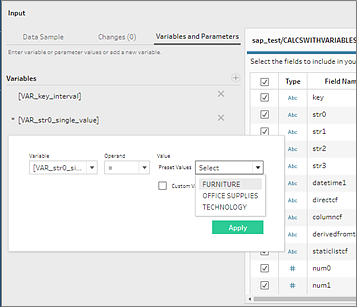
Select from a list of preset values or enter custom values to query your database and return the values you need or add additional variables. To add variables, click the plus button
 in the Variables section and select a variable and operand. Then enter a custom value.
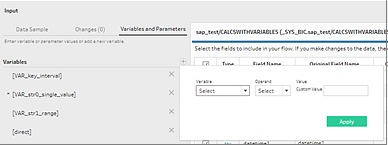
Supported in Tableau Prep Builder version 2020.4.1 and later and when authoring flows on the web starting in Tableau Server and Tableau Cloud version 2020.4.
You can connect to spatial files and spatial data sources in Tableau Prep Builder or when creating or editing flows on the web.
Note: .shp file types are not currently supported on the web. If you need to connect to this file type, connect to it in Tableau Prep Builder, then publish your flow to your server.
Tableau Prep supports the following connection types:
- Spatial File formats
- Tableau Prep Builder: Esri Shapefiles, Esri File Geodatabases, KML, TopoJSON, GeoJSON, extracts, MapInfo MID/MIF, TAB files and zipped shapefiles.
- Tableau Server and Tableau Cloud: Zipped shapefiles, KML, TopoJSON, GeoJSON, Esri File Geodatabases and extracts.
- Spatial databases (Amazon Redshift, Microsoft SQL Server, Oracle and PostgreSQL).
Starting in version 2026.1, you can create calculated fields using spatial functions, and join spatial data in the Join step through the intersects operator. For more information, see Create Spatial Calculations and Joins(Link opens in a new window).
You can also combine spatial tables with non-spatial tables using a standard join and output spatial data to an extract (.hyper) file. Visualising spatial data on a map view in Tableau Prep is not currently supported.
Supported cleaning operations
When working with spatial file data, some cleaning operations are not supported. Only the following cleaning operations are available in Tableau Prep when working with shape file data.
- Filters: Only to remove Null or unknown values
- Rename Field
- Duplicate Field
- Keep Only Field
- Remove Field
- Create Calculated Field
Before you connect
Before connecting to spatial files, makes sure the following files are in the same directory:
- Esri shapefiles: The folder must contain .shp, .shx, .dbf and .prj files as well as .zip files of the Esri shapefile.
- Esri File Geodatabases: The folder must contain the File Geodatabase's .gdb or the .zip of the File Geodatabases’s .gdb.
- KML files: The folder must contain the .kml file. (No other files are required.)
- GeoJSON files: The folder must contain the .geojson file.(No other files are required.)
- TopoJSON files: The folder must contain the .json or .topojson file. (No other files are required.)
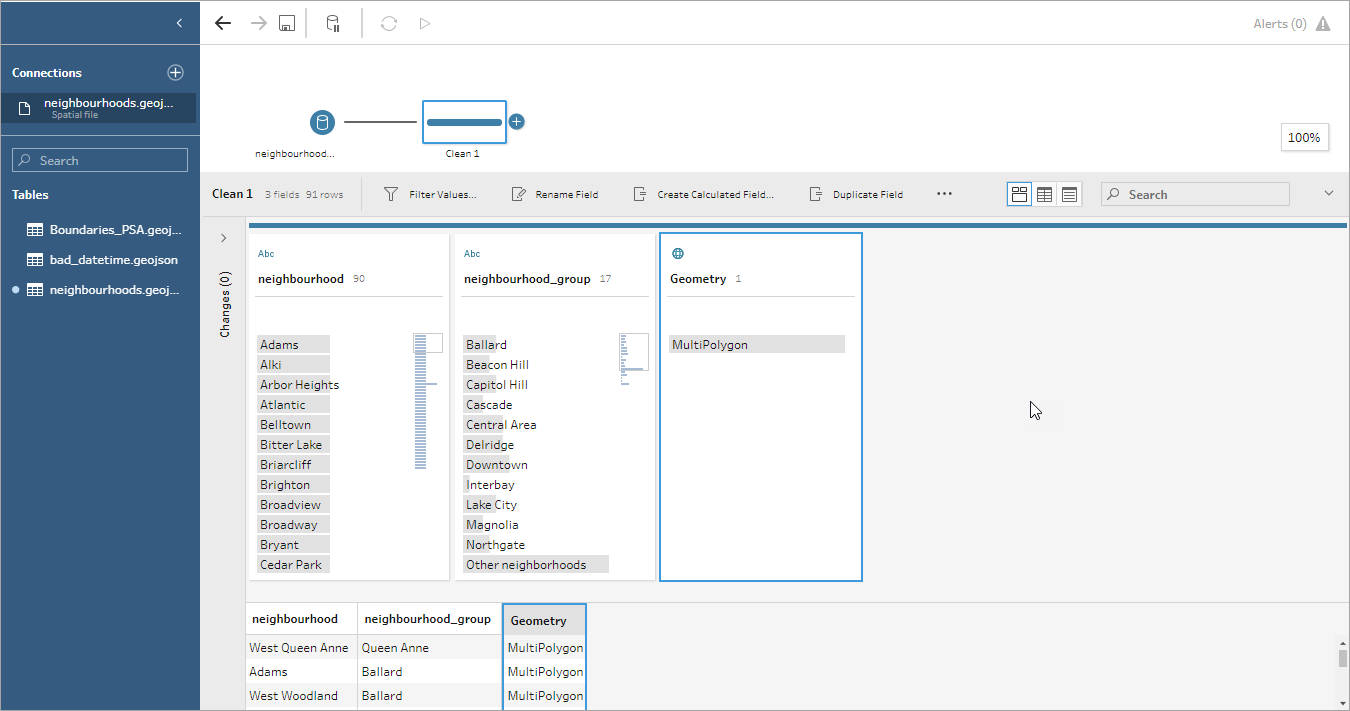
Connect to spatial files
Do one of the following:
- Open Tableau Prep Builder and click the Add connection button.
- Open Tableau Server or Tableau Cloud. From the Explore menu, click New > Flow.
- Open Tableau Prep Builder and click the Add connection
From the list of connectors, select Spatial file.
Spatial fields are assigned spatial data type and cannot be changed. If the fields come from a spatial file, the field is assigned a default field name of "Geometry". If the fields come from a spatial database, the database field names are shown. If Tableau can't determine the type of data, the field shows as "Null".
Supported in Tableau Prep Builder version 2019.2.2 and later. This connector type is not yet supported when authoring flows on the web.
If you need to connect to data sources that aren't listed in the Connections pane, you can connect to any data source using the Other Databases (ODBC) connector that supports the SQL standard and implements the ODBC API. Connecting to data using the Other Databases (ODBC) connector works similarly to how you might use it in Tableau Desktop, however there are a few differences:
You can only connect using the DSN (data source name) option.
To publish and run your flow in Tableau Server, the server must be configured using a matching DSN.
Note: Running flows from the command line that include the Other Databases (ODBC) connector isn't currently supported.
There is a single connection experience for both Windows and MacOS. Prompting for connection attributes for ODBC drivers (Windows) isn't supported.
Only 64-bit drivers are supported by Tableau Prep Builder.
Before you connect
To connect to your data using the Other Databases (ODBC) connector, you must install the database driver and set up and configure your DSN (data source name). To publish and run flows to Tableau Server, the server must also be configured with a matching DSN.
Important: Tableau Prep Builder only supports 64-bit drivers. If you have a 32-bit driver already set up and configured, you may need to uninstall it and then install the 64-bit version if the driver doesn't allow both versions to be installed at the same time.
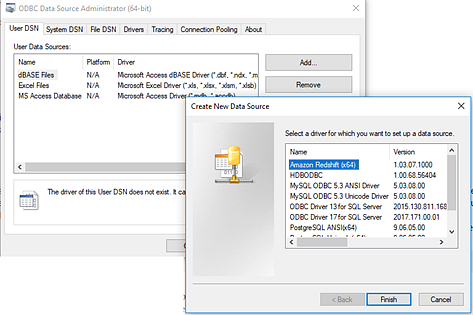
Create a DSN using either the ODBC Data Source Administrator (64-bit) (Windows) or the using an ODBC Manager utility (MacOS).
If you don't have the utility installed on your Mac, you can download one from (www.odbcmanager.net(Link opens in a new window) for example) or you can manually edit the odbc.ini file.
In the ODBC Data Source Administrator (64-bit) (Windows) or the ODBC Manager utility (MacOS), add a new data source then select the driver for the data source then click Finish.
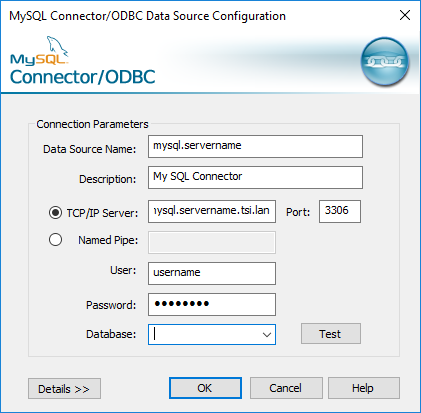
In the ODBC Driver Setup dialog, enter the configuration information such as server name, port, user name and password. Click Test (if your dialog has that option) to verify that your connection is set up correctly, then save your configuration.
Note: Tableau Prep Builder doesn't support prompting for connection attributes so you must set this information when configuring the DNS.
This example shows the configuration dialog for a MySQL Connector.
Connect using Other Databases (ODBC)
Open Tableau Prep Builder and click the Add connection
button.From the list of connectors, select Other Databases (ODBC).
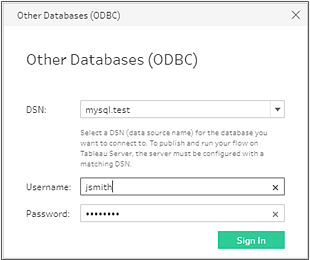
In the Other Databases (ODBC) dialog, select a DSN from the drop-down list and enter the user name and password. Then click Sign In.
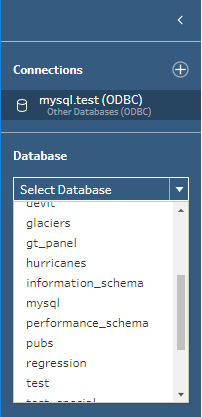
From the Connections pane, select your database from the drop-down list.
Supported for direct Microsoft Excel connections only. Data Interpreter isn't currently available for Excel files stored in cloud drives.
Note: Running Tableau Prep Conductor to refresh Tableau Prep flows that connect to flat files via Bridge isn’t supported. To enable successful Prep Conductor flow refreshes, move the flat file to a location that is accessible by Tableau Cloud directly (Google Drive, Box, Dropbox, etc.)
When working with Microsoft Excel files, you can use Data Interpreter to detect sub-tables in your data as well as remove extraneous information to help prepare your data for analysis. When you turn on Data Interpreter, it detects these sub-tables and lists them as new tables in the Tables section of the Connections pane. You can then drag them into the Flow pane.
If you turn Data Interpreter off, these tables are removed from the Connectionspane. If these tables are already used in the flow, this will result in flow errors from the missing data.
Note: Currently, Data Interpreter only detects sub-tables in your Excel spreadsheets and doesn't support specifying the starting row for text files and spreadsheets. Also, tables that Data Interpreter detected are not included in the Wildcard Union search results.
The example below shows the results of using Data Interpreter on an Excel spreadsheet in the Connections pane. Data Interpreter detected two additional sub-tables.
| Before Data Interpreter | After Data Interpreter |
|---|---|
 | 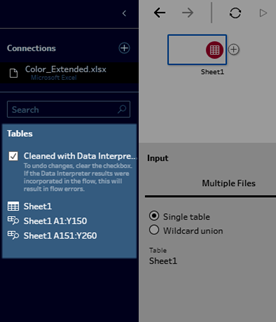 |
To use Data Interpreter, complete the following steps:
Select Connect to Data then select Microsoft Excel.
Select your file and click Open.
Tick the Use Data Interpreter box.
Drag the new table to the Flow pane to include it in your flow. To remove the old table, right-click on the Input step for the old table and select Remove.
Connect using custom connectors
When Tableau Prep doesn't provide a built-in connector for your ODBC- and JDBC-based data, you can use a custom connector. You can:
- Use a partner-built connector. For more information about connectors in the exchange, see Use partner-built connectors.
- Use a custom connector built with the Tableau Connector SDK. The Connector SDK provides tools to build a customised connector for ODBC- or JDBC-based data. For more information, see Connectors Built with the Tableau Connector SDK(Link opens in a new window) in Tableau Desktop help.
Custom connectors for ODBC- and JDBC-based data are supported in Tableau Prep Builder version 2020.4.1 and later.
For connector developers, see Run Your Connector for more information.
Some custom connectors require the installation of an additional driver. If prompted during the connection process, follow the prompts to download and install the required driver. Custom connector currently cannot be used with Tableau Cloud.
Use partner-built connectors
Partner-built or other custom connectors are available from the Connect pane. These connectors are listed under Additional Connections and are also available from the Tableau Exchange connectors page.
- Click Connections in the left pane.
- From the Additional Connectors section in the Connect pane, click on the connector you want to use.
- Click Install and Restart Tableau.
After the connector is installed, it appears in the To a Server section of the Connect pane.
Note: If you receive a warning that the connectors can’t load, install the .taco file you need from the Tableau Exchange connectors page. If you are prompted to install the drivers, go to Tableau Exchange for driver download instructions and locations.
Connect to published data sources
Published data sources are those you can share with others. When you want to make a data source available to other users, you can publish it from Tableau Prep Builder (version 2019.3.1 and later) to Tableau Server or Tableau Cloud, or as output from your flow.
You can use a published data source as an input data source for your flow, whether you are working in Tableau Prep Builder or on the web.
Note: When you publish a flow that includes a published data source as an input, the publisher is assigned as the default flow owner. When the flow runs, it uses the flow owner for the Run As account. For more information about the Run As account, see Run As Service Account(Link opens in a new window). Only the Site or Server Administrator can change the flow owner in Tableau Server or Tableau Cloud and only to themselves.
Tableau Prep Builder supports:
- Published data sources with user filters or functions starting in Tableau Prep Builder version 2021.1.3.
- Connections to a single server and site. Logging in to a different server or the same server and different site isn't supported. You must use the same server or site connection to do the following:
- Connect to the published data source.
- Publish flow output to Tableau Server or Tableau Cloud.
- Schedule the flow to run on Tableau Server or Tableau Cloud.
If your flow uses published data sources and you sign out of the server, this breaks the flow connection. The flow will be in an error state and you won't be able to see the data from the published data source in the profile pane or data grid.
Note: Tableau Prep Builder does not support published data sources that include multi-dimensional (cube) data, multi-server connections or published data sources with related tables.
Tableau Server and Tableau Cloud supports:
- Published data sources with user filters or functions starting in Tableau Server and Tableau Cloud version 2021.2.
- Creating or editing a flow on the web using a published data source (Tableau Server or Tableau Cloud version 2020.4 and later)
- Connecting to published data sources (Tableau Server and Tableau Cloud version 2019.3 and later)
Note: Earlier versions of Tableau Server may not support all features of the published data source.
About credentials and permissions:
- You must be assigned a role of Explorer or higher in the server site where you are signed in to connect to published data sources. Only Creators can create or edit flows on the web. For more information about site roles, see Set User's Site Roles(Link opens in a new window) in the Tableau Server help.
- In Tableau Prep Builder, data source access is authorised based on the identity of the user signed into the server. You will see only the data to which you have access.
In Prep web authoring (Tableau Server and Tableau Cloud), data source access is also authorised based on the identity of the user signed in to the server. You will see only the data to which you have access.
However, when you run the flow manually or using a schedule, data source access is authorised based on the identity of the flow owner. The last user to publish a flow becomes the new flow owner.
- Site and Server Administrators can change the flow owner, but only to themselves.
- Credentials must be embedded to connect to the published data source.
Tip: If credentials aren't embedded for the data source, update the data source to include the embedded credentials.
Using published data sources in your flow
To connect to a published data source and use it in your flow, follow the instructions for your Tableau Prep version:
You can connect to published data sources and more that are stored on Tableau Server or Tableau Cloud directly from the Connect pane. If you have the Data Management(Link opens in a new window) with Tableau Catalog enabled, you can also search for and connect to databases and tables and view or filter by meta data about the data sources, such as descriptions, data quality warnings and certifications.
For more information about Tableau Catalog, see "About Tableau Catalog" in the Tableau Server(Link opens in a new window) or Tableau Cloud(Link opens in a new window) Help.
Open Tableau Prep Builder and click the Add connection
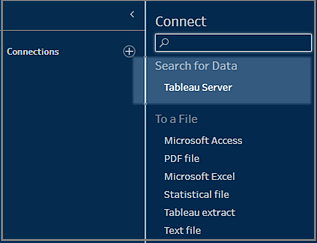
button.In web authoring, from the Home page, click Create > Flow or from the Explore page, click New > Flow. Then click Connect to Data.
On the Connect pane, under Search for Data, select Tableau Server.
Sign in to connect to your server or site.
In web authoring, the Search for data dialog opens for the server you are signed into. Starting in version 2025.3 you can also select your server authentication method (embedded browser or default browser). For more information, see Publish a flow to Tableau Server or Tableau Cloud(Link opens in a new window).
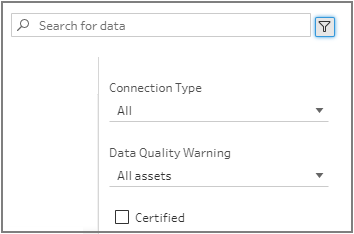
In the Search for Data dialog, search from a list of available published data sources. Use the filter option to filter by connection type and certified data sources.
Select the data source you want to use, then click Connect.
If you don't have permission to connect to a data source, the row and the Connect button is greyed out.
Note: The Content Type drop-down isn't shown if you don't have Data Management with Tableau Catalog enabled. Only published data sources are shown in the list.

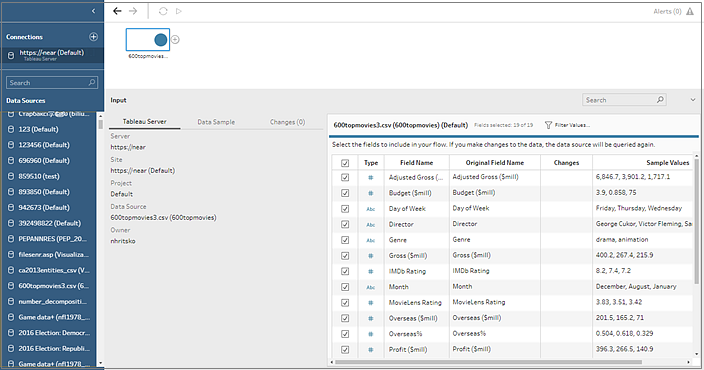
The data source is added to the Flow pane. In the Connections pane, you can select additional data sources or use the search option to find your data source and drag it to the flow pane to build your flow. The Tableau Server tab in the Input pane shows details about the published data source.
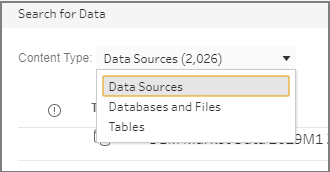
(Optional) If you have Data Management with Tableau Catalog enabled, use the Content Type drop-down to search for databases and tables.
You can use the filter option in the top right corner to filter your results by connection type, data quality warnings and certifications.
Open Tableau Prep Builder and click the Add connection
button.From the list of connectors, select Tableau Server.
Sign in to connect to your server or site.
Select your data source or use the search option to find your data source and drag it to the flow pane to start your flow. The Tableau Server tab in the Input pane shows details about the published data source.
Connect to Virtual Connections
Supported in Tableau Prep Builder version 2021.4.1 and later and in Tableau Server and Tableau Cloud version 2021.4 and later. Data Management is required to use this feature.
You can connect to data using virtual connections for your flows. Virtual connections are a sharable resource that provides a central access point to data.
Considerations when connecting to virtual connections:
- Database credentials are embedded in the virtual connection. You only need to sign into your server to access the tables in the virtual connection.
- Data policies that apply row-level security can be included in the virtual connection. Only tables, fields and values you have access to are shown when working with and running your flows.
- Row-level security in virtual connections does not apply to flow output. All users with access to the flow output see the same data.
- Custom SQL and Initial SQL are not supported.
- Parameters are not supported. For more information about using parameters in your flow, see Create and Use Parameters in Flows.
For more information about virtual connections and data policies, see the Tableau Server(Link opens in a new window) or Tableau Cloud(Link opens in a new window) help.
Open Tableau Prep Builder and click the Add connection
button.In web authoring, from the Home page, click Create > Flow or from the Explore page, click New > Flow. Then click Connect to Data.
On the Connect pane, under Search for Data, select Tableau Server.
Sign in to connect to your server or site.
In web authoring, the Search for data dialog opens for the sever you are signed into.
Click Type All.

Select Virtual Connections.

Select the data source you want to use, then click Connect.
The data source is added to the Flow pane. In the Connections pane, you can select from the list of tables included in the virtual connection and drag them to the flow pane to begin your flow.
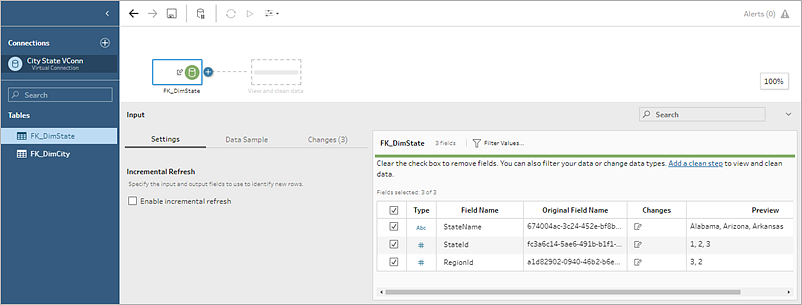
Note: If you see Rename operations in the Changes pane when connecting to a virtual connection, do not remove them. Tableau Prep auto-generates these operations to map to and display the field's user-friendly name.
Connect to Tableau data extracts
You can connect to a data extract as input to your data flow. Extracts are saved subsets of data that you can create by using filters and configuring other limits. Extracts are saved as .hyper files.
For more information on using extracts with Tableau Prep Builder, see Save and Share Your Work.
Connect to data via Tableau Catalog
If you have the Data Management(Link opens in a new window) with Tableau Catalog enabled, you can also search for and connect to databases, files and tables stored on Tableau Server or Tableau Cloud.
For more information about Tableau Catalog, see "About Tableau Catalog" in the Tableau Server(Link opens in a new window) or Tableau Cloud(Link opens in a new window) Help.
Other connection options
When you connect, you may also see the following options, depending on which connection you choose.
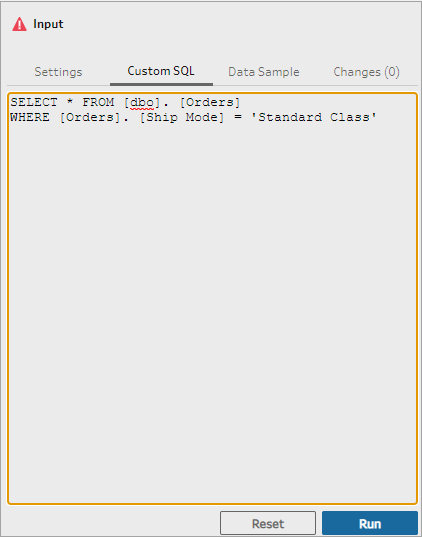
Use Custom SQL to connect to data
If you know exactly the information you need from a database and understand how to write SQL queries, you can use custom SQL queries to connect to data just like you can in Tableau Desktop. You can use custom SQL to union your data across tables, recast fields to perform cross-database joins, restructure or reduce the size of your data for analysis, and so on.
Connect to your data source, and in the Connections pane, in the Database field, select a database.
Click the Custom SQL link to open the Custom SQL tab.

Type or paste the query into the text box and then click Run to run your query.
- Add a clean step in the flow pane to see that only relevant fields from the custom SQL query are added to your flow.
Use Initial SQL to query your connections
Supported in Tableau Prep Builder version 2019.2.2 and later and when authoring flows on the web starting in version 2020.4.1
You can specify an Initial SQL command that will run when a connection is made to a database that supports it. For example, when connecting to Amazon Redshift, you can enter a SQL statement to apply a filter when connecting to the database just like adding filters in the Input step. The SQL command will apply before data is sampled and loaded into Tableau Prep.
Starting in Tableau Prep Builder (version 2020.1.3) and on the web, you can also include parameters to pass application name, version and flow name data to include tracking data when you query your data source.
Run Initial SQL
To refresh your data and run the Initial SQL command do one of the following:
- Change the Initial SQL command and refresh the Input step by re-establishing the connection.
- Run the flow. The Initial SQL command is run before processing all of the data.
- Run the flow on Tableau Server or Tableau Cloud. The Initial SQL is run every time that the flow is run as part of the data loading experience
Note: Data Management(Link opens in a new window) is required to run your flow on a schedule on Tableau Server or Tableau Cloud. For more information about the Data Management, see About Data Management(Link opens in a new window).
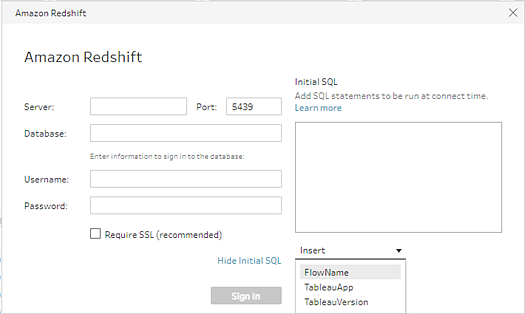
- In the Connections pane, select a connector in the list that supports Initial SQL.
- Click the Show Initial SQL link to expand the dialog and enter your SQL statements.
Include parameters in your Initial SQL statement
Supported in Tableau Prep Builder version 2020.1.3 and later and when authoring flows on the web starting in version 2020.4.1.
You can pass the following parameters to your data source to add additional detail about your Tableau Prep application, version and flow name. The TableauServerUser and TableauServerUserFull parameters are not currently supported.
| Parameter | Description | Returned value |
|---|---|---|
| TableauApp | The application being used to access your data source. | Prep Builder Prep Conductor |
| TableauVersion | The application version number. | Tableau Prep Builder: Returns the exact version. For example 2020.4.1 Tableau Prep Conductor: Returns the major server version where Tableau Prep Conductor is enabled. For example 2020.4 |
| FlowName | The name of the .tfl file in Tableau Prep Builder | Example: Entertainment Data_Cleaned |