Add More Data in the Input Step
Note: Starting in version 2020.4.1, you can now create and edit flows in Tableau Server and Tableau Cloud. The content in this topic applies to all platforms, unless specifically noted. For more information about authoring flows on the web, see Tableau Prep on the Web in the Tableau Server(Link opens in a new window) and Tableau Cloud(Link opens in a new window) help.
After you connect to your data sources and begin to build your flow you may want to refresh your data connections as new data comes in. You can also join or union data sets in the input step to make working with larger data sources more efficient.
Refresh input step data or change your connection
If data changes in your input files or tables after you begin working with your flow, you can refresh the Input step to bring in the new data. You can also easily change and update individual input step connections without breaking your flow.
Refresh your data source
In a Tableau Prep session, you have several options to refresh the data in your flow. While most data types can be refreshed by using the options described in this section, there are some limitations.
File input: You can refresh these data types in Tableau Prep Builder and Tableau Server. You can’t refresh this data type in Tableau Cloud. Instead, you can refresh the file data in Tableau Prep Builder, then republish the flow to Tableau Cloud.
Google Drive, One Drive, Dropbox, Box inputs: To refresh these data source types, edit and replace the connection.
Refresh the data source in the flow pane
In the flow pane, right-click on the Input step you want to refresh and select Refresh from the menu.

Refresh the data source from the top menu
Starting in version 2026.1, you can now see the last time a data source was refreshed in a flow session. If the data source hasn’t been refreshed in the flow session, the status of the refresh shows as Never. When you first open the flow, all data sources in the list will show the status of Never. This status is also not updated by running flows on a schedule.
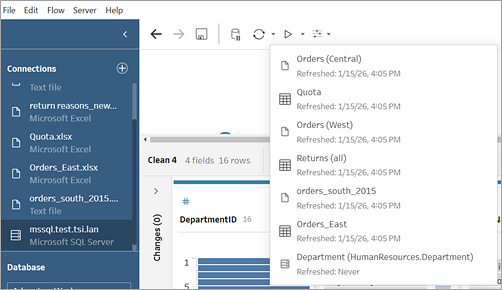
Select an individual data source in the list to refresh it, or refresh all data sources in the flow by clicking the refresh button. Data sources that can’t be refreshed using this method will be listed but appear greyed out.
To refresh a data source from the Refresh menu, do one of the following:
In the flow pane on the top menu, click the Refresh button to refresh the data for all Input steps. Only data sources that can be refreshed using this method will be refreshed.

To refresh the data source for a single Input step, click the drop-down arrow next to the refresh button and select the data source from the list.
Replace your data source
Applies to file types, data sources and extracts in Tableau Prep Builder and on the web.
Refresh your data source by editing individual input connections or replacing individual flow data sources with a different data source.
Edit the connection
Use this option to refresh your credentials or replace the data source with the same data source type.
Note: To maintain performance, Tableau Prep samples large data sets. If your data is sampled, you may or may not see your new data in the profile pane. You can change the settings for how your data is sampled in the Data Sample tab in the Input step, but it may impact performance. For more information about setting your data sample size, see Set your data sample size(Link opens in a new window).
In the Connections pane, right-click or Ctrl-click (MacOS) on the data source and select Edit.

Re-establish your connection by signing in to the database or re-selecting the file or Tableau extract.
Replace the input connection
Easily replace an existing data source in your flow with any new data source without breaking the flow connection. Depending on your Tableau Prep version, you can drag and drop a new data source over your old data source or manually disconnect and reconnect your data source.
Drag and drop to replace the input connection (version 2022.4 and later)
From the Connections pane, drag the new table to the flow pane on top of the input step you want to replace and drop it on the Replace option.

Reconfigure any settings and fix any error as needed.

In the flow pane, right-click on the Input step you want to refresh and select Remove from the menu.

This will temporarily put your flow in an error state.

- Connect to the new or updated data source.
Drag the table to the flow pane on top of the second step in the flow where you want to add the Input step. Drop it on the Add option to reconnect it to the flow.

Union files and database tables in the Input step
Input unions can only be edited and created in Tableau Prep Builder but can be scheduled to run on the web.
When working with multiple files or database tables from a single data source, you can apply filters to search for files or use a wildcard search to find tables and then union the data to include all the file or table data in the Input step. To union files, the files must be in the same directory or sub-directory.
Note: This option isn’t available for Tableau extracts.
New files that are added to the same folder that match the filter criteria are automatically included in the union the next time you open the flow or run it from the command line.
Packaged flow files (.tflx) won't automatically pick up new files because the files are already packaged with the flow. To include new files for packaged flows, open the flow file (.tfl) in Tableau Prep Builder to pick up the new files, then repackage the flow to include the new file data.
To union database tables, the tables must be in the same database and the database connection must support using a wildcard search. The following databases support this type of union:
Amazon Redshift
Microsoft SQL Server
MySQL
Oracle
PostgreSQL
If you add or remove files or tables after you create the union you can refresh the Input step to update your flow with the new or changed data.
If you need to union data from different data sources, you can do that using a Union step. For more information about creating Union steps, see Union your data(Link opens in a new window).
Union files
By default, Tableau Prep Builder unions all .csv files in the same directory as the .csv file you connected to or all the sheets in the Excel file you connected to.
If you want to change the default union, you can specify additional filter criteria to find the files or sheets that you want to include in the union.
Core filter criteria
In Tableau Prep Builder version 2022.1.1 and earlier, you can select from the following criteria:
Search in: Select the directory to use to search for files. Tick the Include subfolders box to include files in the sub-directory of the parent folder.
Files: Select whether to include or exclude the files that match the wildcard search criteria.
Matching Pattern (xxx*): Enter a wildcard search pattern to find files that have those characters in the file name. For example, if you enter order*, all files that include "order" in the file name are returned. Leave this field blank to include all of the files in the specified directory.
Additional filters
Supported in Tableau Prep Builder version 2022.2.1 and later and for flows published to Tableau Cloud.
Note: If you use additional filters in your flow, flow scheduling is currently only available using Tableau Cloud. You can run the flow manually in Tableau Prep Builder or through the command line interface. This feature isn't compatible with Tableau Server version 2022.1 and earlier.
Starting in Tableau Prep Builder version 2022.2.1 and later, the filtering options when searching for files to union have changed. While you still specify a directory and sub-directory to search in, you can now set multiple filters to perform a more granular search.
These filtering options apply to Text, Microsoft Excel and Statistical file types. You can select multiple filters. Each filter is applied separately, in the order that you select them, top to bottom. Filters can't currently be moved around once added, but you can delete and add filters as needed.

Select from the following filters:
| Filter | Description |
|---|---|
| Filename | Select Match or Don't match for a file name pattern. For example "orders*". |
| File size | Filter files by selecting a Range of sizes or Ranked by size. Range of sizes: Select from the following options:
Ranked by size: Include or exclude the N largest or smallest files. |
| Date created | Filter files by selecting a Range of dates, Relative date or Ranked by date. Range of dates: Select from the following options:
Relative date: Include or exclude an exact range of years, quarters, months, weeks or days. You can also configure an anchor relative to a specific date. Note: “Last” date periods include the complete current unit of time, even if some dates haven't occurred yet. For example, if you select the last month and the current date is 7th January, Tableau will display dates for 1st January to 31st January. Ranked by date: Include or exclude the N newest or oldest files. |
| Date modified | Filter files by selecting a Range of dates, Relative date or Ranked by date. Range of dates: Select from the following options:
Relative date: Include or exclude an exact range of years, quarters, months, weeks or days. You can also configure an anchor relative to a specific date. Note: “Last” date periods include the complete current unit of time, even if some dates haven't occurred yet. For example, if you select the last month and the current date is 7th January, Tableau will display dates for 1st January to 31st January. Ranked by date: Include or exclude the N newest or oldest files. |
Note: The instructions below vary based on your Tableau Prep Builder version.
Create an input union
Applies to Tableau Prep Builder version 2022.2.1 and later
Click the Add connection
 button and under Connect, click Text File for .csv files, Microsoft Excel for Excel files or Statistical file for Statistical files, then select a file to open.
In the Input pane, select the Tables tab, and then select Union multiple tables.

- Select a folder to search in. You can also include all sub-folders listed under a given directory to expand your search.
Click Add File Filter and select from the following options:
- File name: Enter a name pattern to search on.
- File size: Search by range of size or ranked by size.
- Date created: Search by range of dates, relative date or ranked by date.
- Date modified: Search by range of dates, relative date or ranked by date.
Click Add File Filter again to add more filters.
Filter results are shown in the Included Tables section.

Click Apply to union the files.
When you add a new step to the flow, you can see all the files added to the data set in the File Paths field in the Profile pane. This field is added automatically.

Click the Add connection
button and under Connect, click Text File for .csv files or Microsoft Excel for Excel files, and then select a file to open.In the Input pane, select the Multiple Files tab and then select Wildcard union.

The example below shows an input union using a matching pattern. The plus sign on the file icon on the Orders_Central Input step in the Flow pane indicates that this step includes an input union. The files in the union are listed under Included files.

Use the search, file and matching pattern options to find the files that you want to union.
Click Apply to union the files.
When you add a new step to the flow, you can see all the files added to the data set in the File Paths field in the Profile pane. This field is added automatically.

Union database tables
Supported in Tableau Prep Builder version 2018.3.1 and later
Note: The input union interface for database tables has been updated in Tableau Prep Builder version 2022.2.1. Your options might look different depending on your version.
Click the Add connection
button and under Connect, connect to a database that supports input unions.Drag a table to the flow pane.
In the Input pane, select the Tables tab, and then select Union multiple tables.
In prior versions, select the Multiple Tables tab, and then select Wildcard union.

In the Tables field, select Include or Exclude from the drop-down option, then enter a matching pattern to find the tables that you want to union.
In prior versions use search, Tables and Matching Pattern options.
Only tables that display in the Connections pane in the Tables section can be included in the union. The input union search doesn't search across schemas or across the database connection to find tables.
Click Apply to union the table data.
When you add a new step to the flow, you can see all the tables added to the data set in the Table Names field in the Profile pane. This field is added automatically.

Merge fields after a union
After you create a union in the input step, you might want to merge fields. You can do this in any subsequent step, except for the Input or Output steps. For more information, see Additional merge field options(Link opens in a new window).
Join data in the Input step
In Tableau Prep Builder (version 2019.3.1 and later), and on the web, when you connect to databases that include tables with relationship data, Tableau Prep can detect and show which fields in a table are identified as the unique identifier and which fields are identified as a related field as well as show the related table names for these fields.
A new column called Linked Keys shows in the Input pane and shows the following relationships if they exist:
 Unique identifier. This field uniquely identifies each row in the table. There can be multiple unique identifiers in a table. The values in the fields must be unique and cannot be blank or null.
 Related field. This field relates the table to another table in the database. There can be multiple related fields in a table.
 Both Unique Identifier and related field. The field is a unique identifier in this table and also relates the table to another table in the database.

You can leverage these relationships to quickly find and add the related tables to your flow or create joins from the Input step. This feature is available for any supported database connector where table relationships are defined.
- Connect to a database (such as Microsoft SQL Server) that contains relationship data for fields, such as unique identifiers or related fields (foreign key).
In the Input pane, click on a field that is marked as a
related field or as both a unique identifier and related field.A dialog opens that shows a list of related tables.
Hover on the table that you want to add or join and click the plus button to add the table to your flow, or click the join button to create a join with the selected table.

If you create a join, Tableau Prep uses the defined field relationship to join the tables and shows you a preview of the join clauses that it will use to create the join.

Alternatively, you can join related tables from the menu in the Flow pane. Click the plus
 icon, then select Add Join to see a list of related tables. Tableau Prep creates the join based on the fields that make up the relationship between the two tables.
Note: If your table doesn't have table relationships defined, this option is not available.

For more information about working with joins, see Join your data(Link opens in a new window).