Schedule Flow Tasks
Note:Flows can be scheduled to run on Tableau Cloud or Tableau Server using Tableau Prep Conductor. Prep Conductor is licensed through Data Management on a per deployment basis. After you purchase and license Data Management, you must enable Prep Conductor.
Starting in version 2020.4.1, you no longer need the Data Management licence to publish flows to the web. As a Creator, you can also create and edit flows directly on your server. For more information authoring flows on the web, see Tableau Prep on the Web.
Note: With the 2024.1 release, changes were introduced for flow schedules on Tableau Cloud. The Schedules tab on the left navigation pane has been removed, and users with permissions to schedule flow tasks can now create custom schedules directly from the flows Scheduled Tasks tab.
To schedule flows to run at a specific time or on a recurring basis you can create scheduled tasks. Scheduled tasks rely on pre-configured schedules.
Starting in version 2021.3, you can link flow runs together when scheduling tasks to run flows one after the other. For more information, see Schedule linked tasks in this topic.
Starting in version 2022.1, you can also run linked tasks via the REST API using the new flow methods Query Linked Tasks, Query Single Linked Tasks and Run Linked Task Now. For more information, see Flow Methods(Link opens in a new window) in the Tableau REST API help.
Running flows that include parameters
Starting in version 2021.4, you can include user parameters in your flows to make flows more dynamic. When the flow runs, you are prompted to enter your parameter values. When setting up flows on a schedule, you specify parameter values at that time.
You must specify the parameter values for any required parameters. For optional parameters, you can enter those values as well, or accept the current (default) value for the parameter. For more information about running flows with parameters, see Run flows on a schedule(Link opens in a new window) in the Tableau Prep help.
Starting in Tableau Prep Builder and Tableau Cloud version 2023.2, you can apply date or time system parameters to flow output names for file and published data source output types. The start time is automatically added to the flow output name.
Note: Your administrator must enable the Flow Parameter server and site settings on your server before you can run flows that include parameters in Tableau Server or Tableau Cloud. For more information, see Create and Interact with Flows on the Web in the Tableau Server(Link opens in a new window) or Tableau Cloud(Link opens in a new window) help.
Schedule a flow task
- Do one of the following:
(version 2022.1 and later) From the Explore page, in List view, in the Actions menu, select Schedule Flow > Single Task. If you select a flow in the list, you can also use the top Actions menu.

From the Overview page for the flow, Scheduled Tasks tab, click New Task or click on the drop-down and select Single Task.

If the output step isn't assigned to a task, you can also create a new task from the Overview page. On that page, in the Schedules field, click Create new task.
In the New Task dialog, on the Single Task (New Task in prior releases) tab, select a schedule from the drop-down list.

Select one of the following options:
Automatically include all output steps for this flow:(default) Select this option to include all current and future output steps for this flow in the scheduled task. As new output steps are added to the flow over time, they are automatically included in the schedule when it runs.
Select the output steps to include in this task: Select this option and manually select the output steps to include in this scheduled task.
To include all output steps in the flow task, tick the box next to Output Steps. This area can't be edited if the Automatically include all output steps for this flow radio button is selected. Select the other radio button to enable this section.

(version 2020.2.1 and later) Select a Refresh Type. For more information about these settings, see Refresh Flow Data Using Incremental Refresh(Link opens in a new window).
Note: Starting in version 2020.2.1 and later, if one input is configured to use incremental refresh and it is associated with multiple outputs, those outputs must be run together and must use the same refresh type. Otherwise, the flow will fail.
Full refresh (default): Refresh all data and create or append data to your table based on the flow output setting.
Incremental refresh: Refresh only the new rows and create or append data to your table based on the flow output setting. The incremental refresh option is only available when the flow is configured to use this refresh type.
Note: Tableau Prep Conductor runs a full refresh for all outputs regardless of the run option you select if no existing output is found. Subsequent flow runs will use the incremental refresh process and retrieve and process only your new rows unless incremental refresh configuration data is missing or the existing output is removed.

- (optional) If you are the flow owner, select Send email when done to notify users when the flow is successful. For more information about how to send email notifications on flow runs, see Notify Users of Successful Flow Runs.
(version 2021.4 and later) If your flows include parameters, enter any required or optional parameter values. You must enter required values for the flow to run.

Click Create Task to create the scheduled task.
Schedule linked tasks
Supported in Tableau Server and Tableau Cloud version 2021.3.0 and later.
Note: Starting in version 2022.1, Linked tasks functionality is enabled by default. Server and Site Administrators can turn off this functionality on the Settings page and on flow schedules in the Schedules dialog. In previous versions, Server Administrators must first enable this functionality to use and manage it.
Use the Linked Tasks option to schedule up to 20 flows to run sequentially, one after the other. Easily set up your flow list by selecting your schedule, then select downstream flows to run in the order you choose.
Flows run in the order specified in the list. Use the menu to move flows around in your list or add new upstream or downstream flows to the list at any time.
Select the outputs that you want to include in the flow run and configure the settings to tell Tableau what to do with remaining flows in the schedule when the previous flow run fails.

- Do one of the following:
(version 2022.1 and later) From the Explore page, in List view in the Actions menu, select Schedule Flow > Linked Task. If you select multiple flows in the list, you can also use the top Actions menu.
From the Overview page for the flow, Scheduled Tasks tab, click New Task and select the Linked Task tab, or click on the drop-down and select Linked Task.
If the output step isn't assigned to a task, you can also create a new task from the Overview page. On that page, in the Schedules field, click Create new task.
In the New Task dialog, on the Linked Tasks tab, select a schedule from the drop-down list. Only schedules that are enabled for linked tasks are shown.

Click the Select output steps drop-down to select the flow outputs to run. By default, all flow outputs are included. To select specific outputs, clear the Include all current and future output steps for this flow tick box.
The flow where the task is initiated is automatically set as the first flow to run, but you can use the menu to change the run order after you add other flows to your list.

Select your refresh type from the following options:
Note: If one input is configured to use incremental refresh and it is associated with multiple outputs, those outputs must be run together and must use the same refresh type. Otherwise, the flow will fail.
Full refresh (default): Refresh all data and create or append data to your table based on the flow output setting.
Incremental refresh: Refresh only the new rows and create or append data to your table based on the flow output setting. The incremental refresh option is only available when the flow is configured to use this refresh type. For more information, see Refresh Flow Data Using Incremental Refresh(Link opens in a new window).
Note: Tableau Prep Conductor runs a full refresh for all outputs regardless of the run option you select if no existing output is found. Subsequent flow runs will use the incremental refresh process and retrieve and process only your new rows unless incremental refresh configuration data is missing or the existing output is removed.
(optional) If you are the flow owner, select Send email when done to notify users when the flow is successful. For more information about how to send email notifications on flow runs, see Notify Users of Successful Flow Runs.
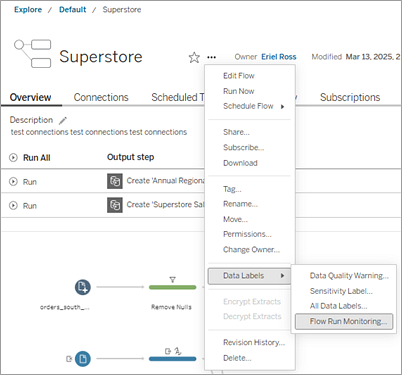
Add a data quality warning. You can turn flow run monitoring on or off at the flow level to generate a data quality warning that shows on the flow if the flow run fails. For more information about turning on data quality warnings see, How to turn on a monitoring quality warning(Link opens in a new window).
- From the More Actions
 menu, next to the Flow name, select Data Labels > Flow Run Monitoring.
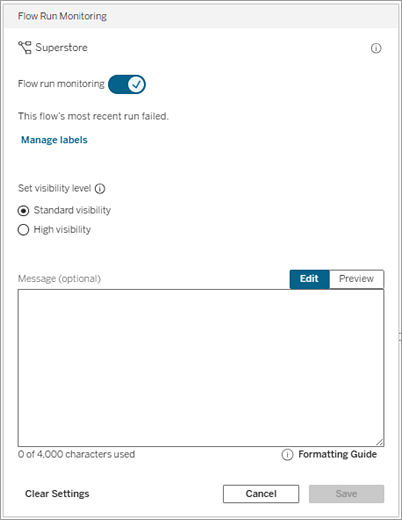
 - In the Flow Run Monitoring dialog, turn flow run monitoring on or off and optionally enter a warning message so that users of the data are aware of issues. The message remains until the flow runs successfully.
- From the More Actions
- Set remaining flow failure options:
- Stop remaining tasks: Select this option to prevent the downstream tasks in the list from being queued to run.
- Email me: Email notifications are automatically sent to the flow owner and the linked task creator when the flow fails, is suspended or is cancelled.
(version 2021.4 and later) If your flows include parameters, enter any required or optional parameter values. You must enter required values for the flow to run.

Click on the drop-down for the 2nd task to add your next flow. Flows that use the previous flow's outputs are shown automatically, or click View all flows to see all available flows.
Select one or more flows and click Add or click Add Next Task to add more flow run tasks to your list.

If you don't have permission to run the flow, you must contact the flow owner to grant permissions before adding the flow to your list.

Repeat steps 3–5 to configure your flow run options.
Note: In version 2021.4 and earlier, click on the Edit icon
 next to your new flow to expand the Options pane.
(Optional) Click on the drop-down next to any numbered task to open the menu to change the order of your flow tasks or insert new tasks between existing tasks.

Click Create Tasks to create the scheduled linked tasks.
Who can do this
- The Server administrator can do this on all sites on the server. The Site administrator can do this on sites they have access to if the site settings to allow users to publish and schedule tasks is enabled.
- For linked tasks, the Server administrator can do this on all sites where the server settings to allow users to schedule linked tasks is enabled. The Site administrator can do this on sites they have access to if the site settings to allow users to schedule linked tasks is enabled.
- Flow owners and project leaders with the Creator site role can create flow tasks for flows or projects that they own respectively.
Site administrators, flow owners and project leaders can create flow tasks for the flows and projects that they own respectively. Only the Creator site role and above can create or edit a flow task.
For more information, see Set Users' Site Roles(Link opens in a new window) and Content Ownership and Permissions(Link opens in a new window)