Use Mapbox Maps
If you have access to Mapbox maps, you can add them to your workbooks or use them to create map views in Tableau Desktop. For a list of country-specific data available, see Supported Map Data.
When you publish a view that uses Mapbox maps to Tableau Server, Tableau Cloud, or Tableau Public, your audience can view your data and your Mapbox map without having a Mapbox account.
Starting in Tableau Desktop 2019.2, Mapbox styles Streets, Outdoors, and Satellite are available by default in Tableau in the Map Layers pane. For more information on map styles and map layers, see Customize How Your Map Looks.
Add a Mapbox map to your workbook
In Tableau Desktop, you can add a Mapbox map to your workbook and use it as a background map.
After you add a Mapbox map to your workbook, the map is saved with the workbook and available to anyone with whom you share the workbook. You can also save a Mapbox map as a Tableau Map Source (.tms) file that you can share with others so they can quickly connect to it and use it in their own workbooks. For more information, see Save a Map Source (Link opens in a new window). To add a Mapbox map:
-
In Tableau Desktop, select Map > Background Maps > Add Mapbox Map.
-
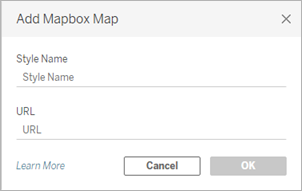
In the Add Mapbox Map dialog box, add:
-
Style name: Enter a name for the Mapbox map. This name can be anything you want, and will appear in the Background maps menu after you add the map.
-
URL: Enter a style URL for the Mapbox map you want to add.
This URL contains the style ID for your Mapbox map, your access token, and your username. It might look similar to the following:
https://api.mapbox.com/styles/v1/<username>/<styleid>?access_token=<access token>

For more information about any of the above items, see the Access Tokens(Link opens in a new window), Maps(Link opens in a new window), and Styles(Link opens in a new window) sections of the Mapbox API Help.
-
-
When finished, click OK to exit the Add Mapbox Map dialog box, and then click Close to return to the view.
Create a map view using a Mapbox map
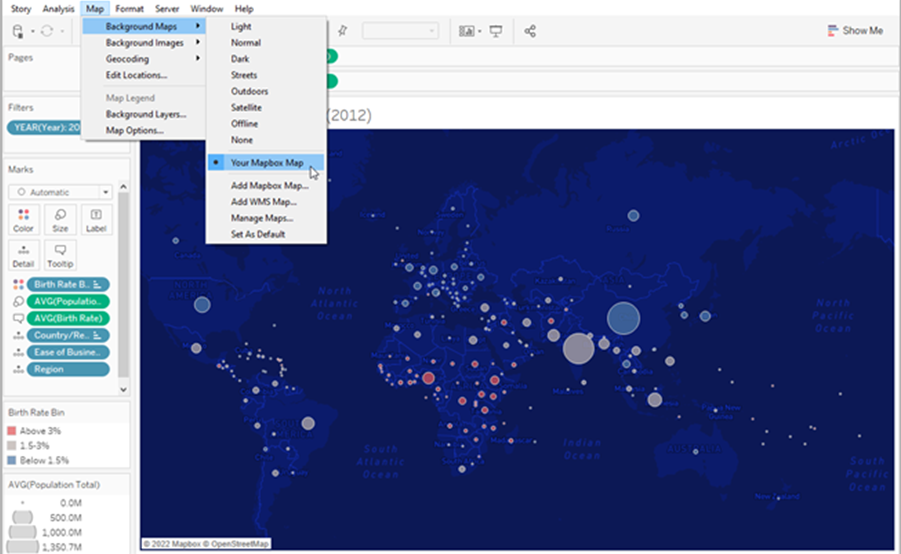
To create a map view using a Mapbox map, select Map > Background Maps, and then select the Mapbox map you want to use. Next, build the map view. For more information, see Mapping Concepts in Tableau(Link opens in a new window).

When creating custom maps in Mapbox Studio, make sure your map uses the Mercator projection. Tableau uses this projection to ensure your data points align correctly with the background map. To learn how to adjust the projection of your map, see
Adjust the projection of the map on the Mapbox documentation site.
Add or subtract map layers from the view
When you add a Mapbox Studio map to Tableau, all the map's layers are added, too. Layer groups and single layers in Mapbox Studio will display as individual layers in the Map Layers Pane in Tableau, and will retain the layer configuration set in Mapbox Studio.
If a layer group in Mapbox Studio includes sublayers that are turned off, those sublayers will also be turned off when the map is added to Tableau, and the layer group will appear as a single layer in the Map Layers pane. If the layer group is turned off in Tableau, then back on, all of that layer group's sublayers will be turned on.
Map layers are different from data layers in Tableau. In Tableau, Data Layers are pre-built tiles that include demographic information by various levels, like State and County. Data layers and Mapbox are independent of one another in Tableau. For more information about how data layers work, see Customize How Your Map Looks(Link opens in a new window).
Note: When you add a custom map from Mapbox Studio, Tableau imports the data for every layer, even if the layer is turned off. Your map's performance could be affected if it includes many layers and sublayers. To improve performance, add or remove layers and sublayers in Mapbox Studio before adding your map to Tableau.
See also:
Use Web Map Service (WMS) Servers(Link opens in a new window)
Save a Map Source (Link opens in a new window)
Import a Map Source(Link opens in a new window)
Customize How Your Map Looks(Link opens in a new window)
