Install Bridge for Linux for Containers
Bridge for Linux provides the scalability and streamlined management capabilities of containerized workloads. The following instructions describe a lightweight way to run Bridge for Linux and assumes you have basic knowledge of Docker and the key terms used in the ecosystem.
Install and run Bridge from a Docker container
To use Bridge on Linux you must create a customized Docker image, install the RPM package, and then run Bridge from inside the container image.
Installation notes:
- You can deploy multiple Bridge on Linux containers on a single computer.
- Serverless solutions with dynamic IPs are not supported.
- Bridge legacy schedules are not supported. See Migrate from Bridge (legacy) to Online schedules for more information.
Prerequisites
-
Installed Docker Engine. For the base image of the docker container, Bridge on Linux is supported on:
- Amazon Linux 2023
- Red Hat Enterprise Linux 8
- Red Hat Enterpirse Linux 9
Note: CentOS is not supported.
- The latest Tableau Bridge RPM package from the Downloads(Link opens in a new window) page on the Tableau website.
- Experience with the Linux operating system.
- Basic shell scripting.
- Docker experience.
- Tableau Site admin Personal Access Token (PAT) or Unified Access Token(Link opens in a new window) (UAT). You must use a dedicated PAT or UAT for each Bridge client. Tableau supports 104 PAT tokens per user.
- If your Bridge host will connect to a remote share, you will need to create a section for UNC mapping in your Docker file. See Connecting to flat files and file-based extracts.
- Bridge for Linux doesn't support Bridge (legacy schedules). See Migrate from Bridge (legacy) to Online schedules.
Step 1: Create a Bridge container image
The following steps are the basic instructions for building a Bridge on Linux base image. For more information, see Docker overview.
When Docker is installed, the only user with permission to run commands is root. You can run Docker commands with sudo or by a user who is a member of the docker group.
Important Base images will vary according to different drivers and platforms. The examples that follow are intended to illustrate the process of building a base image. You must adapt the build process for your particular environment.
- Download the Bridge
.rpmpackage from the Downloads(Link opens in a new window) page on the Tableau website. - (Optional) You can edit the configuration settings to change how the client will run. See Change the Bridge Client Settings for more information.
-
Create a working directory and move the
.rpmpackage into the directory.cd ~$ mkdir Docker$ cd Docker$ mv <RPM_location>.rpm . -
Create a Docker file in the working directory. For example:
$ touch Dockerfile -
Edit the Docker file and add the commands to run
yum update.Red Hat Example
For Red Hat 8:
FROM registry.access.redhat.com/ubi8/ubi:latestRUN yum -y update -
Edit the Docker file and then enter the commands to copy, install, and remove the bridge RPM package from the image:
- Option 1: Use
--mount, for example:FROM registry.access.redhat.com/ubi8/ubi:latest RUN --mount=type=bind,source=<your_bridge_rpm>.rpm,target=/tmp/bridge.rpm \ set -eux; \ yum -y update; \ ACCEPT_EULA=y yum install -y /tmp/bridge.rpm; \ yum -y clean all; \ rm -rf /var/cache/yum
- Option 2: Download the rpm directly>, for example:
FROM registry.access.redhat.com/ubi8/ubi:latest
RUN set -eux; \
 yum -y update; \
 curl -fsSL https://repo.example.com/bridge.rpm -o /tmp/bridge.rpm; \
 ACCEPT_EULA=y yum install -y /tmp/bridge.rpm; \
 rm -f /tmp/bridge.rpm; \
 yum -y clean all; \
 rm -rf /var/cache/yum
- Option 1: Use
-
Build a new container image using the
dockerbuild command.For example, the following command builds an image in the current directory, tagging it with the word
"bridge_base":docker buildx build --platform=linux/amd64 -t bridge_base . -
Check that the base image you created is displayed in the list of images:
docker images | grep bridge
Step 2: Install the drivers
The Bridge client requires drivers to facilitate connectivity between private network data and Tableau Cloud. For drivers, go to Driver Download, select the data source, and then select Linux for the Operating system.
- Installation can be done interactively after the base image is launched, or separate Dockerfiles can be written as a layer on top of the base image.
Example
With the MySQL driver RPM copied into the directory, you can create a separate working directory for layering MySQL drivers using the following Dockerfile:
# Using previously built bridge_base imageFROM bridge_baseCOPY mysql-connector-odbc-8.0.26-1.el8.x86_64.rpmRUN yum install -y mysql-connector-odbc-8.0.26-1.el8.x86_64.rpmNote: A requirement for MySQL and Amazon Aurora MySQL drivers is to configure the locale and install langpacks in the image:
Example:RUN yum install -y glibc-langpack-enENV LANG=en_US.UTF-8 LANGUAGE=en_US:en LC_ALL=en_US.UTF-8Example
Install a postgres JDBC driver. This can also be done in a separate Dockerfile.
# Using previously built bridge_base imageFROM bridge_baseCOPY postgresql-42.3.3.jar /opt/tableau/tableau_driver/jdbc/Example
Install the Amazon Redshift driver.
# Using previously built bridge_base imageFROM bridge_baseyum install -y unixODBCyum --nogpgcheck localinstall -yAmazonRedshiftODBC-64-bit-2.1.7.0.x86_64.rpmodbcinst -i -d -f /opt/amazon/redshiftodbcx64/odbcinst.ini - Create a new image:
docker image build -t bridge_final .
The bridge_final image uses the cached image from the previous step and automates the driver installation for all your Bridge instances. If you have an image repository, you can publish the image to the repository and distribute the image to all the machines you want to run Bridge on.
Step 3: Install language packs and set the locale in Docker
-
Install language packs in your Docker containers:
RUN yum install -y glibc-langpack-en -
Set the locale in Docker using
ENV LC_ALL en_US.UTF-8. You can also set the locale by adding the following to the/etc/profilefile:export LANG="en_US.utf8"export LANGUAGE="en_US.utf8"export LC_ALL="en_US.utf8"
Step 4: Run the Bridge container
Now that you have a base image built, you can deploy it using a variety of methods. The basic steps are:
- Create tokens
- Start the instance of the Bridge container.
- Assign the agent to a pool.
Create tokens
Before you start deploying the container, create a Personal Access Token (PAT) or a Unified Access Token(Link opens in a new window) (UAT). A PAT or a UAT is required to log in to the agent.
Considerations and requirements:
-
Tableau Cloud supports 104 PATs per user. We recommend that you use one PAT or UAT per client.
-
The following token names must match: The
patTokenIdorjwTokenFile(used when running therun-bridge.shcommand), the token name in the JSON file, and the token name that you specify when you generate the token. -
If using a UAT, you must include the required Oauth scopes:
"tableau:remote_agents:*","tableau: jobs:read","tableau:file_uploads:*","tableau:datasources:*"
Start instance
The interactive method in this procedure illustrates the steps necessary to start the worker. When you exit, the container stops running.
-
Run this command to move to the shell prompt for the container as
root:docker container run -it bridge_final /bin/bash
The rest of the commands are executed in the context of this interactive session of the container.
- Add the PAT or UAT token to a flat file in JSON format. For example:
/home/jSmith/Documents/MyTokenFile.txt -
Example token syntax:
{"MyToken" : "uLICC7e8SUS8ZNGe8RIFn4u==:lRihmYHI0XBKle7e8S4uSORXGqAkAl4"} - Change the file permissions to restrict access to the current user. For example:
chmod 600 MyTokenFile.txt -
Start an instance of the Bridge container by running the
run-bridge.shcommand . The process differs according to the token type you are using:PAT command example
/opt/tableau/tableau_bridge/bin/run-bridge.sh -e --patTokenId="Mytoken" --userEmail="admin@tableau.com" --client="myBridgeAgent" --site="mySite" --patTokenFile="/home/jSmith/Documents/MyTokenFile.txt" --poolId="1091bfe4-604d-402a-b41c-29ae4b85ec94"
UAT command example
/opt/tableau/tableau_bridge/bin/run-bridge.sh -e --userEmail="admin@tableau.com" --client="myBridgeAgent" --site="mySite" --jwTokenFile="jwTokenFile.txt" --poolId="1091bfe4-604d-402a-b41c-29ae4b85ec94"
run-bridge.sh parametersGlobal parameters --client(Required) The name that you want to give to the Worker. --site(Required) Site name as it appears in the URI. Don’t include the URI path. --userEmail(Required) User email associated with the token. -e(Optional) By default, the Bridge client worker runs as a background service. To run the worker in the foreground, include the -e argument. --poolId(Optional) Pool Id that is assigned to the client. See Using a pool ID. PAT: required parameters --patTokenIdThe ID of the PAT. See Personal Access Tokens for more information. --patTokenFileFile name and path to the PAT text file. UAT: required parameter --jwTokenFileFile name and path to the UAT text file.
Note: If you are installing older versions of the Bridge for Linux, you must run a different command to start the worker. For versions 2024.2 and older, start the worker with the TabBridgeClientWorker command (not the run-bridge.sh command. All of the command options are the same.
Agent started
The following message indicates the agent is started. “Service started: ...”
Stop the worker
Use Control-C to stop the worker. Rather than restart the worker, you can start a new worker for the container image.
Default pool assignment
If you didn’t assign a pool using the command option --poolId, the client is assigned to the default pool. If you want to use the client with specific domains or VConns, you can assign the client to a named pool using the UI. The menu for this on Tableau Cloud Home > Settings > Bridge. For more information, see Configure the Bridge Client Pool.
Using a pool ID
When starting the Bridge worker with the run-bridge.sh command, the poolId is optional. However, the behavior of the client depends on whether the client is registered to a site, and whether the client is assigned to a pool. Tableau Bridge can only connect or register to one Tableau Cloud site at any given time. The client is registered to a site when you log off and log back in.
If a pool ID isn’t provided
-
If the Bridge client has been registered, the client status remains the same:
- If the client is assigned to a pool, it remains assigned to the pool, regardless of whether it’s a named pool or default pool.
- If the client isn’t assigned to a pool, it will remain unassigned.
- If the Bridge client is new (you never signed in to Tableau Cloud), the client is assigned to the default pool.
If a pool ID is provided
- If the pool ID is provided and is correct, the Bridge client is assigned to the named pool.
-
If the pool ID is provided and incorrect:
- If the Bridge client isn’t t registered, then the client is assigned to the default pool.
- If the Bridge client is registered, the client status remains the same, regardless of named pool, default pool, or unassigned.
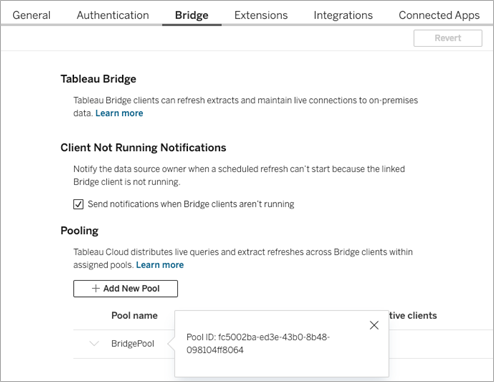
Finding the Pool ID
To find the pool ID, go to the Settings > Bridge page and click on the name of the pool. For example:
Upgrading Bridge for Linux client
Staying in sync with the latest version of Bridge ensures that you can take advantage of the latest features and fixes included with each new version of the Bridge client.
You can not run an in-place upgrade for the container. Instead, you must build a new container image with the latest Bridge binaries and then add the Bridge client to the pool side-by-side with the previous version. After you validate functionality, you then remove the previous Bridge client. Follow these steps:
-
Install and configure the new Tableau Bridge client as documented in the sections above.
-
Add the new Bridge client to the relevant pool. See Configure Pools.
-
Monitor the health of the Bridge jobs to validate stability before continuing to the next step.
-
Remove the previous Bridge client(s) from the pool. Open the pool, identify the client machine to be removed, and click Delete.
-
Wait for the extract refresh timeout process to finish on the Bridge client. The default timeout is 24 hours. For more information, see dataSourceRefreshSettings.
-
After refresh timeout period has elapsed, you may remove the previous instance of Bridge client.
Troubleshooting
Installing older versions
If you are installing older versions of the Bridge for Linux, you must run a different command to start the worker. For versions 2024.2 and older, start the worker with the TabBridgeClientWorker command (not the run-bridge.sh command).
All of the command options are the same as documented above in Step 4: Run the Bridge container .
For example:
/opt/tableau/tableau_bridge/bin/TabBridgeClientWorker -e --patTokenId="Mytoken" --userEmail="admin@tableau.com" --client="myBridgeAgent" --site="mySite" --patTokenFile="/home/jSmith/Documents/MyTokenFile.txt" --poolId="1091bfe4-604d-402a-b41c-29ae4b85ec94"
Worker start up error
In some cases, the following error will be displayed after running the run-bridge.sh command:
Missing log in parameters. Aborting the attempt to start service worker.
In most cases, re-running the command with the original options and the -e option fixes the issue. The -e option runs the Bridge worker service in the foreground.
If you are running the Bridge client in background mode and you see a start up error, verify that all the input parameters include paths to any required files. For example, in background mode, the user context is not provided to resolve a path to the token file.
Working with log files
Log files are stored in the user's My_Tableau_Bridge_Repository/Logs folder. To save logs in a tmp folder, run the following command:
docker container run --volume /tmp/bridge_logs:/root/Documents/My_Tableau_Bridge_Repository/Logs -it bridge_final /bin/bash
In this example, the location is specified by /tmp/bridge_logs. Using the docker command simplifies saving the log files and avoids having to manually copy the Bridge logs files from the container to your local file system.
MySQL driver fails
If LC_MESSAGES aren’t set with UTF-8 locales, you may experience read and display issues. You can edit the /etc/profile file, or relaunch the worker using the following command:
LC_ALL=en_US.UTF-8 /opt/tableau/tableau_bridge/bin/run-bridge.sh -e
Bridge Client stops unexpectedly due to Personal Access Token expiration
When a Personal Access Token (PAT) expires it will cause the Bridge Client to become disconnected from Tableau Cloud and may cause the container to shut down. From the Bridge Client you can validate if your PAT has expired by executing the Start command in the foreground. If the PAT is expired you will see the following error:
The client credentials are invalid. To complete the request, reset the credentials, and sign in to the Tableau Bridge client.
If you are the original PAT owner, you can also verify if the PAT is expired by visiting Manage Account Settings in Tableau Cloud. To resolve the issue, you will need to generate a new PAT and follow the steps above, Step 4: Run the Bridge container .
Embedded extract and embedded live connection timeout errors
The 24.3 release of Bridge on Linux provided significant performance improvements for embedded extracts and embedded live connections. If you experience timeout errors on prior releases, we recommend upgrading to a 24.3+ release of Bridge on Linux. If this does not resolve the issue, Publish the Data Source separately from the workbook.