Configure SCIM with Okta
You can configure user management through Okta, provision groups, and assign Tableau Cloud site roles. If you’re not yet familiar with Tableau site roles and the capabilities each allows, see Set Users’ Site Roles.
Notes:
-
These steps reflect a third-party application and are subject to change without our knowledge. If the steps described here do not match the screens you see in your IdP account, you can use the general SCIM topic along with the IdP’s documentation.
- The configuration steps in the IdP may be in a different order than what you see in Tableau.
Step 1: Perform prerequisites
The SCIM functionality requires that you configure your site to support SAML, OIDC, or Google single sign-on (SSO).
-
If using SAML authentication, complete the following sections in Configure SAML with Okta:
-
If using OIDC authentication, complete Configure Tableau Cloud or TCM for OpenID Connect.
-
After you finish the steps in these two sections, remain signed in to both the Okta administrator console and Tableau Cloud, with the following pages displayed:
-
In Tableau Cloud, the Settings > Authentication page.
-
In the Okta administrator console, Applications > Applications > Tableau Cloud > Provisioning.
-
Step 2: Enable SCIM support
Use the following steps to enable SCIM support with Okta. See also the Notes for SCIM support with Okta section below.
In Tableau Cloud
- Sign in to your Tableau Cloud site as a site administrator, and select Settings > Authentication.
-
Do the following:
-
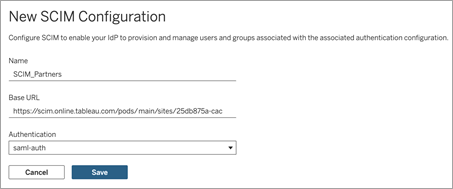
On the Authentication page, under System for Cross-domain Identity Management (SCIM), click the New Configuration button.
-
In the New SCIM Configuration dialog box, do the following:
-
Enter a name for the SCIM configuration.
-
Copy the Base URL to use in your IdP's SCIM settings.
-
From the Authentication drop-down, select the authentication configuration to associate with SCIM.
-
Click Save.
Note: This populates the SCIM token section.
-
-
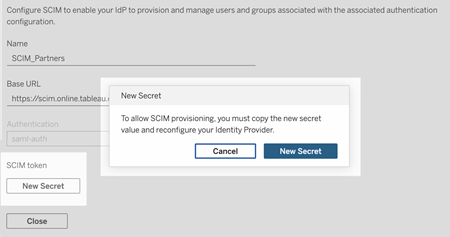
Under SCIM token, do the following:
- Click the New Secret button.
-
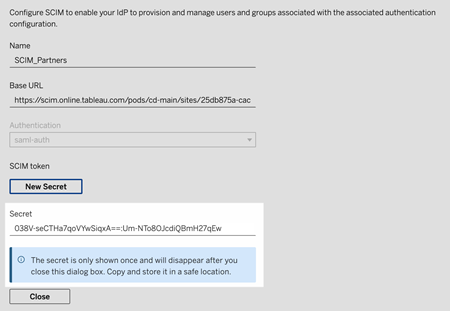
In the New Secret dialog box, click the New Secret button again. A newly generated secret will display.
-
Copy the secret and store it in a safe location.
Important:
-
If you close the SCIM configuration before you can add the secret to your IdP's SCIM settings, you can edit SCIM configuration but will be required to click New Secret again to generate a new secret.
-
The secret is tied to the Tableau site administrator user who created the SCIM configuration. If that user’s site role changes or the user is no longer a member of the site, the secret becomes invalid. In this case, another site administrator can generate a new secret for the existing SCIM configuration and add it to the IdP's SCIM settings or create a new SCIM configuration ensuring the base URL and secret is added to the IdP's SCIM settings.
-
-
Click Close.
-
In Okta
-
In the Okta administrator console, do the following:
-
From the left pane, select Application > Application, click the Tableau Cloud app, and then click the Provisioning tab.
-
Click Enable API Integration button.
-
Select the Enable API integration check box and click Save.
-
Do the following:
-
For API Token, paste the Tableau Cloud SCIM secret token you copied in the previous step.
-
For Base URL, copy and paste the Base URL shown in the Tableau Cloud SCIM settings.
-
-
-
Click the Test API Credentials button to ensure the configuration was done correctly. If the configuration was done correctly, you see a "Tableau Cloud was verified successfully!" message.
-
When finished, click Save.
Step 3: Assign groups to the Tableau Cloud app
For user provisioning to Tableau, we recommend you manage users in groups for easier management in Tableau.
In Okta, assign groups to the Tableau Cloud app so that the users can be provisioned to Tableau Cloud. More specifically, you need two distinct groups, a group assigned to the Assignment tab and a group assigned to the Push Group tab. The group in the Assignments tab is used to create users in Tableau Cloud. The group in the Push Group tab is used to create the group and manage group membership in Tableau Cloud.
Notes:
-
Okta requires that you have a group in the Assignments tab and a group for the Push Group tab to prevent a race condition. For more information, see App assignments and Group Push(Link opens in a new window) and About Group Push(Link opens in a new window)h in the Okta documentation.
-
The steps in this procedure assume you’ve already created at least two groups. For more information about creating groups in Okta, see Create a group(Link opens in a new window) in the Okta documentation.
You can use the procedure below to add a group and assign the group to the Tableau Cloud app.
-
From the left pane, select Application > Application, click the Tableau Cloud app, and then click the Assignments tab.
-
Click on the Assign drop-down and select Assign to Groups.
-
Do the following:
-
Select the relevant group.
-
Select the site role you would like the users to be provisioned with to Tableau. The options are:
-
Unlicensed
-
Viewer
-
Explorer
-
Explorer (can publish)
-
Creator
-
Site Administrator Explorer
-
Site Administrator Creator
-
-
-
When finished, click Save and Go Back button.
-
Repeat steps 1-4 in the Push Group tab and then click the Done button.
Step 4: Enable group provisioning
Okta allows you to push existing groups and their memberships to Tableau Cloud. After a group is pushed, you can manage group membership in Okta to automatically update the corresponding group in Tableau Cloud. Before you follow these steps, we recommend your review Group Push prerequisites(Link opens in a new window) and About Group Push(Link opens in a new window) in the Okta documentation.
Important: After enabling SCIM, users and their attributes should be managed through Okta. Changes made within Tableau Cloud directly may result in unexpected behavior and overwritten values.
The following procedure continues where you left off in the previous section and assume you are signed in to the Okta administrator console.
-
From the left pane, select Application > Application, click the Tableau Cloud app, and then click the Push Groups tab.
-
Click the Push Groups button and then select one of the following options from the drop-down menu:
-
Find groups by name: Select this option to search groups by name.
-
Find groups by rule: Select this option to create a search rule that pushes any groups that match the rule.
-
(Optional) If pushing multiple groups, click the Save & Add Another button, and repeat the previous step.
- When finished, click Save.
You can deactivate group push, unlink pushed groups, or push group membership immediately by clicking Active or Inactive in the Push Status column. To delete, deactivate, or activate multiple groups, click Bulk Edit. For more information, see Enable Group Push(Link opens in a new window) in the Okta documentation.
SCIM and grant license on sign in
Beginning in February 2024 (Tableau 2023.3), you can use SCIM with Grant License on Sign In (GLSI) with Okta.
Using SCIM with GLSI for Okta requires the following:
-
In Okta, adding users to the groups in Tableau Cloud app’s Assignment and Push Group tabs.
-
In Tableau Cloud, enabling the GLSI option for the groups and selecting the minimum site role for the users who are members of the groups.
Note: It’s not possible to set a group with the GLSI attribute in Okta.
-
Users to be provisioned as "Unlicensed" in Okta.
Enable GLSI
To set up and enable GLSI, see Grant License on Sign In.
Remove SCIM users with GLSI
You must first remove SCIM users from their GLSI-enabled groups in Okta before attempting to deactivate them in Okta. Deactivating users will set the users to the "Unlicensed" role in Tableau Cloud. However, users can't get the "Unlicensed" role in Tableau Cloud until they are no longer a member of any GLSI-enabled groups.
-
In Okta, remove the user from the GLSI-enabled group assigned to the Push Group tab first.
-
While still in Okta, deprovision the user by either removing them from the GLSI-enabled group assigned to the Assignments tab or deleting the user in Okta. After you do this, the user will be converted to “Unlicensed” in Tableau Cloud. Deprovisioning a user in Okta only causes the user to be converted to “Unlicensed” in Tableau Cloud and does not delete the user.
Notes:
-
If you want to delete a user in Okta, see Deactivate and delete user accounts(Link opens in a new window) in the Okta documentation.
-
If you want to delete the SCIM user in Tableau Cloud (see Delete SCIM users, below), you manually delete the user from Tableau Cloud.
-
If you encounter issues, see the Error "User role was not updated to: Unlicensed (errorCode=10079)" When Attempting to Deprovision Users via SCIM(Link opens in a new window) knowledge article.
About Tableau Cloud's "All Users" group
If you’ve enabled the default “All Users” group with GLSI, you can’t deprovision the users in Okta and therefore unable to get the "Unlicensed" role for any of the users that belong to the GLSI-enabled group in Tableau Cloud. To remove SCIM users in the GLSI-enabled “All Users” group, you must manually delete the users from Tableau Cloud.
Note: If users have content associated with them, you’ll need to reassign content ownership to other users before you can delete the users.
Delete SCIM users
Deleting SCIM users in Okta will only covert them to the "Unlicensed" role and will not delete them in Tableau Cloud. If you want to delete users, you must manually delete the users in Tableau Cloud.
For more information about deleting users, see "Remove users from a site" in the View, Manage, or Remove Users topic.
Notes for SCIM support with Okta
-
In the Okta user assignment settings, the values for User Name and Primary email must be identical.
-
You must add a separate Tableau Cloud Okta app for each site you want to manage using SCIM.
-
If you want to migrate a site, you will need to re-configure SCIM provisioning for the new site.
-
When provisioning new users, first name and last name attributes in Okta are not synced to Tableau Cloud. New users must set those fields when they sign in to Tableau Cloud for the first time.
-
When a user is unassigned from the Tableau Cloud app in Okta or the user is deactivated or deleted from Okta entirely, the user is converted to an "Unlicensed" site role in Tableau Cloud. If the user owns any content, you must first reassign ownership of those content assets before you can manually delete the user in Tableau Cloud.
-
You can set a user’s site role (such as Creator, Explorer, or Viewer) in Okta at either the user or the group level. We recommend assigning the site role at the group level. If the user is assigned a site role directly, it will override any group settings.
-
A user can be a member of many groups. Groups can have different site roles. If a user is assigned groups with different site roles, the user will receive the most permissive site role in Tableau Cloud. For example, if you choose Viewer and Creator, Tableau will assign the Creator site role.
Site roles are listed below in order from most permissive to least permissive:
-
Site Administrator Creator
-
Site Administrator Explorer
-
Creator
-
Explorer (Can Publish)
-
Explorer
-
Viewer
-
-
You can update the site role attribute for a user in Okta and this change will propagate to Tableau Cloud. Other attributes, such as User Name and Primary email, cannot be updated. To change these attributes, remove the user, change the attribute, and then add the user again.
-
Beginning in February 2024 (Tableau 2023.3), the use of SCIM with Grant License on Sign In (GLSI) is supported. For more information, see SCIM and grant license on sign in above.