SCIM
System for Cross-domain Identity Management (SCIM) is a protocol that standardizes the automation of users and groups provisioning for cloud-based applications like Tableau Cloud. Tableau Cloud supports SCIM, enabling identity providers (IdPs) to centrally manage user identities while streamlining the process of managing users and group membership in Tableau Cloud. The IdP uses SCIM to ensure that access is granted and revoked in a timely way and Tableau Cloud is kept in sync with the provisioning assignments in the IdP. This type of integration improves security and reduces the manual work for site administrators in Tableau Cloud.
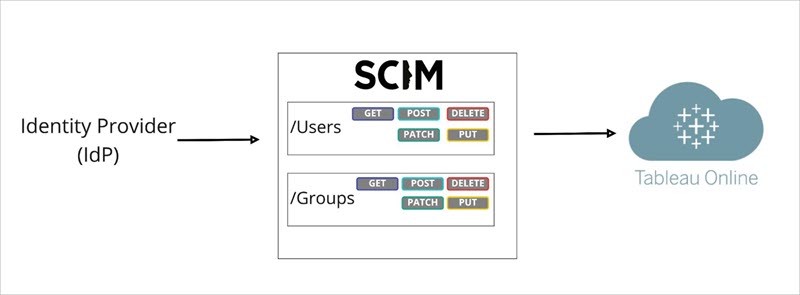
In the diagram above, the IdP pushes updates to Tableau Cloud and controls how often Tableau Cloud’s SCIM endpoints are called to ensure users and groups are appropriately mirrored.
IdP-specific configuration
The steps later in this topic provide general information that you can use with your IdP’s documentation to configure SCIM for your Tableau Cloud site. You can get IdP-specific configuration steps for the following IdPs we support:
Overview of enabling SCIM support
Review the following steps to enable SCIM integration in Tableau Cloud and your IdP. To complete this process, you’ll also need the documentation your IdP provides. Look for topics that refer to configuring or enabling a service provider for SCIM provisioning.
Notes:
-
After enabling SCIM, users and their attributes should be managed through the IdP. Changes made within Tableau Cloud directly may result in unexpected behavior and overwritten values.
-
Beginning in January 2025 (Tableau 2024.3):
-
You can choose the SAML authentication configuration to associate with SCIM. However, only one SAML authentication configuration can support SCIM on a site.
-
The SCIM capability is no longer site admin-scoped. In other words, all site administrators have the ability to configure and edit SCIM.
-
-
Beginning in June 2025 (Tableau 2025.2):
-
You can configure one or more SCIM configurations on a site.
-
You can bypass the SCIM token that Tableau generates and instead use an externally generated JWT (using a Tableau connected app) to support SCIM requests in Tableau Cloud.
-
-
Beginning in December 2025, you can automate users and groups provisioning by using the Tableau SCIM API(Link opens in a new window).
-
Beginning in February 2026 (Tableau 2026.1), you can choose OIDC and Google authentication to associate with SCIM.
-
Beginning in June 2026 (Tableau 2026.2), custom domains(Link opens in a new window) are supported with SCIM integration.
Step 1: Perform prerequisites
Before enabling SCIM integration with your Tableau Cloud site, you’ll need to meet the following requirements:
-
Have site administrator access to the Tableau Cloud site.
-
Able to modify your IdP's settings for Tableau Cloud.
-
Your site is already configured to support SAML or OIDC (or Google) single sign-on (SSO). If you haven’t done this, see Enable SAML Authentication on a Site or TCM or Configure Tableau Cloud or TCM for OpenID Connect, and then follow your IdP’s documentation to add Tableau Cloud as an application.
-
Optionally, if using external token generation and management, you have the following:
-
Created and enabled a Tableau connected app. If you haven't done this, see Use Tableau Connected Apps for Application Integration.
-
A valid JWT that contains the following scopes:
tableau:users:*andtableau:groups:*
-
Step 2: Enable SCIM support
In Tableau Cloud - using a Tableau-generated token
-
Sign in to your Tableau Cloud site as a site administrator, and select Settings > Authentication.
-
Do the following:
-
On the Authentication page, under System for Cross-domain Identity Management (SCIM), click the New Configuration button.
-
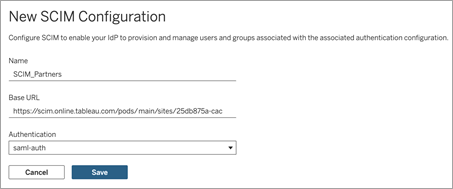
In the New SCIM Configuration dialog box, do the following:
-
Enter a name for the SCIM configuration.
-
Copy the Base URL to use in your IdP's SCIM settings.
-
From the Authentication drop-down, select the authentication configuration to associate with SCIM.
-
Click Save.
Note: This populates the SCIM token section.
-
-
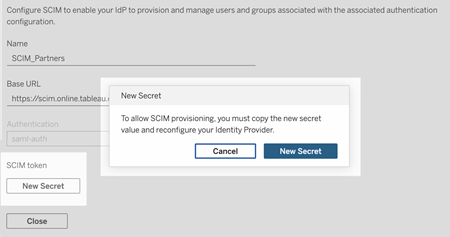
Under SCIM token, do the following:
- Click the New Secret button.
-
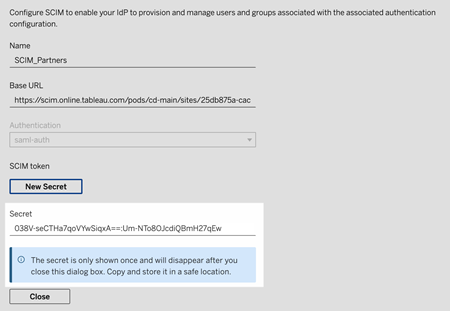
In the New Secret dialog box, click the New Secret button again. A newly generated secret will display.
-
Copy the secret and store it in a safe location.
Important:
-
If you close the SCIM configuration before you can add the secret to your IdP's SCIM settings, you can edit SCIM configuration but will be required to click New Secret again to generate a new secret.
-
The secret is tied to the Tableau site administrator user who created the SCIM configuration. If that user’s site role changes or the user is no longer a member of the site, the secret becomes invalid. In this case, another site administrator can generate a new secret for the existing SCIM configuration and add it to the IdP's SCIM settings or create a new SCIM configuration ensuring the base URL and secret is added to the IdP's SCIM settings.
-
-
Click Close.
-
-
Navigate to your IdP's SCIM settings and paste the Tableau Cloud base URL and SCIM token in the appropriate fields.
In Tableau Cloud, using an external token
-
Sign in to your Tableau Cloud site as a site administrator, and select Settings > Authentication.
-
Do the following:
-
Under System for Cross-domain Identity Management (SCIM), click the New Configuration button.
-
In the New SCIM Configuration dialog box, do the following:
-
Enter a name for the SCIM configuration.
-
Copy the Base URL to use in your IdP's SCIM settings.
-
From the Authentication drop-down, select the authentication configuration to associate with SCIM.
-
Click Save.
Note: This populates the SCIM token section, which you can safely ignore.
-
When finished, click Close.
-
-
-
Navigate to your IdP's SCIM settings and paste the Tableau Cloud base URL in the appropriate field.
In the IdP
After meeting the prerequisites and enabling SCIM in Tableau Cloud, use the steps in your IdP's documentation to enable SCIM support with your identity provider (IdP). For some general guidance for specific IdPs, see IdP-specific configuration.
Step 3: Provision users and groups
Follow your IdP’s documentation to provision users and groups after enabling SCIM support. For some general guidance for specific IdPs, see IdP-specific configuration.
You can also automate users and groups provisioning by using the Tableau SCIM API(Link opens in a new window).
Replace a Tableau-generated SCIM token
When you need to replace your Tableau-generated SCIM token, follow the steps below to generate a new secret for the existing SCIM configuration.
Note: To generate a new token for an existing SCIM configuration, you must be the site administrator who created the SCIM configuration.
-
In Tableau Cloud, navigate to Settings > Authentication.
-
Under System for Cross-domain Identity Management (SCIM), next to the SCIM configuration, select Actions > Edit Configuration.
-
Under SCIM token, do the following:
-
Click the New Secret button.
-
In the New Secret dialog box, click the New Secret button again. A newly generated secret will display.
-
Copy the secret and store it in a safe location.
Important:
-
If you close the SCIM configuration before you can add the secret to your IdP's SCIM settings, you can edit SCIM configuration but will be required to click New Secret again to generate a new secret.
-
The secret is tied to the Tableau site administrator user who created the SCIM configuration. If that user’s site role changes or the user is no longer a member of the site, the secret becomes invalid. In this case, another site administrator can generate a new secret for the existing SCIM configuration and add it to the IdP's SCIM settings or create a new SCIM configuration ensuring the base URL and secret is added to the IdP's SCIM settings.
-
-