Tableau Content Migration Tool Use Cases
Tableau Content Migration Tool as the name suggests, is primarily used for moving Tableau Cloud content from one project to another. However, there are many features in the tool that makes it ideal for accomplishing several tasks related to content migration and maintenance.
Note: In many of the use cases we use the term migration to describe moving content from one environment, site, or project to another. However, technically the Content Migration Tool copies content and does not automatically delete or archive the original or source content.
The information below describes some common use cases where you can leverage the Content Migration Tool.
Content promotion
You can use the Content Migration Tool to create content for development projects and then perform routine migrations to promote content to staging or production projects on your site.
Use the following steps to migrate content to production projects:
-
Create a plan and select the site to use as your source. In this example, we describe a migration between projects on the same site, so choose the same Tableau site as your destination. For more information, see Create a Plan in Migration Plan Overview topic.
When migrating workbooks between two projects on the same site, your sign-in credentials for the source and destination may be similar or identical. In this scenario, we recommend using personal access tokens for a more reusable connection. For more information, see Personal Access Tokens.
-
Select the development project with the content you want to migrate. You can select entire projects, specific workbooks and data sources, and user permissions. For more information, see Planning in Migration Plan Overview topic.
If you need to make any changes or transformations to the content during this migration, you can configure that in the plan as well. This is referred to as Mapping.
-
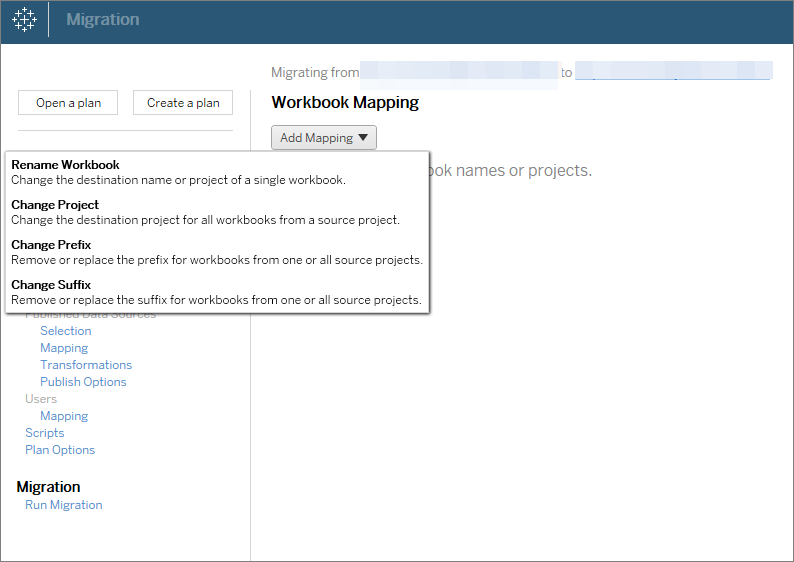
Select Change Project from the Add Mapping menu to add a project mapping. Select your development project as the source and production project as the destination, or click Add New to create a new project.
Other types of mapping include:
-
Changes to workbooks: Includes renaming workbooks and changing the destination project. For a full list of workbook transformations, see Migration Plans: Workbooks.
-
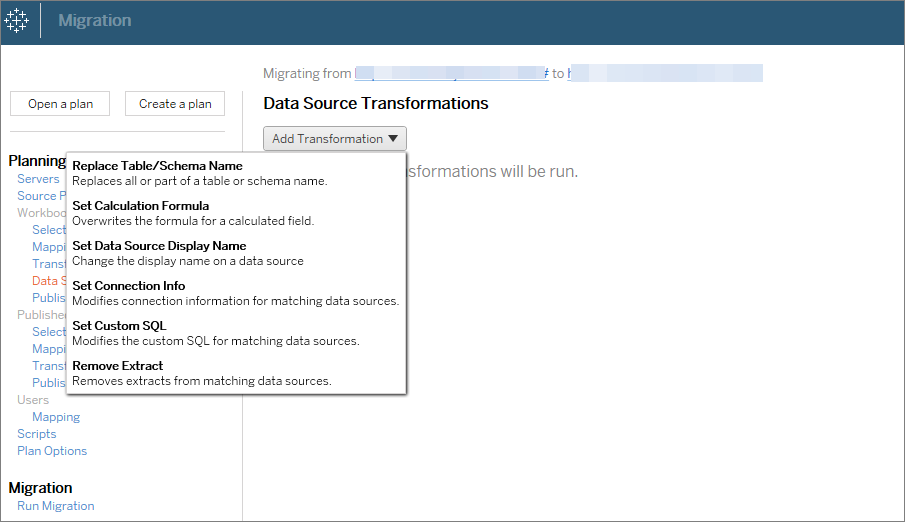
Changes to data sources: Includes replacing table or schema names, settings calculation formulas, and setting connection information. For a full list of data source transformations, see Migration Plans: Workbooks (embedded data sources) and Migration Plans: Published Data Sources (published data sources).
-
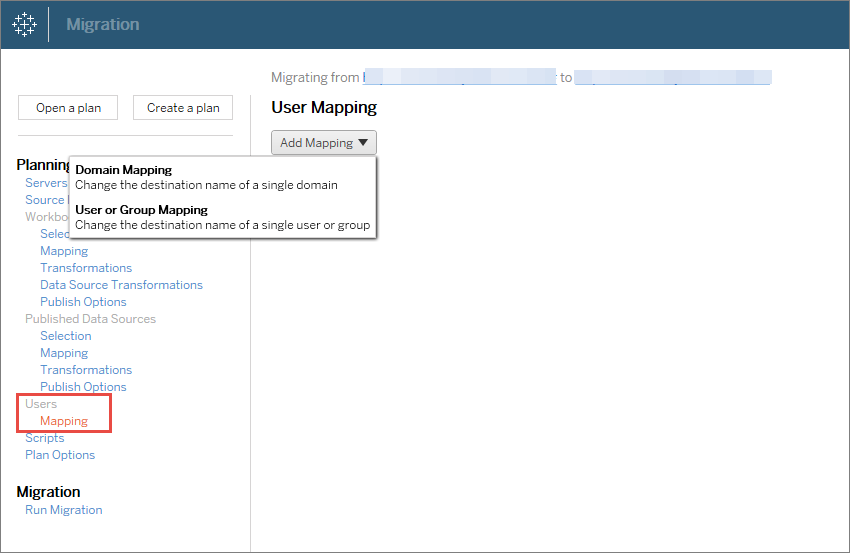
Changes to Users: Includes domain, user, and group name changes in the destination.
-
-
When you are ready, click Run Migration to end the Planning phase and prepare to run your plan.
-
To schedule this to run regularly, you can script this as a job using the Content Migration Tool Runner and schedule it. For more information on using the Content Migration Tool Runner, see Using the Tableau Content Migration Tool Console Runner.
Tailoring content for customers
When working in a consulting scenario, you can customize content for each of your customers using the Content Migration Tool. Each workbook functions as a template for your migration plan, allowing you to apply styling (text, images, etc.) and replace data sources for specific customers.
In this example, we describe a migration between projects; an internal project where you store templates, and an external project you share with customers.
Use the following steps to customize content for your customers:
-
Create a plan and select the site to use as your source. Choose the same Tableau site as your destination. For more information, see Create a Plan in Migration Plan Overview topic.
When migrating workbooks between two projects on the same site, your sign-in credentials for the source and destination may be similar or identical. In this scenario, we recommend using personal access tokens for a more reusable connection. For more information, see Personal Access Tokens.
-
Select the internal project that contains the template content you want to migrate. You can select entire projects, specific workbooks and data sources, and user permissions. For more information, see Planning in the Migration Plan Overview.
If you need to make any changes or transformations to the content during this migration, you can configure that in the plan as well. This is referred to as Mapping.
-
Select Change Project from the Add Mapping menu to add a project mapping. Select your internal project as the source and production project as the destination, or click Add New to create a new project.
-
In the Workbooks step of the Migration Plan, use workbook mappings and transformations to customize your content. Below are two examples of frequently used transformations. For a full list of workbook transformations, see Migration Plans: Workbooks.
-
To personalize content, you can use the Replace Image and Replace Text transformations to update the workbook with a customer's company name and logo.
-
When it comes to data sources, you can use the Replace Table/Schema Name or Set Custom SQL transformations to modify content for your customer.
-
-
Verify and run the plan. When you are ready, click Run Migration to end the Planning phase and prepare to run your plan.
Environment migration
You can use the Content Migration Tool to migrate content between Tableau Cloud and Tableau Server environments with a valid Advanced Management license.
Use the following steps to migrate content between Tableau deployments:
-
Create a plan and select the site you want to migrate from as your source. For more information, see Create a Plan in Migration Plan Overview topic.
-
Select the content you want to migrate from your source site. You can select entire projects, specific workbooks and data sources, and user permissions.
-
Create user permissions mappings to customize and secure content. For more information, see Migration Plans: Permissions and Ownership.
-
Verify and run the plan. When you are ready, click Run Migration to end the Planning phase and prepare to run your plan.
Tips
- Before you perform an environment migration, make sure you understand the Migration Limitations when using the Content Migration Tool.
- You can migrate your content in stages, test and validate content iteratively before final migration is complete.
- Content Migration Tool migration does not handle embedded credentials, subscriptions, and custom views. These will have to be migrated manually.
External content sharing
You can use the Content Migration Tool to share internal content with external collaborators, without allowing access to your project. This keeps your data secure and allows you to publish only select workbooks and data sources. Once content has been shared, collaborators sign in to their Tableau Cloud site to view and make changes, without affecting content stored on your internal project.
Before you continue, make sure the content you are sharing is compatible between the internal and external projects.
Use the following steps to share content externally:
-
Prepare internal content. As a best practice, we recommend separating content on the internal project, with locked permissions and strict governance rules. Workbooks and data sources should be clearly labeled to indicate the content is for external use. For more information, see Use Projects to Manage Content Access.
Note: Content shared with external projects must use data extracts unless the data source is publicly accessible. For information about creating extracts and replacing data sources, see Extract Your Data and Replace Data Sources in Tableau Desktop help.
If you have implemented row level security, those data sources must be updated to reflect user filters and other details for the external project. For more information about row level security, see Restrict Access at the Data Row Level in Tableau Desktop help.
-
Create a plan and select the site to use as your source. Choose the same Tableau site as your destination. For more information, see Create a Plan in Migration Plan Overview topic.
When migrating workbooks between two projects on the same site, your sign-in credentials for the source and destination may be similar or identical. In this scenario, we recommend using personal access tokens for a more reusable connection. For more information, see Personal Access Tokens.
-
Select the internal project that contains the template content you want to migrate. You can select entire projects, specific workbooks and data sources, and user permissions. For more information, see Planning in the Migration Plan Overview.
If you need to make any changes or transformations to the content during this migration, you can configure that in the plan as well. This is referred to as Mapping.
-
Select Change Project from the Add Mapping menu to add a project mapping. Select your internal project as the source and external project as the destination, or click Add New to create a new project.
-
Verify and run the plan. When you are ready, click Run Migration to end the Planning phase and prepare to run your plan.
Validating database migrations
This use case is when you intend to validate content after a migration of the underlying databases. One example of database migration is moving from SQL Server to Snowflake. CMT can help you validate the content built from both data sources is the same before you finalize your migration, but it cannot perform the actual database migration.
Use the following steps to validate database migrations:
-
Create a plan and select the site to use as your source. Choose the same Tableau site as your destination. For more information, see Create a Plan in Migration Plan Overview topic.
-
Select the content you want to change the data source or database connections.
- Configure the migration to copy your content to a new project. Let’s call the source project as Project A, and the new or the destination project as Project B.
Changes to workbooks: Create a workbook mapping to change Project A to Project B. For a full list of workbook transformations, see Migration Plans: Workbooks.
Changes to data sources: Create a data source mapping to change the Project A to Project B. For a full list of data source transformations, see Migration Plans: Published Data Sources.
-
Verify and run the plan. When you are ready, click Run Migration to end the Planning phase and prepare to run your plan.
-
Update the content in Project B with the new database connections or replace the data sources. This needs to be done manually by authoring.
-
Test each workbook in Project A with the copy in Project B and review for any inconsistencies in the data due to the change in data source.
-
Once you have confirmed everything is working as expected, overwrite the content in Project A with the updated content in Project B.
Note: If the content already exists in the destination project and you do not select the Overwrite Newer Workbooks and Overwrite Newer Data Sources publish options, the content will not be copied to the destination project.
Maintenance tasks
You can use the Content Migration Tool to perform a variety of maintenance tasks.
Tagging stale content
Using the Content Migration Tool, you can manage archiving stale content. For example, you can build a plan that runs on a regular schedule that can automatically pick up content tagged as Stale Content and move it to an Archive project. After a certain amount of time, the content in this project can be purged from the system. For more information see, Migration Plans: Workbooks.
Restoring content
You can use the Content Migration Tool to restore content removed (accidentally or purposefully) from a project with content from a backup project.
Use the following steps to restore content from a backup project:
-
Create a plan and select the site to use as your source. Choose the same Tableau site as your destination. For more information, see Create a Plan in Migration Plan Overview topic.
-
Select the content you want to restore from the backup project.
-
Configure the migration to restore content from your backup project. Let’s call the backup project Project A and the project you want to restore to Project B.
-
Changes to workbooks: Create a workbook mapping to change Project A to Project B. For a full list of transformations, see Migration Plans: Workbooks.
-
Changes to data sources: Create a data source mapping to change Project A to Project B. For a full list of data source transformations, see Migration Plans: Published Data Sources.
-
-
Verify and run the plan. When you are ready, click Run Migration to end the Planning phase and prepare to run your plan.
-
Review the content on the production site.
Partial backup
Once you have a backup project, you can use the Content Migration Tool to transfer new content from production to the backup project.
Notes:
- Before you perform a partial backup, make sure you understand the Migration Limitations when using the Content Migration Tool.
- The Content Migration Tool shouldn't be used to backup your entire site. We recommend prioritizing the content you need most.
Use the following steps to perform a partial backup of your content:
-
Create a plan and select the site to use as your source. Choose the same Tableau site as your destination. For more information, see Create a Plan in Migration Plan Overview topic.
-
Select the content you want to backup from the production project. You can select entire projects, specific workbooks and data sources, and user permissions. To migrate only new content, make sure the publish options Overwrite Newer Workbooks and Overwrite Newer Data Sources are not selected. For more information, see Migration Plans: Workbooks.
- Configure the migration to copy content to your backup project. Let’s call the source project Project A and the backup project Project B.
Changes to workbooks: Create a workbook mapping to change Project A to Project B. For a full list of transformations, see Migration Plans: Workbooks.
Changes to data sources: Create a data source mapping to change Project A to Project B. For a full list of data source transformations, see Migration Plans: Published Data Sources.
-
Verify and run the plan. When you are ready, click Run Migration to end the Planning phase and prepare to run your plan.
-
To schedule this to run on a regular basis, you can script this as a job using the Content Migration Tool Runner and schedule it. For more information on using the Content Migration Tool Runner, see Using the Tableau Content Migration Tool Console Runner.