Migration Plans: Sites
The first step when creating a migration plan in the Tableau Content Migration Tool is to sign in to the source and destination sites.
In the

Required permissions and licenses
The user account(s) used to sign in to the source and destination sites must have an Explorer role or higher, and the following permissions for the content you want to migrate:
- View
- Download Workbook/Save a Copy
- Optional: Administrator (to select workbooks, to access a user list)
Both the source and destination sites must have Advanced Management capacities. For more information, see About Tableau Advanced Management on Tableau Cloud.
Step 1: Source
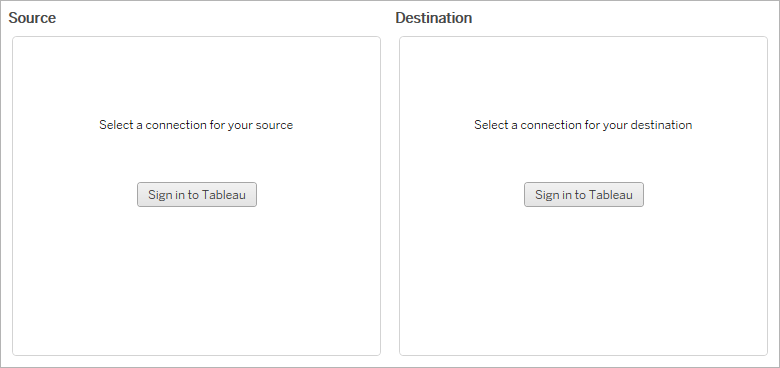
Here is the starting point of the migration. Sign in to
Sign in to the source site
Use the steps below to sign in to Tableau Cloud or Tableau Server. For more information about signing in to Tableau Cloud with Single Sign-On and Tableau with MFA, see Sign In to Tableau Cloud(Link opens in a new window).
- Click Sign in to Tableau.
-
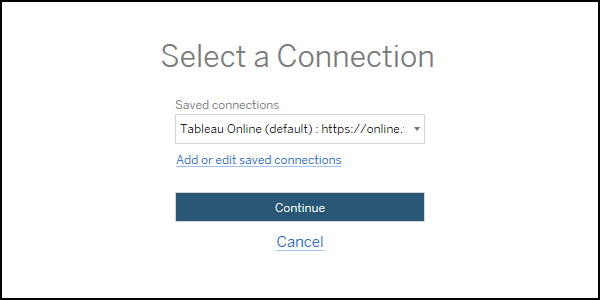
In the Select a Connection dialog window, select a saved connection and click Continue.

If no connections are available, click Add or edit saved connections to add a new connection. For more information, see Saved connections.
-
Enter your username and password, and click Sign In.
If your server is configured for SAML or Single Sign-On, you are redirected to the Identity Provider sign-in page to complete the authentication process.
-
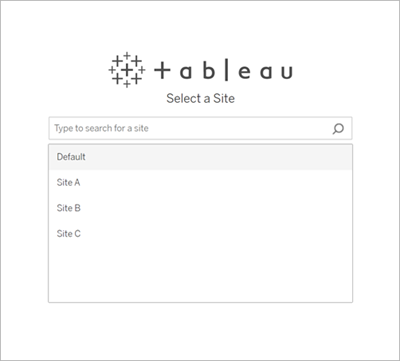
Select the site you want to use.

To change the source server or update your site selection, click Select a different source.
Step 2: Destination
Repeat the sign-in process for the destination site (the site you are migrating content to).
If you are migrating your workbooks between two projects on the same Tableau site, your sign-in credentials for the source and destination site will be identical (including the server URL and site name).
Saved connections
Using saved connections allow you to quickly sign in to the source and destination sites by creating a reusable connection. When adding a saved connection, you must specify the preferred sign-in method for your site.
The Content Migration Tool supports the following sign-in methods:
-
Personal access tokens: Allows users to create long-lived authentication tokens for improved security, auditing, and automation of migration plans. Personal access tokens let users sign in without requiring interactive login in the Content Migration Tool. For more information, see Personal Access Tokens.
-
Browser-based sign-in: Users enter their credentials and complete authentication through an embedded web browser. This option may be similar to how you usually authenticate to Tableau.
-
Username and password sign-in: Users authenticate through the Content Migration Tool instead of an embedded browser window. This option passes credentials to the server using Tableau REST APIs. You can use username and password sign-in to troubleshoot issues that prevent the use of browser-based sign-in.
Add or edit saved connections
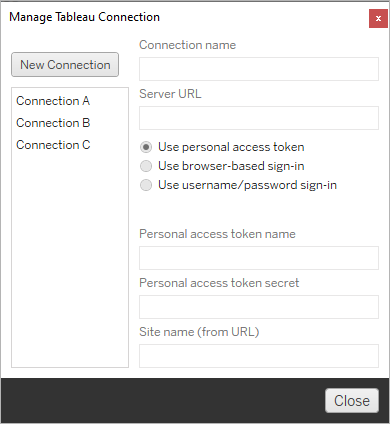
A link to Add or edit saved connections is displayed at the bottom of the Content Migration Tool, and when signing in to the source and destination sites. Clicking this link will open the Manage Tableau Connections window.

Use the steps below to add a saved connection:
-
On the Manage Tableau Connections window, click New Connection, or select an existing connection to make changes.
-
Enter a Connection Name (name to describe your server) and the Server URL.
If you don't include a prefix for the Server URL, the Content Migration Tool will use
http://. -
Select the sign-in method for your connection.
If you're using personal access tokens, see Add saved connections with personal access tokens.
-
Click Save.
After you create a saved connection, it's listed in the Select a Connection window next time you sign in to the source and destination sites.
Add saved connections with personal access tokens
Adding a saved connection with a personal access token requires more information than other sign-in methods. You will need to create a new personal access token on the source and destination sites to begin. Personal access tokens should not be shared between applications. For more information, see Personal Access Tokens.
-
In a web browser, sign in to your Tableau site.
-
At the top of the page, click your profile image or initials, and then select My Account Settings.
-
Under Personal Access Tokens, enter a descriptive name for your token in the Token Name field, and then click Create new token.
-
In the resulting window, click Copy to clipboard and then close the window.
-
Paste the token secret to a file. Store the file in a safe location.
-
In the Content Migration Tool, click Add or edit saved connections.
-
On the Manage Tableau Connections window, enter a Connection name and the Server URL.
If you are connecting to Tableau Cloud, you must enter the full pod URL of your site. For example,
https://10ay.online.tableau.com. Your pod is shown in the first portion of the site URL after signing in to Tableau Cloud. -
Enter the Personal access token name and Personal access token secret, obtained when creating a personal access token in the previous section.
-
In the Site name field, enter the site name as it appears in the URL, without spaces. This is different than the friendly site name. For example, “Site A” would be “sitea” in a browser URL.
-
Click Save.
Step 3: Continue to the next step
After successfully signing in to both source and destination sites, click Next to continue to the Migration Plans: Source Projects section of the planning phase.
Who can do this
Tableau site user with an Explorer role or higher. To migrate content, you must have View and Download/Save a Copy capabilities for workbooks on the source site and View and Publish capabilities for target projects on the destination site. For more information, see Permissions.
