Add, Delete or Activate Sites
In Tableau Cloud Manager (TCM), the sites you manage correspond to the Tableau Cloud sites within your organisation. By default, a tenant contains up to three sites, but this capacity increases with different licence types – up to ten sites with an Enterprise licence and a maximum of 50 with a Tableau+ licence.
Note: Multi-Site Pilot Program customers aren’t eligible to manage multiple sites using Tableau Cloud Manager. For more information about feature availability, contact your Tableau account representative.
The Sites page contains data for each site in your tenant, including site location, user count and storage usage. TCM allows you to manage sites and users, but doesn't extend to the governance of content and site settings. These capabilities are reserved for users with the site administrator role, who have the necessary access and permissions at the site level.
This topic walks you through the steps to add new sites and modify existing ones in TCM.
Add sites
As a cloud administrator, you can expand your organisation's capabilities within Tableau Cloud by adding new sites. Tableau recommends creating sites when you must manage a unique set of users and their content separately from others. Consider creating a site for the following scenarios:
Environment Separation: To differentiate between development, testing and production environments.
Project Isolation: For projects that require confidentiality or are independent of existing projects.
Regional Requirements: When expanding to new regions or to comply with specific data residency and privacy laws.
To add a site, follow these steps:
Sign in to Tableau Cloud Manager as a cloud administrator.
On the Sites page, click New Site.
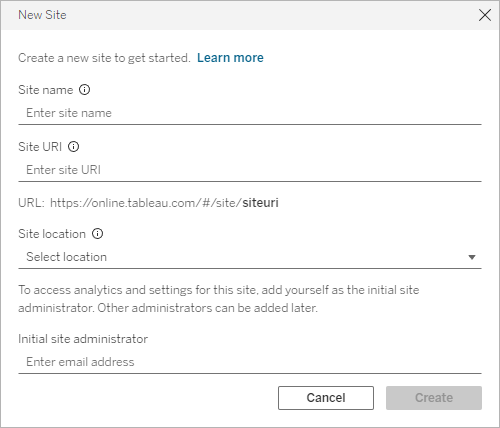
Complete the fields in the New Site dialog:

Site name: A name for the Tableau Cloud site. The site name can be the name of your organisation or for a specific team, such as Sales or Marketing. Providing a descriptive name allows users to quickly understand the intended purpose of the site.
Must be unique within Tableau Cloud Manager (TCM) and the Tableau Cloud pod hosting the tenant.
Can only contain Unicode letters, numbers and the characters
!@$%*.?-_,’()&/:#.Must not exceed 80 characters.
Site URI: The uniform resource identifier (URI) that users enter to sign in to the site.
Must be unique across all Tableau Cloud pods.
Can only contain letters (
A-Z,a-z), numbers (0-9), hyphens (-) or underscores (_).Must begin and end with a letter or number.
Site location: The region or pod where the Tableau Cloud site is hosted. We suggest selecting the closest location to your user base.
Initial site administrator: Email address of the initial site administrator. To access analytics and settings for the site, add yourself as the initial site administrator. Other site administrators can be added later.
Review the values and click Create.
The initial site administrator receives an email with steps to sign in to the site. For more information, see Sign In to Tableau Cloud.
Modify site authentication
Site authentication is only configurable by site administrators, directly at the site level. If you're a cloud administrator, you must also have site administrator privileges to change authentication settings. For more information, see Configure authentication for Tableau Cloud sites.
Delete sites
Deleting a site deactivates it immediately and schedules it for deletion after 30 days. During this time, the site is inaccessible to users, but you can reactivate it at any time within the 30-day period. Before proceeding with deletion, ensure that site administrators have notified content owners to back up all necessary workbooks and data sources. Site deletion is irreversible after the 30-day period, and all published content will be permanently removed.
Note: In the event that you accidentally delete a site, allow up to 24 hours for the operation to complete before attempting to reactivate the site.
To delete a site, follow these steps:
Sign in to Tableau Cloud Manager as a cloud administrator.
Navigate to the Sites page and select the tick box next to the site you want to delete.
Click the Actions menu or ellipsis icon (...) and select Delete.
In the confirmation dialog, click Delete. A notification appears, indicating that the site is scheduled for deletion.
After a site is scheduled for deletion, it reflects a "Delete Pending" status and is removed from the Sites page in Cloud Manager upon deletion. To view the remaining days before deletion, hover over the information icon in the Status column.

Activate sites
Cloud administrators can activate a site scheduled for deletion within the 30-day period to prevent permanent removal and ensure continued availability.
To activate a site, follow these steps:
Sign in to Tableau Cloud Manager as a cloud administrator.
Navigate to the Sites page and select the tick box next to the site you want to activate.
Click the Actions menu or ellipsis icon (...) and select Activate.
In the confirmation dialog, click Activate.
After a site is activated, it reflects an "Active" status and will be accessible to users again. Activating the site preserves all existing workbooks and data sources without any changes.
User activation and site roles
When activating a site, users are restored to the roles they held before the site was scheduled for deletion. If there aren’t enough licences available, such as when other sites consume licences during the suspended state, users are added until the available licence count is exhausted. Any remaining users are unlicensed on the site.
To license the affected users, adjust site role limits across sites. For more information, see Manage Site Role Limits.
