Extract Your Data
A data extract is a subset of information that is saved separately from the original dataset. It serves two purposes: to enhance performance and to utilize Tableau features that may not be available or supported in the original data. By creating a data extract, you can effectively reduce the overall data volume by applying filters and setting other limitations.
After a data extract is created, it can be refreshed with the latest data from the original source. During the refresh process, you have the flexibility to choose between a full refresh, which replaces all existing content in the extract, or an incremental refresh, which only includes new rows since the previous refresh.
Benefits of Extracts
- Handling large datasets: Extracts can handle massive amounts of data, even reaching billions of rows. This allows users to work with extensive datasets efficiently.
- Improved performance: Interacting with views that utilize extract data sources results in better performance compared to views connected directly to the original data. Extracts optimize query performance, resulting in faster data analysis and visualization.
- Enhanced functionality: Extracts provide access to additional Tableau functionality that may not be available or supported by the original data source, such as specific functions.
- Offline data access (Tableau Desktop): Extracts allow for offline access to data. This means that even when the original data source isn't available, users can still save, manipulate, and work with the data locally.
Create an extract
There are multiple ways to create an extract, but the main approach is explained below.
- After you connect to your data and set up the data source on the Data Source page, in the upper-right corner, select Extract, and then select the Edit link to open the Extract Data dialog box.
- Expand each section to see its options, or select Expand All. More information on each section is presented further on in this topic.
- Data Storage: change between Logical Tables or Physical Tables.
- Filters: set up filters to limit how much data gets extracted based on fields and their values.
- Aggregation: select Aggregate data for visible dimensions to aggregate the measures using their default aggregation. You can also select Roll up dates to a specified date level such as Year, Month, etc.
- Number of Rows: set the number of rows you want to extract. You can extract All rows, Sample, or the Top N rows.
- Incremental refresh: set up an incremental refresh based on a specific column and date range. You can also choose whether or not last rows are replaced or appended.
- When finished, choose Save Settings.
- Select the sheet tab. This initiates the creation of the extract.
- Next, select a location to save the extract.
- Enter an extract file name.
- Select Save. If the Save dialog box doesn't display, see the Troubleshoot extracts section.

Extract settings descriptions
You can configure numerous settings when creating an extract.
Data Storage
Under Data Storage you can select either logical or physical tables. Logical tables store data in one extract table for each logical table in the data source. On the other hand, physical tables store data in one extract table for each physical table in the data source.
Both the logical tables and physical tables options only affect how the data in your extract is stored. The options don't affect how the tables in your extract are displayed on the Data Source page.
For example, suppose your extract consists of one logical table that contains three physical tables. If you directly open the extract (.hyper) file that has been configured to use the default option, logical tables, you see one table listed on the Data Source page. However, if you open the extract using the packaged data source (.tdsx) file or the data source (.tdsx) file with its corresponding extract (.hyper) file, you see all three tables on the Data Source page.
Logical tables
Tableau uses logical tables as the default structure for storing extract data. Tableau generally recommends that you use the default data storage option, logical tables, when setting up and working with extracts. Many of the features you may want, like extract filters, aggregation, Top N, or pass-through functions (RAWSQL), are only available to you if you use the logical tables option. However, you can't append data to extracts that have more than one logical table.
If you choose the logical table option and your extract includes joins, the joins are applied when the extract is created.
Physical tables
This option performs joins at query time and can potentially improve performance and reduce the size of the extract file, if your data meets all of the following conditions:
- All joins between physical tables are equality (=) joins.
- The data types of the columns used for relationships or joins are identical.
- No pass-through functions (RAWSQL) used.
- No incremental refresh configured.
- No extract filters are configured.
- No Top N or sampling configured.
- No data needs to be appended to the extract.
Tips for working with physical tables
Extracts that are larger than expected: To determine if the extract is larger than it should be, the sum of rows in the extract using the Logical Tables option must be higher than the sum of rows of all the combined tables before the extract has been created. If you encounter this scenario, try using the physical tables option.
Filtering options: When using the Physical Tables option, other options to help reduce the data in your extract, like extract filters, aggregation, Top N and Sampling are disabled. If you need to reduce the data in an extract that uses the Physical Tables option, consider filtering the data before it’s brought into Tableau Desktop using one of the following suggestions:
- All joins between physical tables are equality (=) joins.
- Connect to your data and define filters using custom SQL. Instead of connecting to a database table, connect to your data using custom SQL instead. When creating your custom SQL query, make sure that it contains the appropriate level of filtering that you need to reduce the data in your extract. For more information about custom SQL in Tableau Desktop, see Connect to a Custom SQL Query.
- Define a view in the database. If you have write access to your database, consider defining a database view that contains just the data you need for your extract and then connect to the database view from Tableau Desktop.
Row-level security with extracts: If you want to secure extract data at the row level, using the Physical Tables option is the recommended way to achieve this scenario. For more information about row-level security in Tableau, see Restrict Access at the Data Row Level.
Filters
Use filters to limit how much data gets extracted based on fields and their values.
Note: Extract filters on logical tables are pervasive (apply to the entire data source) for data sources with a single base table. For data sources with multiple base tables using multi-fact relationships, extract filters are per-table and apply only to the logical table itself. For more information on pervasive and per table filters, see Filter Data from Data Sources.
Aggregation
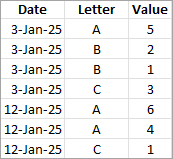
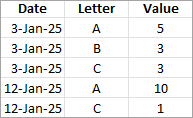
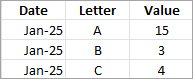
Aggregation allows you to aggregate measures. You can also select Roll up dates to a specified date level such as Year, Month, etc. The examples show how the data will be extracted for each aggregation option you can choose:
- Original data: Each record is shown as a separate row. There are seven rows in the original data.
- Aggregate data for visible dimensions (no roll up): Records with the same date and letter have been aggregated into a single row. There are five rows in the extract.
- Aggregate data for visible dimensions (roll up dates to Month): Dates have been rolled up to the Month level and records with the same region have been aggregated into a single row. There are three rows in the extract.
| Original data | Aggregation without roll up | Aggregation with roll up |
|
|
|
Number of rows
You can extract all rows or the top N rows. Tableau first applies any filters and aggregation and then extracts the number of rows from the filtered and aggregated results. The number of rows options depend on the type of data source you’re extracting from. You might not see the sampling option in the Extract Data dialog box because some data sources don't support sampling.
Note(s):Any fields that you hide first in the Data Source page or on the sheet tab will be excluded from the extract. Click the Hide All Unused Fields button to remove the hidden fields from the extract.
Incremental Refresh
Most data sources support an incremental refresh. Rather than refreshing the entire extract, you can configure a refresh to add only the rows that are new since the previous time you extracted the data.
For example, you may have a data source that is updated daily with new sales transactions. Rather than rebuild the entire extract each day, you can add the new transactions that occurred that day.
Incremental Refresh tips
Incremental Refresh:
- In Number of Rows, you need to select All Rows.
- Incremental Refresh isn't available if you enable Aggregation.
Advanced Settings:
- Advanced Settings aren't compatible with Filters.
Extract tips
Save your workbook to preserve the connection to the extract
After you create an extract, the workbook begins to use the extract version of your data. However, the connection to the extract version of your data isn’t saved until you save the workbook. This means if you close the workbook without saving the workbook first, the workbook will connect to the original data source the next time you open it.
Toggle between sampled data and entire extract
When you're working with a large extract, it can be helpful to create a smaller sample of the data. This allows you to set up your view without having to run lengthy queries every time you add a field to your analysis. You can easily switch between using the sample data and the complete data source by selecting the appropriate option in the Data menu.
Don't connect directly to the extract
When you save extracts to your computer, you can directly connect to them using a new Tableau Desktop. However, it isn't recommended for a few of the following reasons:
- The names of the tables may be different. Extracts use special naming to ensure that each table has a unique name, which might be hard to understand.
- You can’t update or refresh the extract. When you connect directly to an extract, Tableau considers it as the original source of data, rather than a copy. This means you can’t link it back to your original data source.
- The structure and relationships between tables will be lost. The arrangement and connections between tables are stored in the .tds file, not in the .hyper file. Therefore, when you connect directly to the .hyper file, you lose this information. If you use logical tables storage for the extract, you won't see any references to the original physical tables.
Don't use an extract if you connect to a virtual connection with user functions in the data policy
If a virtual connection has a data policy that contains User Functions(Link opens in a new window) (for example, USERNAME()) and you connect to it from a workbook or data source and create an extract there, the extract will contain only the rows that match the virtual connection data policy at the time the extract is created. To take advantage of a virtual connection with user functions in the data policy, use a live connection from the workbook or data source to the virtual connection instead of an extract.
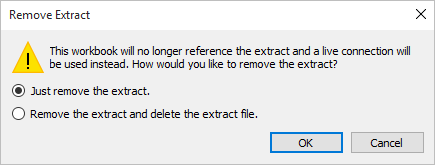
Remove the extract from the workbook
You can remove an extract at any time from the Data menu by selecting the extracted data source > .

When you remove an extract, you can choose to Remove the extract from the workbook only or Remove and delete the extract file. The latter option deletes the extract from your hard drive.
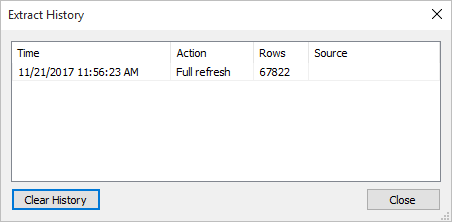
See extract history (Tableau Desktop)
You can see when the extract was last updated and other details by selecting a data source on the Data menu and then selecting .
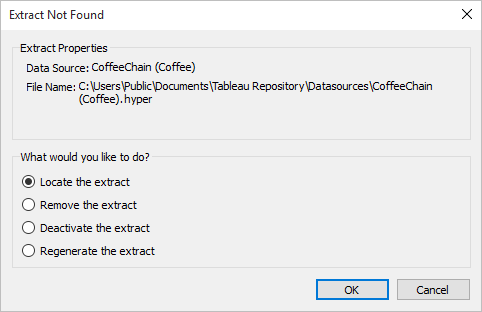
If you open a workbook that is saved with an extract and Tableau can't locate the extract, select one of the following options in the Extract Not Found dialog box when prompted:
- Locate the extract: Select this option if the extract exists but not in the location where Tableau originally saved it. Click OK to open an Open File dialog box where you can specify the new location for the extract file.
- Remove the extract: Select this option if you have no further need for the extract. This is equivalent to closing the data source. All open worksheets that reference the data source are deleted.
- Deactivate the extract: Use the original data source from which the extract was created, instead of the extract.
- Regenerate the extract: Recreates the extract. All filters and other customizations you specified when you originally created the extract are automatically applied.
Troubleshoot extracts
- Creating an extract takes a long time: Depending on the size of your data set, creating an extract can take a long time. However, after you’ve extracted the data and saved it to your computer, performance can improve.
- Extract isn’t created: If your data set contains a large number of columns (for example, in the thousands), in some cases Tableau might not be able to create the extract. If you encounter problems, consider extracting fewer columns or restructuring the underlying data.
- Save dialog doesn’t display or extract isn’t created from a .twbx: If you follow the procedure before this to extract data from a packaged workbook, the Save dialog doesn't display. When an extract is created from a packaged workbook (.twbx), the extract file is automatically stored in the package of files associated with the packaged workbook. To access the extract file that you created from the packaged workbook, you must unpackage the workbook. For more information, see Packaged Workbooks.
Extract feature updates
Subrange refresh for incremental extracts
In Tableau versions 2024.2 and newer, you can specify an additional time period to re-extract previously extracted data and capture any changes that may have occurred. For more information, see Refresh Extracts.
Incremental Refresh
Starting from version 2024.1, Tableau introduces a feature that enables users to perform incremental refreshes on extracts using a non-unique key column. There’s a new UI that supports these advanced settings.
This update also introduces an additional step in the extraction process. During an incremental refresh, Tableau first removes rows from the extract that match the previously recorded highest value. Subsequently, Tableau queries for all rows that have a value higher than or equal to the previous highest value. This approach ensures that any deleted rows are accounted for, along with any newly added ones.
Extracts in the web
Beginning with version 2020.4, extracts are available in web authoring and content server. Now, you no longer have to use Tableau Desktop to extract your data sources. For more information, see Create Extracts on the Web.
Logical and physical table extracts
With the introduction of logical tables and physical tables in the Tableau data model in version 2020.2, extract storage options have changed from Single Table and Multiple Tables, to Logical Tables and Physical Tables. These options better describe how extracts will be stored. For more information, see Extract Your Data.
Deprecation of .tde format
When you create an extract it uses the .hyper format. Extracts in the .hyper format take advantage of the improved data engine, which supports faster analytical and query performance for larger data sets. Beginning in March 2023, extracts using the .tde format are deprecated in Tableau Cloud, Tableau Public, and Tableau Server (version 2023.1.0). Version 2024.2 is the last version that can open .tde format files. For more information, see Extract Upgrade to .hyper Format.
Changes to values and marks in the view
To improve extract efficiency and scalability, values in extracts can be computed differently from some data sources. Changes to how the values are computed can affect the way marks in your view are populated. In some rare cases, the changes can cause your view to change shape or become blank. These changes can also apply to multi-connection data sources, data sources that use live connections to filed-based data, data sources that connect to Google Sheets data, cloud-based data sources, extract-only data sources, and WDC data sources.
Format of date and date time values
Extracts are subject to consistent and strict rules around how date strings are interpreted through the DATE, DATETIME, and DATEPARSE functions. This affects how dates are parsed, or the date formats and patterns that are allowed for these functions. More specifically, the rules can be generalized as the following:
- Dates are evaluated and then parsed by column, not by row.
- Dates are evaluated and then parsed based on the locale of where the workbook was created, not on the locale of the computer where the workbook is opened.
These rules allow extracts to be more efficient and to produce results that are consistent with commercial databases.
Common causes of changes to date/datetime values
- Where the date is ambiguous and can be interpreted in several different ways, the date will be interpreted based on the format Tableau has determined for that column. For some examples, see Scenario 1 below.
- When a function has to parse a YYYY-MM-DD (ISO) format. For an example, see Scenario 2.
- When a function parses years, it’s interpreted as the following:
- Year "07" is interpreted as "2007"
- Year "17" is interpreted as "2017."
- Year "30" is interpreted as "2030."
- Year "69" interpreted as "2069."
- Year "70" is interpreted as "1970."
Common causes of null values
- When a function has to parse multiple date formats in a single column. After Tableau determines the date format, all other dates in the column that deviate from the format become null values. For some examples, see Scenario 1 below.
- When a function has to parse a YYYY-MM-DD (ISO) format. Values that exceed what is allowed for "YYYY," or "MM," or "DD" cause null values. For an example, see Scenario 2.
- When a function has to parse date values that contain trailing characters. For example, time zone and daylight savings suffixes and keywords, such as "midnight" cause null values.
- When a function has to parse an invalid date or time. For example, 32/3/2024 causes a null value. In another example, 25:01:61 causes a null value.
- When a function has to parse contradicting inputs. For example, suppose the pattern is 'dd.MM (MMMM) y' and the input string is '1.09 (August) 2024', where both "9" and "August" are months. The result is a null value because the month values aren't the same.
- When a function has to parse contradicting patterns. For example, a pattern that specifies a mix of Gregorian year (y) and ISO week (ww) causes null values.
Change to the number of rows
In a live connection, Tableau respects and uses the source database's collation settings. In an extract, Tableau's own settings are used and these may be slightly different than the rules applied in the source database. The raw data remains the same, but the way that data is aggregated and shown in the UI may not agree.
Regardless of the connection type and collation settings, the total number of rows can be verified to be the same between a live connection and an extract by looking at View Data > Full Data analysis.
Scenario 1
Suppose you have a workbook created in an English locale that uses .hyper extract data source. The table after this shows a column of string data contained in the extract data source.
| 10/31/2024 |
| 31/10/2024 |
|
12/10/2024 |
Based on the particular English locale, the format of the date column was determined to follow the MDY (month, day, and year) format. The following tables show what Tableau displays based on this locale when the DATE function is used to convert string values into date values.
| October 31, 2024 |
| October 31, 2024 |
| December 10, 2024 |
If the extract is opened in a German locale, you see the following:
| 31 Oktober 2024 |
| 31 Oktober 2024 |
| 12 Oktober 2024 |
However, after the extract is opened in a German locale, the DMY (day, month, and year) format of the German locale is strictly enforced and causes a Null value because one of the values doesn't follow the DMY format.
| Null |
| October 31, 2024 |
| October 12, 2024 |
Scenario 2
Suppose you have a column of string data contained in the data source.
| 2024-10-31 |
| 2024-31-10 |
|
2024-12-10 |
| 2024-10-12 |
Because the date uses the ISO format, the date column always follows the YYYY-MM-DD format. The following tables show what Tableau displays when the DATE function is used to convert string values into date values.
| October 31, 2024 |
| Null |
| December 10, 2024 |
| October 12, 2024 |
Change to the number of rows
In a live connection, Tableau respects and uses the source database's collation settings. In an extract, Tableau's own settings are used and these may be slightly different than the rules applied in the source database. The raw data remains the same, but the way that data is aggregated and shown in the UI may not agree.
Regardless of the connection type and collation settings, the total number of rows can be verified to be the same between a live connection and an extract by looking at View Data > Full Data analysis.
Sort order and case sensitivity
Extracts have collation support and therefore can more appropriately sort string values that have accents or are cased differently.
For example, suppose you have a table of string values. In terms of sort order, this means that a string value like Égypte is now appropriately listed after Estonie and before Fidji.
With regard to casing, the same string values are considered unique and therefore stored as individual values.
Breaking ties in Top N queries
A Top N query in your extract can produce duplicate values for a specific position in a rank. For example, suppose you create a top 3 filter. Positions 3, 4, and 5 have the same values. The top filter returns 1, 2, and 5 positions.
Precision of floating-point values
Extracts are better at taking advantage of the available hardware resources on a computer and therefore able to perform mathematical operations in a highly parallel way. Because of this, real numbers can be aggregated by .hyper extracts in different order. When numbers are aggregated in different order, you might see different values in your view after the decimal point each time the aggregation is computed. This is because floating-point addition and multiplication are not necessarily associative. That is, (a + b) + c isn't necessarily the same as a + (b + c). Also, real numbers can be aggregated in different order because floating-point multiplication isn't necessarily distributive. That is, (a x b) x c isn't necessarily the same as a x b x c. This type of floating-point rounding behavior in .hyper extracts resemble that of floating-point rounding behavior in commercial databases.
For example, suppose your workbook contains a slider filter on an aggregated field comprised of floating point values. Because the precision of floating-point values have changed, the filter might now exclude a mark that defines the upper or lower bound of the filter range. The absence of these numbers could cause a blank view. To resolve this issue, move the slider on the filter or remove and add the filter again.
Accuracy of aggregations
Extracts optimize for large data sets by taking better advantage of the available hardware resources on a computer and therefore able to compute aggregations in a highly parallel way. Because of this, aggregations performed by .hyper extracts can resemble the results from commercial databases more than the results from software that specializes in statistical computations. If you’re working with a small data set or need a higher level of accuracy, consider performing aggregations through reference lines, summary card statistics, or table calculation functions like variance, standard deviation, correlation, or covariance.
APIs
You can use the Extract API to create .hyper extracts. For tasks such as publishing extracts, you can use the Tableau Server REST API or the Tableau Server Client (Python) library. For refresh tasks, you can use the Tableau Server REST API as well. For more information, see Tableau Hyper API.