Create Extracts on the Web
You can extract your data sources on the web (without using Tableau Desktop) to improve data source performance and support additional analytical functions. When you extract your data source, Tableau will copy the data from your remote data store to Tableau Server or Tableau Cloud. To learn more about the benefits of extracting your data, see Extract Your Data. On the web, you can extract while in Web Authoring or while in Content Server.
Create extracts in Web Authoring
You can create extracts directly in web authoring with default extract settings.
Extract an Embedded Data Source in Web Authoring
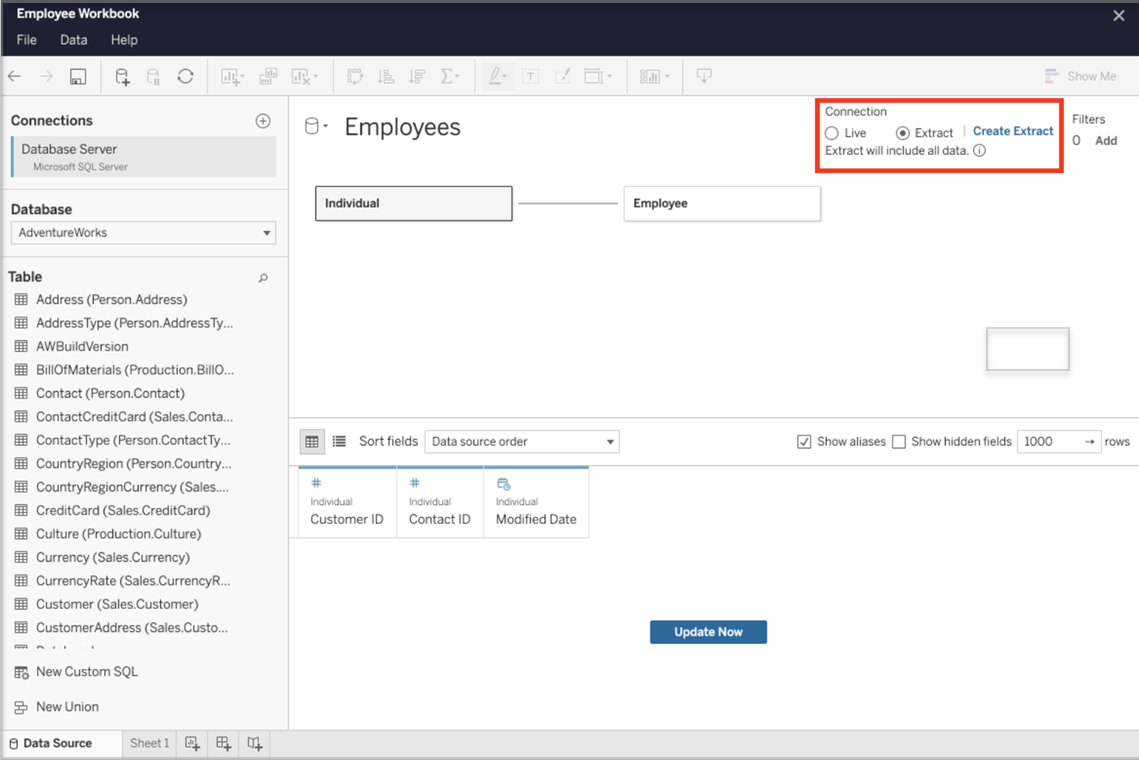
Complete the following steps to create an extract in web authoring.
Tip: It's recommended to finalize your data model before you create the extract. Extract creation may take a long time and any changes to your data model, such as adding new logical tables, will invalidate the extract.
- Select the Data Source tab in the bottom left corner of the web authoring pane. For new workbooks, you will start in the Data Source tab.
- In the top-right corner, change the connection type from Live to Extract.
- Select Create Extract. You will see the Creating Extract dialog box.
Extract creation might take a long time and you can close your authoring session while the extract is being created. To ensure your extract creation isn't lost, in the dialog box, choose Notify Me When Complete to specify a location for the extracted workbook to be saved. If your extract succeeds, your workbook will be saved to the specified location and you will be notified that you can continue your web authoring session.
If your extract creation fails, you will be notified that the extract couldn't be created and you can restore your unsaved changes by reopening the original workbook in web authoring.
Define your Extract Settings
You can configure one or more of the following options to tell Tableau how to store, define filters for, and limit the amount of data in your extract.
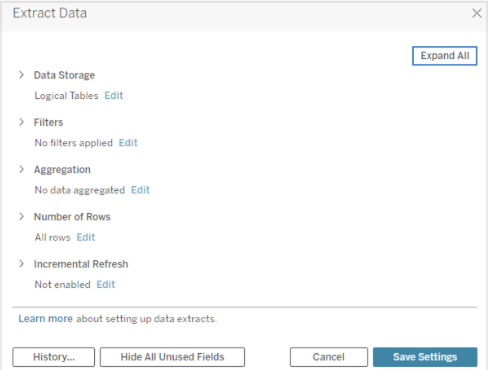
Decide how the extract data should be stored
You can choose to have Tableau store the data in your extract using one of two structures (schemas): logical tables (denormalized schema) or physical tables (normalized schema). For more information about logical and physical tables, see The Tableau Data Model. The option you choose depends on what you need.
Logical Tables
Logical Tables store data using one extract table for each logical table in the data source. Physical tables that define a logical table are merged and stored with that logical table. For example, if a data source was made of a single logical table, the data would be stored in a single table.
If a data source was made of three logical tables (each containing multiple physical tables), the extract data would be stored in three tables—one for each logical table.
Select Logical Tables when you want to limit the amount of data in your extract with additional extract properties like extract filters, aggregation, Top N, or other features that require denormalized data. Also use when your data uses pass-through functions (RAWSQL). This is the default structure Tableau uses to store extract data.
If you use this option when your extract contains joins, the joins are applied when the extract is created.
Physical Tables
Physical Tables stores data using one extract table for each physical table in the data source.
Select Physical Tables if your extract is comprised of tables combined with one or more equality joins and meets the conditions for using the Physical Tables option listed below. If you use this option, joins are performed at query time.
This option can potentially improve performance and help reduce the size of the extract file. For more information about how Tableau recommends you use the Physical Tables option, see Tips for using the Physical Tables option in the Tableau Desktop help.
In some cases, you can also use this option as a workaround for row-level security. For more information about row-level security using Tableau, see Restrict Access at the Data Row Level in the Tableau Desktop help.
Conditions for using the Physical Tables option
To store your extract using the Physical Tables option, the data in your extract must meet all of the conditions listed below.
- All joins between physical tables are equality (=) joins.
- Data types of the columns used for relationships or joins are identical.
- No pass-through functions (RAWSQL) used.
- No incremental refresh configured.
- No extract filters configured.
- No Top N or sampling configured.
- When the extract is stored as physical tables, you can't append data to it.
- For logical tables, you can't append data to extracts that have more than one logical table.
Note: Both the Logical Tables and Physical Tables options only affect how the data in your extract is stored. The options don't affect how tables in your extract are displayed on the Data Source page.
Determine how much data to extract
Select Add to define one or more filters to limit how much data gets extracted based on fields and their values.
Aggregate the data in the extract
Select Aggregate data for visible dimensions to aggregate the measures using their default aggregation. Aggregating the data consolidates rows, can minimize the size of the extract file, and increase performance.
When you choose to aggregate the data, you can also select Roll up dates to a specified date level such as Year, Month, etc. The following examples show how the data will be extracted for each aggregation option you can choose.
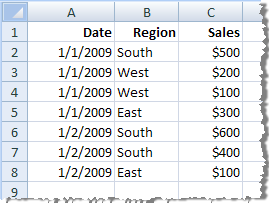
| Original data |
|
Each record is shown as a separate row. There are seven rows in your data. |
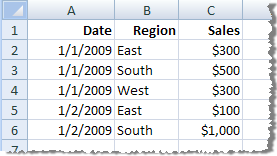
| Aggregate data for visible dimensions
(no roll up) |
|
Records with the same date and region have been aggregated into a single row. There are five rows in the extract. |
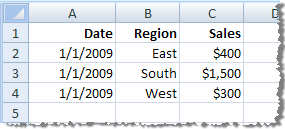
| Aggregate data for visible dimensions (roll up dates to Month) |
|
Dates have been rolled up to the Month level and records with the same region have been aggregated into a single row. There are three rows in the extract. |
Choose the rows to extract
Select the number of rows you want to extract.
You can extract All rows or the Top N rows. Tableau first applies any filters and aggregation and then extracts the number of rows from the filtered and aggregated results. The number of rows options depend on the type of data source you are extracting from.
Notes:
- Not all data sources support sampling. So, you might not see the Sampling option in the Extract Data dialog box.
- Any fields that you hide first in the Data Source page or on the sheet tab will be excluded from the extract.
Configure Incremental Refresh Settings
Most data sources support an incremental refresh. Rather than refreshing the entire extract, you can configure a refresh to add only the rows that are new since the previous time you extracted the data.
For example, you may have a data source that is updated daily with new sales transactions. Rather than rebuild the entire extract each day, you can just add the new transactions that occurred that day. To have incremental refresh as an option when you schedule a refresh you must first define the settings.
Periodically you might want to do a full refresh to ensure you have the most up to date data.
Note: If the data structure of the source data changes (for example, a new column is added), you will need to do a full extract refresh before you can start doing incremental refreshes again.
Set up Incremental Refresh
Follow the steps below to set up an extract to be refreshed incrementally. Ensure you’ve selected All rows in the Number of Rows section.
Incremental refreshes can only be defined when you are extracting from all rows in the database. You can't incrementally refresh a sample extract.
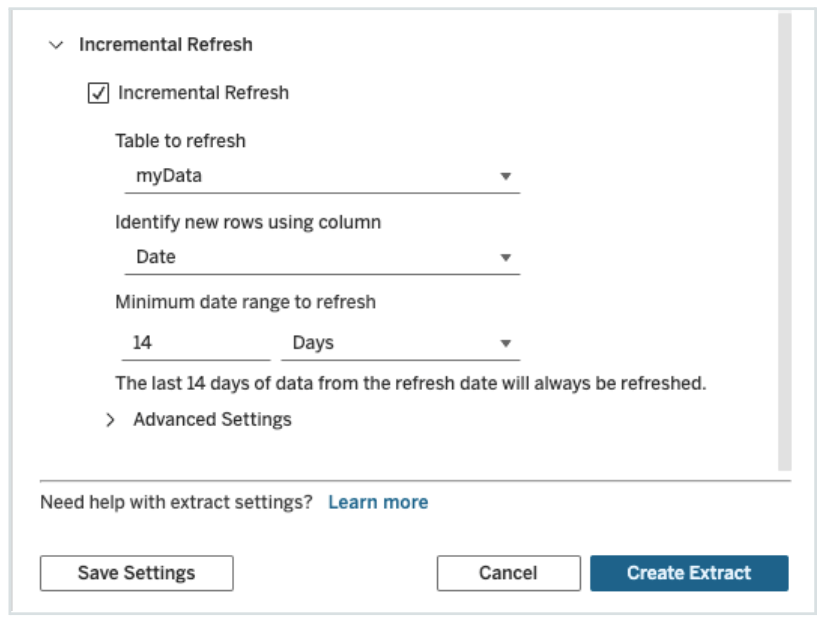
- Expand the Incremental Refresh section.
- Check the Incremental refresh box.
- Choose a table to refresh.
- Select a column to use for identifying new rows.
- (Optional) Enter an amount of time and unit of time in the Minimum date range to refresh fields to extract new data added since the last refresh, and also replace a subrange of existing data in the extract to capture changes that may have occurred in the data source. You have the option to define the length of time in multiple ways from seconds to years within this field. For example, you could enter "2" and "months" to have the extract refresh get all new rows, plus refresh the previous two months worth of data.
Note: Configuring extract refreshes along with a minimum date to refresh can be complex to understand. Before you use it, see Configure an incremental extract refresh.
Use Advanced Settings
You can expand Advanced Settings to establish how new rows are retrieved.
Note: If you have set a Minimum date range for refreshing, the Advanced Settings feature won't be accessible.
Advanced Settings allow you to either replace the last rows added by refreshing values equal to or greater than the last recorded value, or retain the last rows added by only refreshing the extract with values greater than the last recorded value.
In the first approach, Tableau allows users to incrementally refresh extracts with a non-unique key column such as date, datetime, or ID.
This method adds a new step when performing an incremental refresh. Tableau will first delete rows in the extract that are equal to the previous highest value seen. Tableau then queries for all rows that are higher than or equal to the previous highest value which will pick up all the deleted rows and any new ones.
Conversely, you can still opt to not replace the last rows added and only add rows with values greater than the last recorded value.
To finish, select Create Extract.
Considerations when refreshing extracts
Editing an extract:
If you're editing an existing extract, the last refresh is shown so you can be sure you are updating the extract with the correct data.
Full Refresh:
A Full Refresh replaces all of the rows with the data in the original data source every time you refresh the extract. A Full Refresh can take longer and be expensive on the database.
Date/Time precision and extracts:
The data engine, which is the underlying mechanism that Tableau uses to create extracts, stores time values with a precision of up to 3 decimal places.
If you specify a datetime or timestamp column for Identify new rows using column, and your database uses a higher precision than Tableau, you can end up with duplicate rows after an incremental refresh.
For example, if the database has two rows, one with a datetime value of 2015-03-13 17:30:56.502352 and one with a datetime value of 2015-03-13 17:30:56.502852, Tableau will store both rows using a datetime value of 2015-03-13 17:30:56.502 thereby creating duplicate rows.
Limitations
- You can't create extracts for embedded data sources that reference published data sources. As a workaround, create the extract directly on the published data source. For more information, see Extract a Published Data Source on Content Server.
- You can't create extracts for file-based data sources. File-based data sources already have special performance features and adding extraction will have no performance benefit.
- This feature doesn't apply to bridge-based data sources in Tableau Cloud.
- Custom SQL Limitation: Custom SQL queries aren't supported with Advanced Settings. Users relying on custom SQL will need to adjust their approach if they wish to use the Advanced Settings for incremental refresh.
Create extracts in Content Server
Extract a Published Data Source on Content Server
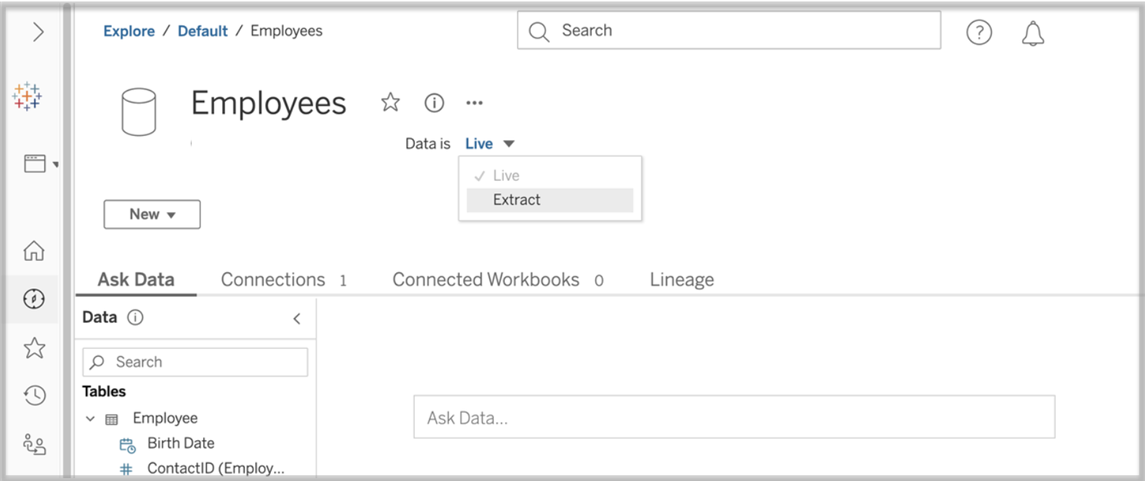
Complete the following steps to extract a published data source.
- Sign in as an administrator or as the owner of the data source.
- On the Content tab, select Explore, and then select Data sources.
- Select a data source by clicking on the Data Source name.
- At the top of the screen, under the Data Source name, select the drop-down menu that says Live.
- Change the connection type from Live to Extract. If the extract encryption at rest feature is enabled on the site, select either Encrypted or Unencrypted.
- If you see an error message about embedded credentials, embed your credentials in the data source. To do this, choose Edit Connection. Select "Embedded password in connection” and then choose Save.
Extract an Embedded Data Source on Content Server
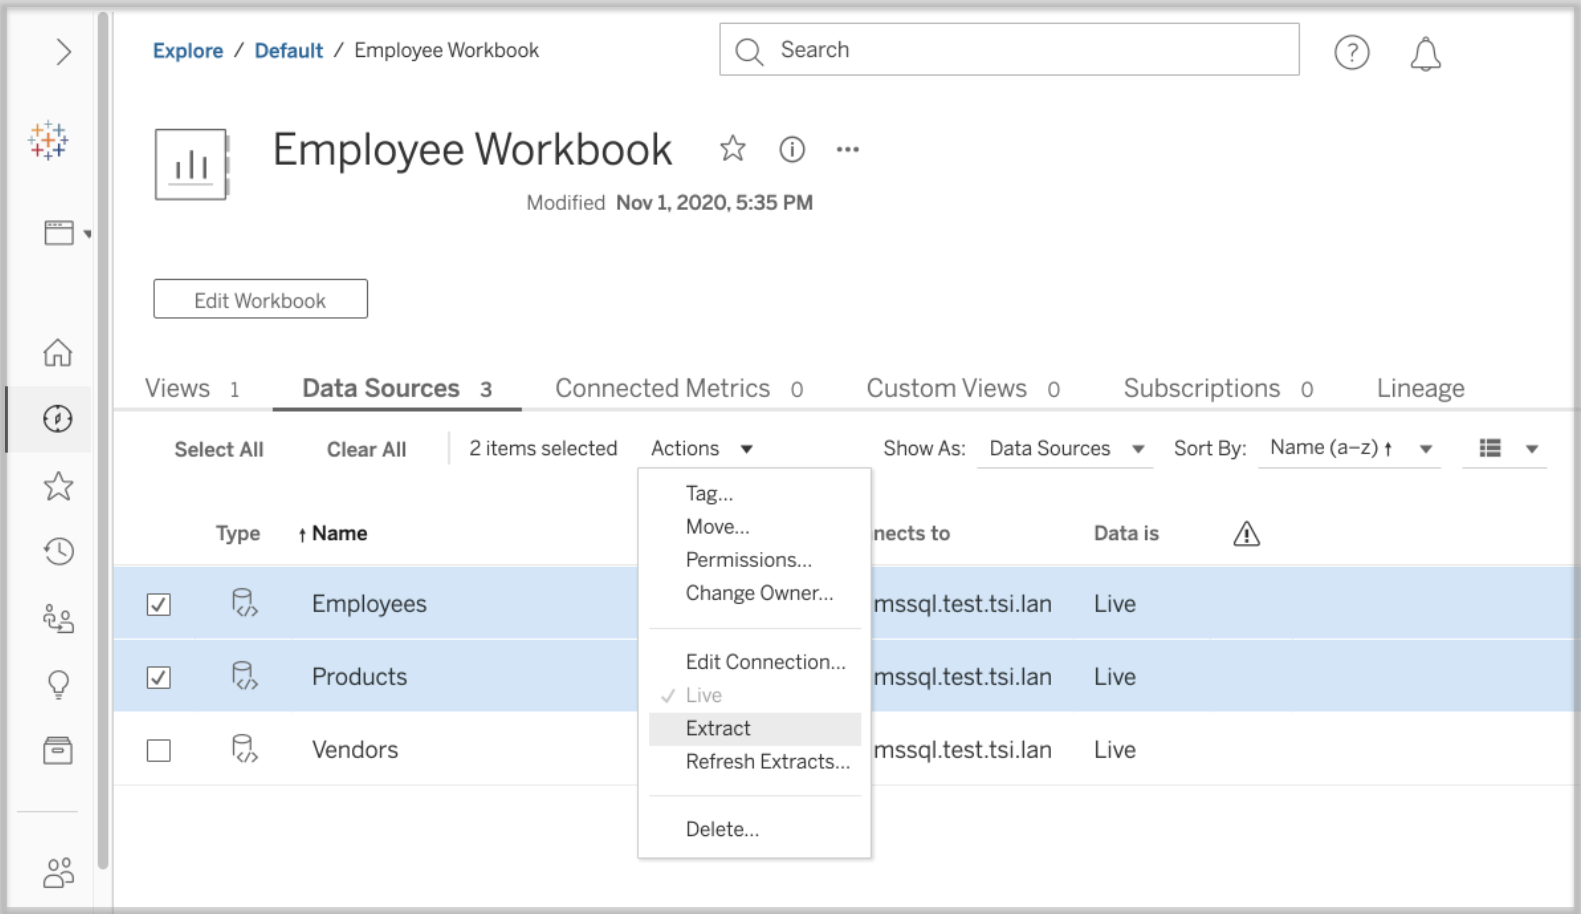
Complete the following steps to extract one or more data sources that are embedded in a published workbook.
- Sign in as an administrator or as the owner of the data source.
- Navigate to the published workbook.
- Navigate to the Data Sources tab
- Select one or more of the data sources.
- Choose the Action button.
- Select Extract. If the extract encryption at rest feature is enabled on the site, select either Encrypted or Unencrypted.
Limitations
- Your connection credentials must be embedded in the data source.
- You can't create extracts for embedded data sources that reference published data sources. As a workaround, create the extract directly on the published data source.
- You can't create extracts for file-based data sources. File-based data sources already have special performance features and adding extraction will have no performance benefit.
- Starting with version 2023.1, changing a live connection to an extract on Content Server will remove any extract filters that were previously created on Tableau Desktop or Web Authoring.
- This feature doesn't apply to bridge-based data sources in Tableau Cloud.
Keep Extracted Data Fresh
After data is extracted, you can optionally set up an extract refresh schedule to keep the data fresh. For more information, see Refresh Data on a Schedule.
Monitor and Manage Extracts
Server administrators can monitor extract creation on the Background Tasks for Extracts admin view. For more information, see Background Tasks for Extracts.
Server administrators can manage extracts on the Jobs page. For more information, see Managing Background Jobs in Tableau Server.
Extract creation jobs, like extract refresh jobs, have a maximum query limit before they timeout. This is to prevent jobs from running forever and using an unbounded amount of server resources. The extract query limit timeout can be configured by server admins using the TSM. command line interface configuration setting backgrounder.querylimitFor more information, see tsm configuration set Options.
Server administrators can manage web authoring. For more information, see Set a Site’s Web Authoring Access and Functions.
