Organize and Customize Fields in the Data Pane
The Data pane has many features to help you organize and customize your data source semantics.
Group and sort options are only available for relational data sources—not for cubes (multidimensional data sources).
Organize the Data Pane
Single table data sources default to grouping by folder. Multi-table data sources default to grouping fields by the table they came from.
Grouping by folder lets you manually decide how to organize fields.
Grouping by table puts dimensions and measures together under their table. This structure is useful when fields with similar names appear in multiple tables.
Regardless of the default, you can switch between grouping by data source table and grouping by folder.
Tip: You can change between grouping by folder or grouping by table at any time. All folder information is preserved.
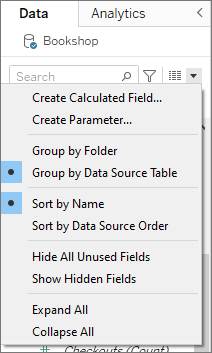
Group by folder
Items in the Data pane like fields, parameters, and sets can be manually grouped into folders.
- Open the Data pane menu (under the data sources) and select Group by Folder.
- Or right-click on a field in the Data pane and select Group by > Folder.
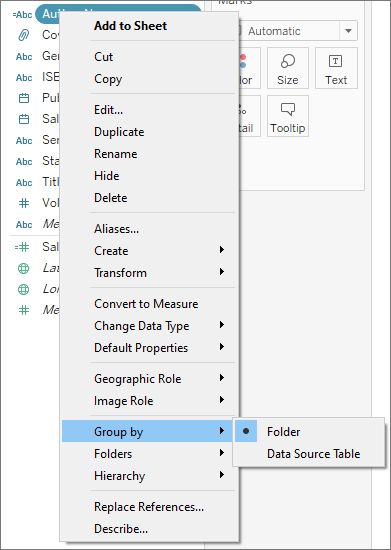
Note: Many of the context menus in the Data pane change depending on how you access them. If the menu doesn't have what you're looking for, try opening the menu from another place. It's accessible from right-clicking on a field, right-clicking on white space in the Data pane, or using the drop-down menu by the search bar.
Some options only appear or are unavailable based on other settings (such as Create folder).
Before folders are set up, all fields are listed together with dimensions at the top and measures at the bottom.
Create folders
After you set the Group by option to Folder, create your folders.
- In the Data pane, select the fields you want to group together and right-click (or right-click an empty area in the Data pane).
- Select Folders > Create Folder.
- When prompted, name the new folder.
Folders are sorted alphabetically in the Data pane. You can start the folder name with a number to force them to appear in a specific order.
Add fields to folders
After you create the folder structure, it's time to put fields in the folders.
- Drag a field on top of the folder name. If the folder is expanded, you can drag the field into the general area of the folder.
- Or, right click on a field and select Folder > Add to Folder > then choose the desired folder.
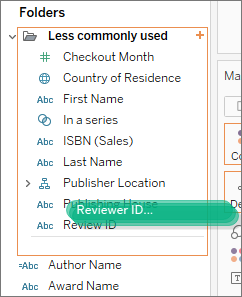

Fields can only appear in one folder, but you can duplicate (right-click > Duplicate) a field you want to have available in more than one folder.
Sort fields in the Data pane
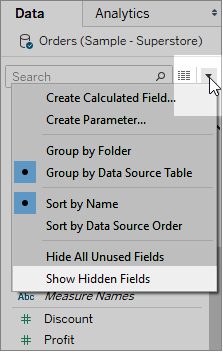
Whether they're grouped by table or by folder, you can configure how fields are sorted. These Sort by options are also in the Data pane menu.
You can sort by one of the following options:
- Sort by Name. Lists the dimensions and measures in alphabetical order according to their field aliases.
- Sort by Data Source Order. Lists the dimensions and measures in the order they’re listed in the underlying data source.
Find fields
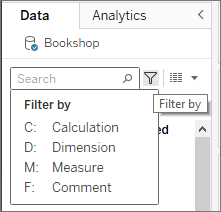
You can filter the Data pane to show only certain types of fields. Select the Filter by icon next to the search box to show the clickable list of options: dimensions, measures, calculations, or fields with comments. Clear the filter using the X in the search box.
Search for a field
You can search the Data pane for items like fields, folders, or hierarchies.
- Click in the search bar at the top of the Data pane under the data sources.
- As you type in the search box, the contents of the Data pane are filtered to show items that contain the typed string.
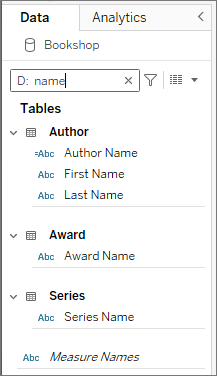
- Use the Filter by prefixes to limit your search to specific types of fields, such as typing "D:" before searching "name" to return only dimensions that contain the string "name".
- C: for calculations
- D: for dimensions
- M: for measures
- F: for fields with comments
Find a field in the Data pane
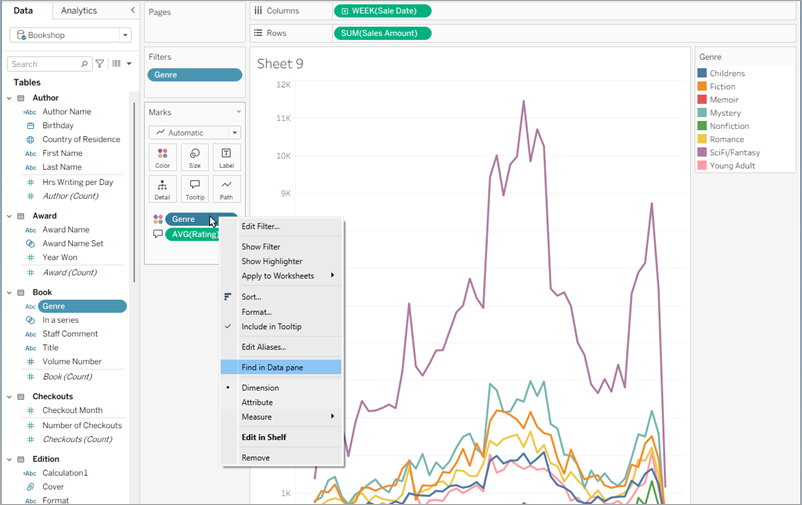
From a field in the view you can easily locate that same field in the Data pane. This can be useful when you need to work a specific field in a long list of fields or when fields have similar names.
To find a field in the data pane:
-
Right-click on the pill in the view to open the drop-down menu
-
Select Find in Data pane
The field in the Data pane is highlighted, just as it is when you click on it.
Rename Fields
You can rename fields in the Data pane. For example, rename a field named Customer Segment in the data source to be Business Segment in Tableau. Renaming a field doesn't change the name of the field in the underlying data source, only what appears in Tableau. The changed field name is saved with the workbook and when you export the data source. You can rename any type of field: dimensions, measures, sets, or parameters.
Rename a field
-
Click field name in the Data pane and hold the mouse button down until the field name is shown in an edit box:

You can also press F2 or Ctrl + Enter to make the field name editable.
- Type the new name for the field and press Enter.
The field shows the new name in the Data pane.
Revert to the Default Field Name
To revert a field's name, click the field name in the Data pane and hold the mouse button down until the name is shown in the box. At the right of the edit field is a small circular arrow that you can click to restore the original data source field name:

To revert the names of multiple fields that were in the original data source, select them all, right-click, and then select Reset Names.
Combine Fields
Combine fields to create a cross product of members from different dimensions. You can combine dimensions if you want to encode a data view using multiple dimensions.
To combine the fields, select multiple dimensions in the Data pane and then right-click (control-click on a Mac) the fields and select Create > Combined Field.
Note: For cube (multidimensional) data sources, you must select levels from different hierarchies. In Tableau, cube data sources are supported only in Windows.
For example, the selections in the example produce a new field that consists of the Category and Sub-Category dimensions.

The two dimensions are combined into a new dimension. The name of the field is automatically created from the names of the original fields. Right-click (control-click on a Mac) the new field and select Rename to change the name.
When you use the new field in a view, a header is created for each combination of the two original dimensions. For example, the following view shows the members of the combined Category and Sub-Category fields.

Note: For cube data sources, to show the fully qualified name, right-click the combined field in the Data pane and select Qualify Member Names.
Hide or Unhide Fields
You can selectively hide or show fields in the Data pane.
- To hide a field: right-click (control-click on a Mac) the field and select Hide.
- To show hidden fields: select Show
Hidden Fields on the Data pane menu. The hidden fields are then shown in the Data pane with a hidden icon
 .
. - To unhide a field: show hidden fields, then click the icon to unhide the field.
- To hide all unused fields: select Hide All Unused Fields on the Data pane menu to quickly hide all the fields that aren’t being used in the workbook.
Note: Hiding fields can be a good way to decrease the size of a data extract file because hidden fields are automatically excluded from the extract.
Add Calculated Fields to the Data Pane
You can create calculated fields that appear in the Data pane. These new computed fields can be used like any other field. Select Create Calculated Field on the Data pane menu. Alternatively, select .
