Configure SCIM with Microsoft Entra ID
You can configure user management through Microsoft Entra ID (also known as Azure Active Directory (AD)), provision groups, and assign Tableau Cloud site roles.
While you complete the following steps, it will help to have the Entra ID documentation at hand. See the tutorial, Configure Tableau Cloud for automatic user provisioning(Link opens in a new window).
Notes:
-
If you have already enabled provisioning for your application and would like to update to use the Tableau SCIM 2.0 endpoint, see the Microsoft article Update a Tableau Cloud application(Link opens in a new window). If you are setting up provisioning for a new instance of the Tableau Cloud application, follow the steps below.
-
These steps reflect a third-party application and are subject to change without our knowledge. If the steps described here do not match the screens you see in your IdP account, you can use the general SCIM topic along with the IdP’s documentation.
- The configuration steps in the IdP may be in a different order than what you see in Tableau.
Step 1: Perform prerequisites
The SCIM functionality requires that you configure your site to support SAML, OIDC, or Google single sign-on (SSO).
-
If using SAML authentication, complete the section "Add Tableau Cloud to your Microsoft Entra ID applications" in Configure SAML with Microsoft Entra ID.
-
If using OIDC authentication, complete Configure Tableau Cloud or TCM for OpenID Connect.
-
After adding Tableau Cloud from the Azure Marketplace, remain signed in to both the Entra portal and Tableau Cloud, with the following pages displayed:
- In Tableau Cloud, the Settings > Authentication page.
- In the Entra portal, the Tableau Cloud application > Provisioning page.
Step 2: Enable SCIM support
Use the following steps to enable SCIM support with Microsoft Entra ID. See also Notes and limitations for SCIM support with Azure Active Directory section below.
Note: For the steps in the Entra portal, make sure you're using Tableau Cloud app from the gallery.
In Tableau Cloud
-
Sign in to your Tableau Cloud site as a site administrator, and select Settings > Authentication.
-
Do the following:
-
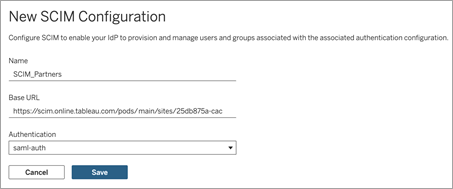
On the Authentication page, under System for Cross-domain Identity Management (SCIM), click the New Configuration button.
-
In the New SCIM Configuration dialog box, do the following:
-
Enter a name for the SCIM configuration.
-
Copy the Base URL to use in your IdP's SCIM settings.
-
From the Authentication drop-down, select the authentication configuration to associate with SCIM.
-
Click Save.
Note: This populates the SCIM token section.
-
-
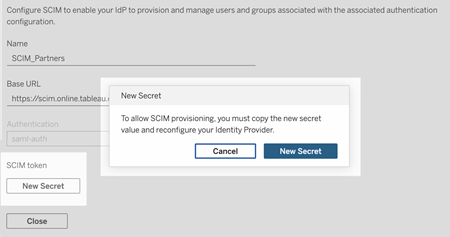
Under SCIM token, do the following:
- Click the New Secret button.
-
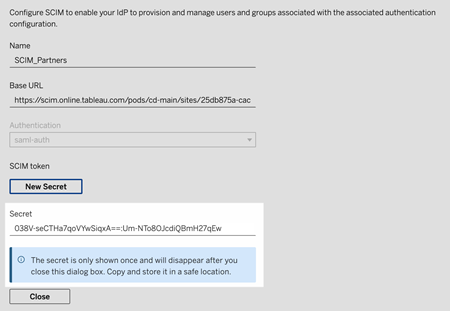
In the New Secret dialog box, click the New Secret button again. A newly generated secret will display.
-
Copy the secret and store it in a safe location.
Important:
-
If you close the SCIM configuration before you can add the secret to your IdP's SCIM settings, you can edit SCIM configuration but will be required to click New Secret again to generate a new secret.
-
The secret is tied to the Tableau site administrator user who created the SCIM configuration. If that user’s site role changes or the user is no longer a member of the site, the secret becomes invalid. In this case, another site administrator can generate a new secret for the existing SCIM configuration and add it to the IdP's SCIM settings or create a new SCIM configuration ensuring the base URL and secret is added to the IdP's SCIM settings.
-
-
Click Close.
-
In Microsoft Entra
-
On the Provisioning page in your Entra portal, do the following:
-
For Provisioning Mode, select Automatic.
-
For Authentication Method, select Bearer Authentication.
-
For Tenant URL, copy and paste the Base URL shown in the Tableau Cloud SCIM settings.
-
For Secret Token, copy and paste the Tableau Cloud SCIM secret that was generated.

-
-
Click the Test Connection button to verify the credentials are working as expected, and then click Save.
-
In the Mappings section, verify that Provision Microsoft Entra ID Groups and Provision Microsoft Entra ID Users are enabled.

-
Select Provision Microsoft Entra ID Groups, and on the Attribute Mappings page, review the attributes synchronized from Entra ID to Tableau Cloud. To save any changes, click Save.

-
Select Provision Microsoft Entra ID Users, and on the Attribute Mapping page, review the attributes synchronized from Entra ID to Tableau Cloud. To save any changes, click Save.

Step 3: Assign groups to the Tableau Cloud app
Use the following steps to assign groups to the Tableau Cloud gallery app in Microsoft Entra ID.
-
From the application page, select Enterprise Apps > Users and groups.
-
Click Add user/group.
-
On the Add Assignment page, select a group and assign one of the following site roles:
-
Creator
-
SiteAdministratorCreator
-
Explorer
-
SiteAdministratorExplorer
-
ExplorerCanPublish
-
Viewer
-
Unlicensed
-
-
Click Assign.
Note: You'll receive an error if you select a role that is not in the above list. For more information about site roles, see Set Users’ Site Roles.
Create groups for site roles
A user can be a member of multiple groups in Entra ID , but they will only receive the most permissive site role in Tableau Cloud. For example, if a user is a member of two groups with site roles Viewer and Creator, Tableau will assign the Creator site role.
To keep track of role assignments, we recommend creating role-specific groups in Entra ID, such as “Tableau - Creator”, “Tableau - Explorer”, etc. You can then use the groups to quickly provision new users for the correct role in Tableau Cloud.
Site roles are listed below in order from most permissive to least permissive:
-
Site Administrator Creator
-
Site Administrator Explorer
-
Creator
-
Explorer (Can Publish)
-
Explorer
-
Viewer
Note: Users and their attributes should be managed through Entra ID. Changes made within Tableau Cloud directly may result in unexpected behavior and overwritten values.
Step 4: Provision groups
After you have enabled SCIM support and assigned groups to the Tableau Cloud application in Entra ID, the next step is to provision users to your Tableau Cloud site.
-
On the Provisioning page, expand the Settings section, and define the groups you want to provision to Tableau Cloud in Scope.

Note: The Entra ID setting "Sync all users and groups" is not supported with Tableau Cloud.
-
Toggle Provisioning Status to On.
-
Click Save.
Saving starts the initial synchronization of the groups defined in Scope. Synchronization occurs approximately every 40 minutes as long as the Entra ID provisioning service runs. To manually provision users outside of the schedule, select Provision on demand. For more information about on demand provisioning, see the Microsoft article On-demand provisioning in Microsoft Entra ID(Link opens in a new window).
After provisioning is complete, you should see the groups from Entra ID on the Site Users page in Tableau Cloud.
Change user authentication in Tableau Cloud
By default, provisioned users are assigned the authentication type you associated with SCIM. To change the authentication type for users, use the steps below.
-
In Tableau Cloud, select Users.
-
On the Site Users page, select the check boxes next to the users you want to assign an authentication type.
-
On the Actions menu, select Authentication.
-
In the Authentication dialog, select the preferred authentication type for the user.
For more information about the different authentication types in Tableau Cloud, see Authentication.
Notes for SCIM support with Azure Active Directory
-
You must add a separate Tableau Cloud app for each site you want to manage using SCIM.
-
When deprovisioning a user in the Tableau Cloud application in Azure AD or if a user is deleted from Azure AD entirely, the user is converted to an Unlicensed site role in Tableau Cloud. If the user owns any content, you must first reassign ownership of those content assets before you can manually delete the user in Tableau Cloud.
-
Beginning in February 2024 (Tableau 2023.3), the use of SCIM with Grant License on Sign In (GLSI) is supported. GLSI requires the following:
1. Manually enabling the option for a group and selecting the minimum site role for the users who are members of the group directly in Tableau Cloud. It is not possible to set a group with the GLSI attribute in Azure AD, but you can set the attribute for the group you have provisioned from Azure AD in Tableau Cloud.
2. The user must be provisioned as unlicensed from the IdP.