Deploy Data Connect
As of September 2025, Tableau Data Connect is no longer available for new deployments. We recommend that existing customers migrate their Data Connect deployment to Private Connect(Link opens in a new window) or Tableau Bridge(Link opens in a new window). Data Connect will be retired in the future.
Before you deploy Data Connect in your organization verify that you have met the prerequisites:
-
The person or team responsible for deploying Data Connect should have experience with the Linux operating system, shell scripting, Docker, and Kubernetes.
-
Minimum hardware requirements as specified in Plan Your Data Connect Deployment.
-
Networking specification and database access as specified in Plan Your Data Connect Deployment.
Step 1: Set up your cluster
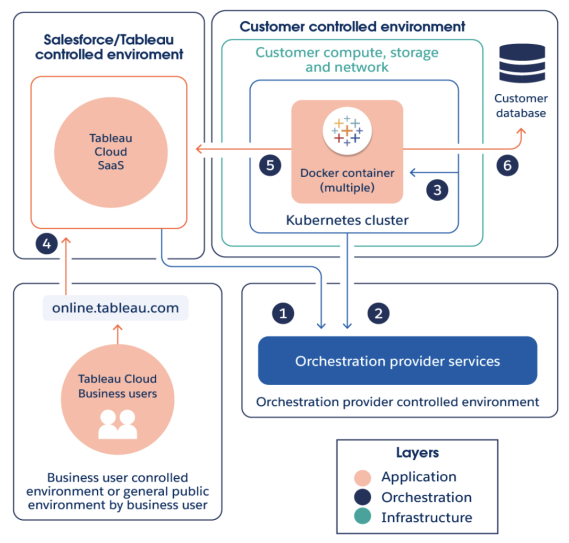
Verify the following connectivity and access:
-
Data Connect infrastructure, cluster, and container require networking access to the orchestration provider services (#2 in the image above) and to Tableau Cloud (outbound only, #5).
-
Data Connect infrastructure, cluster, container, and Agent require networking access to your database (#6).
See Networking specifications.
Deploy and configure
Run the following procedure on each computer in your organization where you want to run the Kubernetes cluster.
-
Verify that your secondary volume is unformatted. On the Linux node, run the following command:
lsblk -fThe following image shows an example where the extra volume
nvme1n1on a cluster node is unformatted and theFSTYPEis empty:
-
On the Data Connect tab, under Pools, click New Pool. In the New Pool window, enter a pool name and then click Create.
-
On the Data Connect tab, under Cluster and Nodes, click New Cluster. In the New Cluster window, enter a cluster name and then click Create.
-
On the cluster you just created, click the Actions column and then click New Node. In the Add New Node window, click Download File.
A cluster.tar file is downloaded to your Downloads folder. This file contains the bootstrapping scripts that you will run on the node.
-
Copy the cluster.tar file onto your computer. The following example shows how to copy the tar file, extract the files, change the script to an executable file, and then run the script. The example shows this in the context of AWS. Change the file paths for your environment.
Run the following commands as root or sudo user, replacing
<key-name>and<IP-address> with your values:> scp -i <key-name>.pem /Downloads/cluster.tar ec2-user@ip-<IP-address>.us-west-2compute.internal:~/> ssh -i <key-name>.pem ex2-user@ip-<IP-address>.us-west-2compute.internal> tar -xvf cluster.tar> chmod +x onboard_node.sh preflight_check.sh> ./onboard_node.shNote: bzip2 is not installed with Ubuntu by default. To install it, run
apt install bzip2 -y.After the script is successfully run, you will see
Successfully performed all operationsin the terminal window and the Tableau team will begin the provisioning process.If you encounter an error, verify that your deployment meets the minimum hardware requirements and networking specifications described in Plan Your Data Connect Deployment.
-
On the Data Connect tab for your site, find in the pool you created in step 2. Under the Actions column, click Assign Cluster and then select the cluster you created in step 3.
-
Click the chevron (⌄) on the cluster to see the host name and available actions. If this information isn't displayed, you may need to reload the page. After confirming the hostname is the target node, click Accept Node and then click Confirm.
The cluster node will transition to Provisioning status. Provisioning the node may take an hour or more.
-
When the status on your node changes to Available, navigate to the pool to which you assigned the cluster and click the actions button (...), and then click Refresh Tokens. Verify that you are refreshing tokens for the correct pool, and then click Confirm.
-
Wait for the token refresh to complete. When complete, the pool status is set to Available. Navigate back to the cluster and click the chevron (⌄) to collapse the cluster name section. Click the actions button for the cluster (...) and then click Get Container Registry Information.
- If you receive an error when attempting this step, the registry is not yet deployed and the provisioning process may still be finalizing. Wait a few minutes and try again.
- When the registry information (server name, user name, and password) is displayed, copy it for the next step.
Step 2: Build your base image and publish
In this step, you will build your base image with the drivers you need, then publish the image to your Docker container registry. Before you begin:
-
Verify that you have your Docker container registry information from the previous step.
-
Each pool can have its own unique base image and set of drivers.
-
If you plan to connect using a TDC file, you will need to include this file in your base image. The system user,
tableau, must have read access to this file. For more information about how to create and store this file, see the Tableau Desktop help topic, Customize and Tune a Connection(Link opens in a new window).
Important Base images will vary according to different drivers and platforms. The examples that follow are intended to illustrate the process of building a base image. You must adapt the build process for your particular environment.
Build the container
The following procedure shows an example of building a container. You may need to install package manager tools or other tools specific to your deployment. Please note that the docker image you build must be from Red Hat because the Tableau Bridge installer is a Red Hat installer (*.rpm file).
-
Log in to any node in the Data Connect cluster. Copy the cluster.tar file onto your computer. The following example shows how to copy the tar file, extract the files, change the script to an executable file, and then run the script. The example shows this in the context of AWS. Change the file paths for your environment.
Run the following commands as root or sudo user, replacing <key-name> and <IP-address> with your values:
scp -i <key-name>.pem /Downloads/cluster.tar ec2-user@ip-<IP-address>.us-west-2compute.internal:~/
ssh -i <key-name>.pem ec2-user@ip-<IP-address>.us-west-2compute.internal
tar -xvf clustertar.tar
chmod +x onboard_node.sh preflight_check.sh
./onboard_node.sh
-
Install Docker and supporting tools as required:
#RedHat
sudo dnf install -y container-tools podman-docker
#Ubuntu
sudo apt-get update -y
sudo apt-get install -y docker.io
-
Create the Dockerfile:
touch Dockerfile
-
Update the Dockerfile to include the drivers to support your connections. The commands specified in this Dockerfile will run during build time for your base image. For example:
# example base
FROM registry.access.redhat.com/ubi8
RUN yum -y update
WORKDIR /
# Go to https://tableau.com/support/drivers
# Follow the instructions to install your drivers for linux
CMD [“/bin/bash”]
The target directory for driver files will vary. See Tableau Driver Download(Link opens in a new window) for more details.
Note: Data Connect supports Exchange Connectors that have a Linux driver and are labeled, "Works with Tableau Cloud via Bridge.” For more information, see Tableau Exchange Connectors(Link opens in a new window).
Example Dockerfile lines for public JDBC driver, using curl command to download the driver:
RUN mkdir -p /opt/tableau/tableau_driver/jdbc
RUN curl --location --output /opt/tableau/tableau_driver/jdbc/<file> <URL>
Example Dockerfile lines for non-public JDBC driver, using copy:
RUN mkdir -p /opt/tableau/tableau_driver/jdbc
COPY  <file> /opt/tableau/tableau_driver/jdbc
Example Dockerfile lines for taco driver, using copy:
RUN mkdir -p /home/tableau/Documents/My_Tableau_Bridge_Repository/Connectors
COPY  <file> /home/tableau/Documents/My_Tableau_Bridge_Repository/Connectors
-
While you are still logged into your Kubernetes cluster node, set the variable POOL_ID with the value of your pool id. To display the pool id value, open the Data Connect tab and click the pool name.
-
Set the registry value that you copied to the respective values.
REGISTRY_HOSTNAME=registry_host_name_you_copied
REGISTRY_USERNAME=registry_user_name_you_copied
REGISTRY_PASSWORD=registry_password_you_copied
-
Set the pool ID value:
POOL_ID=<pool_id_value>
-
-
Build the container, which is used as your base image.
docker build -f <path_to_dockerfile> -t $REGISTRY_HOSTNAME/bridge-base:$POOL_ID .
-
Sign in to your existing Kubernetes node and push the image to the local container registry.
docker login --username $REGISTRY_USERNAME $REGISTRY_HOSTNAME
docker push $REGISTRY_HOSTNAME/bridge-base:$POOL_ID
-
Under the pool you are configuring, click the actions button (...) and click Refresh Base Image. This action will initiate a deployment using the base image and may take up to 10 minutes.
Note: Whenever a new base image is created and refreshed, a new deployment will be created. The bridge agent used for the prior base image will persist as an unassigned asset. Do not delete unassigned bridge agents.
Step 3: Map a domain to a pool
The domain names that you specify in the allowlist are the server names used for the data source connection.
-
While on the Data Connect tab, under the pool and private network allowlist section, select the pool you have assigned and click New Domain in the Actions column.
-
In the Domain text box, enter the URI of the domain using the information described in Allowlist registry rules. The domain URI that you specify will be scoped only to the pool you are configuring.
-
Under Domain permissions, confirm that the Allow radio button is selected.
-
When finished, click Save.
Troubleshooting connection errors
You must configure your network infrastructure so that the Data Connect can reach all required data sources that you would like to connect to. To verify that Data Connect can reach your data sources, run the following curl command from the nodes where Data Connect will run:
$ curl -v $DB_HOSTNAME:$DB_PORT
If you have successfully set up your connection, you should see a collection of responses. Some examples are shown here:
-
Host $DB_HOSTNAME:$DB_PORT was resolved: Confirms the DNS servers successfully resolved the hostname. -
Connected to $DB_HOSTNAME: Confirms the node has network connection. -
Empty reply from server. Closing connection: This is expected since curl is not a database client. -
Could not resolve host: $DB_HOSTNAME: There is an issue with DNS resolution. -
Trying $DB_IP_ADDRESS:$DB_PORT: When this message is followed by a hanging result, there is a network problem.
If you are using a third party for the Data Connection infrastructure, ensure that networking logic is not being disrupted by the third party.
(Optional) Step 4: Share clusters across sites
By default, Data Connect Clusters and their corresponding nodes are used only by the site where they were originally created. But Data Connect clusters can be shared across all sites within your Tableau Cloud Manager tenant. Sharing clusters allows queries on different sites within the tenant to use the same node infrastructure.
To ensure data privacy across the sites, no data about your shared cluster is available to any other sites on your tenant.
Note: Sharing a cluster is a permanent operation. To unshare a cluster you will have to remove and reinstall a cluster.
Clusters can only be shared after they are successfully accepted on the original site where they were created.
To share a Data Connect cluster:
-
Navigate to the cluster you would like to share, click the action ellipsis (...), and then click Share.
After you have shared the cluster, site admins on other sites within your tenant will be able to use the cluster with any pools they create in their site.
(Optional) Step 5: Creating a pool on a shared cluster as a cluster recipient
Before you creating your pool as a recipient on a shared cluster verify the following:
-
The shared cluster has networking connectivity to the databases used by your site
-
All database drivers required by the database in your site must be installed on the cluster
To begin using a shared cluster as a cluster recipient you will need to communicate with the cluster owner to have your pool’s base image added to the cluster:
-
On the Data Connect tab, under Pools, click New Pool.
-
In the New Pool window, enter a pool name and then click Create.
-
In the new pool, click Assign Cluster, select the shared cluster, click the action ellipsis (...), and then click Refresh Tokens.
-
Verify that you are refreshing tokens for the correct pool, and then click Confirm.
-
When the pool status is set to Available, copy the Pool_ID of your pool.. To display the Pool_ID value, click the pool name.
-
Add a base image for your site. See Step 2: Build your base image and publish, above.
The admin with access to the cluster will need to build a new container with the
Pool_IDvalue as part of adding the base image. You will also need the registry values on the site that originally created the cluster, which can be provided by the cluster owner. -
After the base image has been published to the local container registry, navigate to the pool on the share site and then click, Refresh Base Image.
-
To complete setup see, Step 3: Map a domain to a pool, above.
Add a node from an existing cluster
-
Navigate to the cluster and click New Node.
-
Follow steps 4, 5, 7, 8, 9 in the procedure above, Step 1: Set up your cluster. Omit step 6 since you will not need to assign the cluster.
-
After the refresh token step is complete, go to the pool associated with the cluster and click Refresh Base Image.
Note: When a new base image is created and refreshed, a new deployment will be created. The Bridge client used for the prior base image will persist as an unassigned asset. Do not delete unassigned Bridge clients.
Remove a node from an existing cluster
After a node is removed from a cluster the Bridge client will no longer be accessible by Tableau Cloud. Any jobs running on Data Connect at the time the node is deleted will fail. However, no additional jobs will be routed to those Bridge clients.
To remove a node, navigate to the cluster, click the action ellipsis (...), and select Delete.
Updating base images for existing pools
If you decide to utilize a new database or update a driver that your Data Connect cluster will use, you can make changes to existing base images to accommodate those changes. To do so, update the container file with the changes as explained in Step 2: Build your base image and publish. After you have updated the container file, click Refresh Base Image. Deploying the new base imager may take up to 15 minutes. Your previous base image will be used until the new base image has been successfully deployed.
Troubleshooting Database Connectivity
Start by validating that your domains adhere to the allowlist registry rules. See Configure Pools.
Next, confirm that you have configured your network infrastructure so that the Data Connect can reach all required data sources that you would like to connect to. To verify that Data Connect can reach your data sources, run the following curl command from the nodes where Data Connect will run:
$ curl -v $DB_HOSTNAME:$DB_PORT
If you have successfully set up your connection, you should see a collection of responses. Some examples are shown here:
-
Host $DB_HOSTNAME:$DB_PORT was resolved: Confirms the DNS servers successfully resolved the hostname. -
Connected to $DB_HOSTNAME: Confirms the node has network connection. -
Empty reply from server. Closing connection: This is expected since curl is not a database client. -
Could not resolve host: $DB_HOSTNAME: There is an issue with DNS resolution. -
Trying $DB_IP_ADDRESS:$DB_PORT: When this message is followed by a hanging result, there is a network problem.
If you are using a third party for the Data Connection infrastructure, ensure that networking logic is not being disrupted by the third party.