Enable SAML Authentication on a Site or TCM
This topic explains how to enable SAML on the site
Note: Enabling SAML authentication for TCM requires a separate setup and app integration from Tableau Cloud.
This topic assumes you are familiar with the information in Authentication and How SAML Authentication Works.
IdP-specific configuration information
The steps in the sections later in this topic provide basic steps that you can use with your IdP’s documentation to configure SAML for your Tableau Cloud site
Enable SAML
For Tableau Cloud
Sign in to your Tableau Cloud site as a site administrator, and select Settings > Authentication.
On the Authentication tab, click the New Configuration button, select SAML from the Authentication drop-down and then enter a name for the configuration.

Note: Configurations created before January 2025 (Tableau 2024.3) can't be renamed.
For TCM
Alternatively, in TCM, do the following:
Sign in to TCM as a cloud administrator, and select Settings > Authentication.
Select the Enable an additional authentication method tick box, and select SAML from the Authentication drop-down.
Click the Configuration (required) drop-down arrow.
SAML configuration steps
This section takes you through the configuration steps that appear on the Authentication tab in the Tableau Cloud
Note: To complete this process, you will also need the documentation your IDP provides. Look for topics that refer to configuring or defining a service provider for a SAML connection, or adding an application.
Go to your IdP, sign in to your IdP account and use the instructions provided by the IdP’s documentation to download your IdP's metadata. The IdP's metadata enables Tableau Cloud
For step 1, the IdP’s documentation will also guide you in how to provide metadata to a service provider. It will instruct you to download a SAML metadata file, or it will display XML code. If it displays XML code, copy and paste the code into a new text file, and save the file with a .xml extension.
For Tableau Cloud, in the New Configuration page in Tableau Cloud, import the metadata (.xml) file that you downloaded from the IdP or configured manually from the XML it provided.
For TCM, in the Authentication page in TCM, import the metadata (.xml) file that you downloaded from the IdP or configured manually from the XML it provided.
Notes:
- After uploading the IdP metadata, both the IdP entity ID and IdP SSO service URL fields populate automatically.
- If editing the configuration, you will need to upload the metadata file so Tableau knows to use the correct IdP entity ID and SSO service URL.
- You can use the Clear IdP Metadata button if you need to upload a new metadata file.
Attributes contain authentication, authorisation and other information about a user.
Note: Tableau Cloud
Username: (Required) Enter the name of the attribute that stores users’ usernames (email addresses).
Email address: (Optional) Enter the name of the attribute that contains the email address that the IdP uses during the authentication process to enable users to receive notifications at an email address that is different from the username. The email address attribute is used for notifications purposes only and not used for sign-in.
Display name: (Optional but recommended) Some IDPs use separate attributes for first and last names, and others store the full name in one attribute.
Select the button that corresponds to the way your IdP stores the names. For example, if the IdP combines first and last name in one attribute, select Display name, and then enter the attribute name.

Note: Applies to Tableau Cloud only.
Select the method by which users sign in to embedded views. The options are to open a separate pop-up window that displays the IdP’s sign-in form, or to use an inline frame (iframe).
Important: Because iframes can be vulnerable to clickjacking attacks, not all IDPs support signing in through an iframe. With clickjacking, the attacker tries to lure users into clicking or entering content. They do this by displaying the page to attack in a transparent layer over an unrelated page. For Tableau Cloud, an attacker might try to capture user credentials or to get an authenticated user to change settings. For more information, see Clickjacking(Link opens in a new window) on the Open Web Application Security Project website.
If your IdP doesn’t support signing in through an iframe, select Authenticate in a separate pop-up window.
To create the SAML connection between
Select the Export Metadata button to download an XML file that contains the Tableau Cloud SAML entity ID, Assertion Consumer Service (ACS) URL and X.509 certificate.
Select Download Certificate if your IdP expects the required information in a different way. For example, if it wants you to enter the Tableau Cloud entity ID, ACS URL and X.509 certificate in separate locations.
To create the SAML connection between Tableau Cloud and your IdP, you need to exchange required metadata between the two services. To get metadata from Tableau Cloud, choose one of the following methods. See the IdP’s SAML configuration documentation to confirm the correct option.
Select the Export Metadata button to download an XML file that contains the Tableau Cloud SAML entity ID, Assertion Consumer Service (ACS) URL and X.509 certificate.
Select Download Certificate if your IdP expects the required information in a different way. For example, if it wants you to enter the Tableau Cloud entity ID, ACS URL and X.509 certificate in separate locations.

For step 5, use the instructions provided by the IdP’s documentation to submit the TCM metadata.
For step 6, use the instructions provided by the IdP’s documentation to submit the Tableau Cloud metadata.
We highly recommend that you test the SAML configuration to avoid any locked-out scenarios. Testing the configuration helps ensure that you have configured SAML correctly before changing the authentication type of your users to SAML. To test the configuration successfully, make sure that there is at least one user who you can sign in as who is already provisioned in the IdP and added to your Tableau Cloud
If you can't successfully sign in to TCM, start with the troubleshooting steps suggested on the Authentication page. If those steps do not resolve the issue, see Troubleshoot SAML.
We highly recommend that you test the SAML configuration to avoid any locked-out scenarios. Testing the configuration helps ensure that you have configured SAML correctly before changing the authentication type of your users to SAML. To test the configuration successfully, make sure that there is at least one user who you can sign in as who is already provisioned in the IdP and added to your Tableau Cloud
If you can't successfully sign in to Tableau Cloud, start with the troubleshooting steps suggested on the New Configuration page. If those steps do not resolve the issue, see Troubleshoot SAML.
Select existing Tableau Cloud
When you add or import users, you also specify their authentication type. On the Users page, you can change users’ authentication type at any time after adding them.
For more information, see one of the following:
Add Users to a Site or Import Users topic for Tableau Cloud
Manage Users With Tableau Cloud Manager topic for TCM
Note: Applies to Tableau Cloud only.
Let users choose their authentication type
When this option is selected, only a pop-up window will be supported. In this pop-up window, two sign-in options appear where a view is embedded: a sign-in button that uses single sign-on (SSO) authentication and a link to use Tableau credentials as the alternative.
Tip: With this option, users need to know which sign-in option to choose. As part of notification you send your users after you add them to the single sign-on site, let them know which type of authentication to use for a variety of sign-in scenarios. For example, embedded views, Tableau Desktop, Tableau Bridge, Tableau Mobile, and so on.
Tableau with MFA
This option requires users to sign in using
List of authentication configurations
When a specific configuration option is selected, the way users can sign in to embedded views is determined by the setting you configured in step 6 above for the named configuration.
Use Tableau authentication
If a site
If you no longer want an identity provider to handle authentication , or require all users to sign in with their
If you want to keep SAML enabled for some users, but require others to use
Change the site’s authentication type
For Tableau Cloud
Beginning in January 2025 (Tableau 2024.3), you can enable multiple authentication types and methods on a site. To change what authentication you want available on the site, enable or disable the authentication configurations.
Sign in to the Tableau Cloud site as a site administrator.
Select Settings > Authentication.
Disable or enable authentication configurations for the site by clicking the Actions menu and selecting Disable or Enable.
After you make the SAML configuration inactive, the metadata and IdP information are preserved so that if you want to enable it again, you do not need to set up the SAML connection with the IdP again.
For TCM
Sign in to the TCM as a cloud administrator.
Select Settings > Authentication.
Remove the selection from the Enable an additional authentication method tick box.
Update SAML certificate
The certificate used for Tableau site metadata is provided by Tableau and not configurable. To update the certificate for SAML, you must upload a new certificate to your IdP and re-exchange the metadata with Tableau Cloud.
For Tableau Cloud
Sign in to the site as a site administrator and select Settings > Authentication.
Under Authentication types, go to the SAML configuration you want to update and click the Actions menu and select Edit.
Open a new tab or window, and sign in to your IdP account.
Use the instructions provided by the IdP’s documentation to upload a new SAML certificate.
Download the new XML metadata file to provide to Tableau Cloud.
Return to the Edit Configuration page in Tableau Cloud, and in step 2, upload the metadata file that you downloaded from the IdP.
Scroll down the page and click the Save and Continue button.
For TCM
Sign in to the TCM as a cloud administrator, and select Settings > Authentication.
From the Authentication drop-down, select SAML > Configuration (required).
Open a new tab or window, and sign in to your IdP account.
Use the instructions provided by the IdP’s documentation to upload a new SAML certificate.
Download the new XML metadata file to provide to TCM.
Return to the Authentication page in TCM, and in step 2, upload the metadata file that you downloaded from the IdP.
Scroll down the page and click the Save and Continue button.
Customise and control data access using user attributes
User attributes are user metadata defined by your organisation. User attributes can be used to determine access in a typical attribute-based access control (ABAC) authorisation model. User attributes can be any aspect of the user profile, including job roles, departmental membership, management level, etc. They might also be associated with run-time user contexts like where the user is signed in or their language preference.
By including user attributes in your workflow, you can control and customise the user experience through data access and personalisation.
- Data access: User attributes can be used to enforce data security policies. This ensures that users only see the information they are authorised to see.
- Personalisation: By passing user attributes like location and role, your content can be customised to display only the information relevant to the user accessing it, making it easier for them to find the information they need.
Summary of steps to pass user attributes
The process of enabling user attributes in a workflow is summarised in the following steps:
- Enable the user attributes setting
- Include user attributes in the assertion
- Ensure the content author includes user attribute functions and relevant filters
- Review the content
Step 1: Enable the user attributes setting
For security purposes, user attributes are only validated in an authentication workflow when the user attribute setting is enabled by a
Sign in to Tableau Cloud and click Settings > Authentication.
Under the Control User Access in Authentication Workflows heading, tick the Enable capture of user attributes in authentication workflows box.
For more information about site settings, see Control User Access in Authentication Workflows.
Step 2: Include user attribute in the assertion
Make sure the assertion contains the user attributes.
Note: Attributes in the SAML response are subject to a 4,096-character limit, with the exception of scope or scp attributes. If the attributes in the response, including user attributes, exceed this limit, Tableau removes the attributes and passes the ExtraAttributesRemoved attribute instead. The content author can then create a calculation with the ExtraAttributesRemoved attribute to determine how to display the content to users when the attribute has been detected.
Example
Suppose you have an employee, Fred Suzuki, who is a manager located in the South region. You want to ensure that, when Fred reviews reports, he is only able to see data for the South region. In a scenario like this, you might include the Region user attribute in the SAML response like in the example below.
<saml:Assertion xmlns:saml="urn:oasis:names:tc:SAML:2.0:assertion"
	<saml;Issuer">https://myidp.okta.com/saml</saml:Issuer">
   <saml;Subject">
	  <saml:NameId Format="urn:oasis:names:tc:SAML:1.1:nameid-format:emailAddress"fsuzuki@example.com</saml:NameID">
   <saml:AttributeStatement xmlns:saml="urn:oasis:names:tc:SAML:2.0:assertion">
  		<saml:Attribute Name="Region" NameFormat="urn:oasis:names:tc:SAML:2.0:attrname-format:unspecified">
  			<saml:AttributeValue">South</saml:AttributeValue">
    	</saml:Attribute">
   </saml:AttributeStatement">
</saml:Assertion">
Step 3: Ensure the content author includes attribute functions
Ensure the content author includes the user attribute functions and related filters to control what data can be displayed in their content. To ensure the user attribute assertions are passed to Tableau, the content must contain one of the following user attribute functions:
USERATTRIBUTE('attribute_name')USERATTRIBUTEINCLUDES('attribute_name', 'expected_value')
The function that the content author uses depends on whether the user attributes are expected to return a single value or multiple values. For more information about these functions and examples of each, see User Functions(Link opens in a new window) in the Tableau Help.
Notes:
- Preview of the content with these functions are not available when authoring in Tableau Desktop or in Tableau Cloud. The function will return NULL or FALSE. To ensure the user functions work as expected, we recommend the author review the functions after making the content available.
- To ensure content is rendered as expected, the content author might consider including a calculation that uses the
ExtraAttributesRemovedthat 1) checks for this attribute and 2) determines what to do with the content if it does, such as show a message. Tableau will only add theExtraAttributesRemovedattribute and will remove all other attributes (exceptscporscope) when the attributes in the SAML XML exceed 4,096 characters. This is to ensure optimal performance and to respect storage limitations.
Example
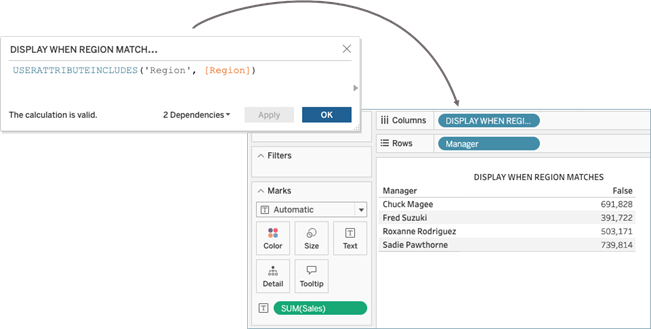
Continuing the example introduced in Step 2: Include user attribute in the assertion above: to pass the “Region” user attribute assertion to a workbook, the author can include USERATTRIBUTEINCLUDES. For example, USERATTRIBUTEINCLUDES('Region', [Region]), where ‘Region’ is the user attribute and [Region] is a column in the data. Using the new calculation, the author can create a table with Manager and Sales data. When the calculation is added, the workbook returns ‘False’ values as expected.
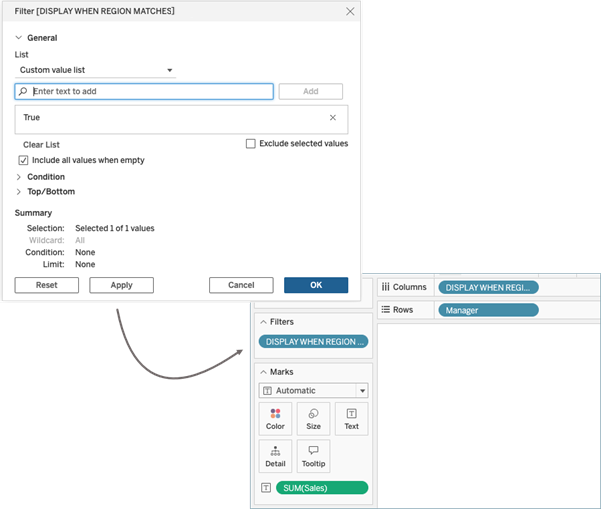
To show only the data associated with the South region in the embedded workbook, the author can create a filter and customise it to show values when the South region is ‘True’. When the filter is applied, the workbook becomes blank as expected because the function is returning ‘False’ values and the filter is customised to show ‘True’ values only.
Step 4: Review the content
Review and validate the content.
Example
To conclude the example from Step 3: Ensure the content author includes attribute functions above, you can see the Sales data in the view is customised to Fred Suzuki because his user context is the South region.

Managers from the regions represented in the workbook should see the value associated with their region. For example, Sawdie Pawthorne from the West region sees data specific to her region.
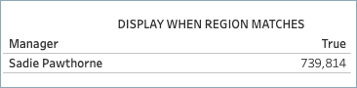
Managers whose regions are not represented in the workbook see a blank workbook.
Known issues and limitations
There are a few known issues and limitations you should consider when working with user attribute functions.
Blank images using the Tableau REST API
Tableau REST API requests Query Preview Image(Link opens in a new window), Query Workbook Image(Link opens in a new window) and Get Custom View Image(Link opens in a new window) produce blank images.
Limitations
- User attribute functions in published data sources (.pds) are not supported.
- User attribute functions in Tableau Bridge workflows are not supported.