Change Installation Settings after Installation
When you install Tableau Desktop and Tableau Prep Builder, there are several features that are turned on by default. For example, with Tableau Desktop, automatic product updates or the ability to automatically save user workbooks is included as part of the install. But you might have some features that you don't want users to have access to, such as the ability to upload crash dump files and logs. As an administrator you can turn some of these features off.
For Windows, you can also configure custom content to show in the Discover pane, replace default accelerator workbooks with custom sample workbooks, and turn some features off during installation. For a list of these features, see Install From the Command Line in Install Tableau Desktop and Tableau Prep Builder from the Command Line.
For Mac, you can configure custom discover pane content, replace default accelerator workbooks with custom workbooks, or turn some features off only after installation. To configure custom content for the Discover pane, replace sample workbook with custom samples, or to change settings after installation (both Windows and Mac), you can change the registry or .plist file then restart the application to see your changes.
To deploy changes to remote computers, you can export the settings from the registry (Windows) or .plist (Mac) file, modify the settings you want to turn off and then use the modified file to create an automated script to push the updates to each computer where Tableau Desktop is installed.
Important: Always make a backup of the registry file before making any changes to it. Editing the Windows registry incorrectly can have harmful effects on your computer.
Set your display language (optional)
When you first runTableau Desktop or Tableau Prep Builder, it recognizes your computer locale using the User Locale setting and uses the appropriate language if it is supported. If you are using an unsupported language, the application defaults to English.
For Tableau Prep Builder, the display format for numbers and dates is based on the locale of the operating system on the machine where the application is installed. For Tableau Desktop you can configure date and number formatting for your workbooks. For more information see Language and Locale(Link opens in a new window) in the Tableau User help.
To configure Tableau Desktop or Tableau Prep Builder to display the user interface (menus, messages, etc.) in a different language, do the following, then restart the application to apply the change.
-
Select Help in the top menu.
-
Select Choose Language.
-
Select the language from the list.
Change your My Tableau Repository location (optional)
During install, Tableau Desktop and Tableau Prep Builder automatically creates a My Tableau <application> Repository folder structure in your documents folder on your computer. If you need to move this repository to another location, for example because you are required to have your data on a network server instead of on your local machine, you can specify a new location and point Tableau Desktop or Tableau Prep Builder to the new folder.
When setting a new location for your repository, the following rules apply:
-
The new folder must be a directory.
-
You must have permissions to write to the new folder.
-
The new folder can't be located in the existing My Tableau Repository folder structure.
Note: Changing the repository location does not move the files contained in the original repository. Instead, Tableau creates a new repository where you can store your files.
-
Open Tableau Desktop or Tableau Prep Builder.
-
From the top menu, select File >Repository Location.
-
In the Select Repository Folder dialog, select a new folder that will act as the new repository location.
-
Restart the application to use the new repository.
Configure the Discover pane to show custom content (Tableau Desktop only)
By default, Tableau provides information such as links to training, blog posts, and public vizzes in the Discover pane in Tableau Desktop to help your users get started using Tableau. The Discover pane shows on launch and persists on the Start page so that these links and information are always at your users fingertips.
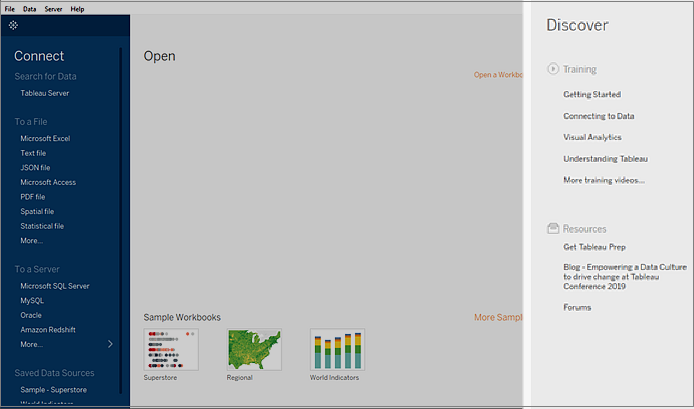
However, you may want to use the Discover pane to show content that is specific to your organization instead. To do that you can create your own web page for your content that is hosted on a webserver that you provide using an https enabled URL, then use the DiscoverPane key and a DiscoverPaneURL value to replace the default content provided by Tableau with content from your custom web page.
Note: For best results don’t use web pages that include javascript or redirects.
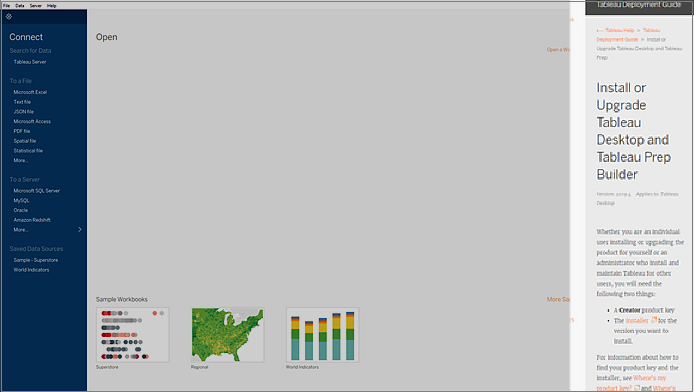
To help you get started quickly, Tableau Desktop provides a template(Link opens in a new window) that models the same layout as the Tableau provided Discover pane. Simply download the template and replace the links with your custom content. The template includes a section for metrics, layout structure and links to content.
Windows
You can configure the Discover pane to point to your custom web page during install when installing using the command line by adding the property DISCOVERPANEURL="<https://YourWebPage.com>" to the command line. If you want to configure the Discover pane to use your custom content after install is complete, then follow the steps below. Restart the application to see your changes.
-
As an administrator on the computer where Tableau is installed, make a backup of the registry file before you make any changes to it.
-
Open the registry editor (
regedit.exe). -
Navigate to the following registry path:
Computer\HKEY_LOCAL_MACHINE\SOFTWARE\Tableau\Tableau <version>. For exampleComputer\HKEY_LOCAL_MACHINE\SOFTWARE\Tableau\Tableau 2020.1 -
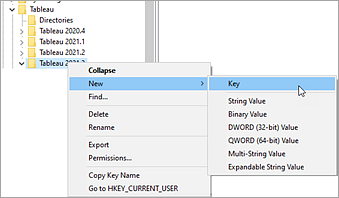
Right-click on your Tableau version and select New > Key and name it DiscoverPane.
-
In the right pane for the new DiscoverPane key, right-click and select New > String Value and name it DiscoverPaneURL.
-
Right-click on the new DiscoverPaneURL string value and select Modify. Then in the Edit String dialog, in the Value data field, enter the URL for your custom web page. You content must be hosted using an https enabled URL. Using an http enabled URL isn't supported.
For example
https://help.tableau.com/current/desktopdeploy/en-us/desktop_deploy_user.htm.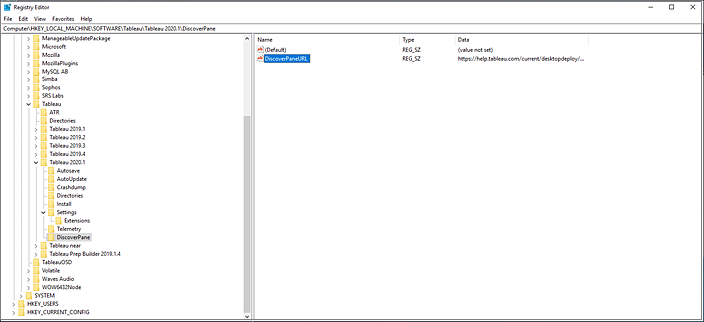
-
To reset the Discover pane back to the Tableau Desktop default content, modify the DiscoverPaneURL value and clear the custom web page URL that you entered, leaving the Value data field blank. When you restart Tableau Desktop the Discover pane will show the default Tableau content.
Mac
Modify the /Users/<local user>/Library/Preferences/com.tableau.Tableau-<version>.plist by adding a DiscoverPane key and a DiscoverPaneURL value. Restart the application to see your changes.
-
Set the value to your custom URL by running the following command from the Terminal command prompt. Use the same capitalization as shown below.
defaults write com.tableau.Tableau-<version> DiscoverPane.DiscoverPaneURL <https://YourWebPageURL>For example, in Tableau Desktop 2020.1, use this command:
defaults write com.tableau.Tableau-<version> DiscoverPane.DiscoverPaneURL https://help.tableau.com/current/desktopdeploy/en-us/desktop_deploy_user.htm -
To reset the Discover pane back to the Tableau Desktop default content, run this command:
defaults write com.tableau.Tableau-<version> DiscoverPane.DiscoverPaneURL “ ”When you restart Tableau Desktop the Discover pane will show the default Tableau content.
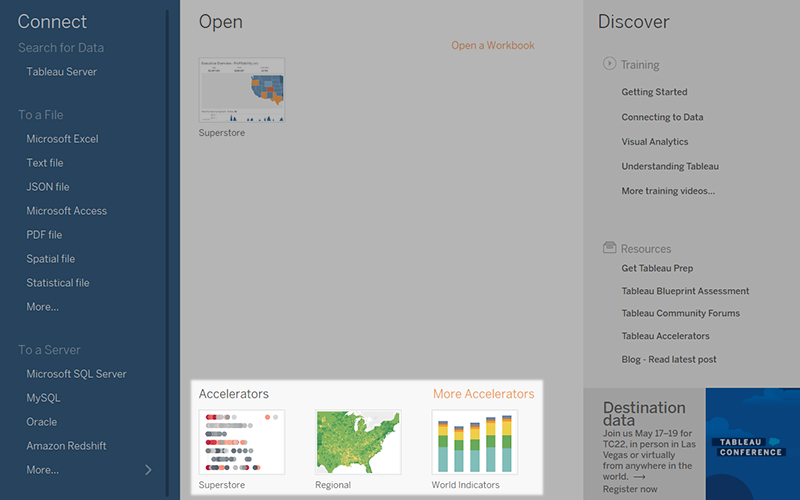
Replace accelerator workbooks with custom workbooks (Tableau Desktop only)
By default, Tableau provides three packaged accelerators to help users explore Tableau. (Prior to version 2022.2, these accelerators were called sample workbooks.) Starting in version 2021.3, you can create up to 5 packaged workbooks targeted to your specific users and replace the accelerators Tableau provides on the Start page Accelerators section with your custom workbooks.
Note: When installing Tableau Server, you can choose to include sample workbooks in the Default site. If you checked the Include samples option during installation, you can publish custom sample workbooks from Tableau Desktop to the Tableau Samples project on your server.
Custom sample workbooks must meet the following requirements:
- You can include a maximum of 5 sample workbooks at one time.
- Only packaged workbook (.twbx) files are supported.
- Workbooks must be stored in directory on a local machine that Tableau and the user has Read access to. Network directories are not supported.
- Workbook file names cannot contain the characters ', ", <, >, or &.
Note: Custom samples aren't persisted when upgrading to a new release version (for example 2021.4). You'll need to specify the file path for your custom samples when installing your upgrade via the command line or modify the registry (Windows) or .plist (MacOS) post upgrade.
Before you start
Windows and Mac
Create a directory on your local machine where the samples are stored and add up to 5 sample packaged workbook (.twbx) files.
You can replace workbook files as needed, but 5 is the maximum number of workbooks that can be shown on the Start page. For information about replacing custom workbooks, see Manage custom workbooks.
Windows
From the command line
When installing from the command line, add the property CUSTOMSAMPLESDIR="path to directory".
For example: tableauDesktop-64bit-2021-3-0.exe /quiet /norestart ACCEPTEULA=1 CUSTOMSAMPLESDIR="C:\Users\mkim\Documents\My Tableau Repository\CustomSamples"
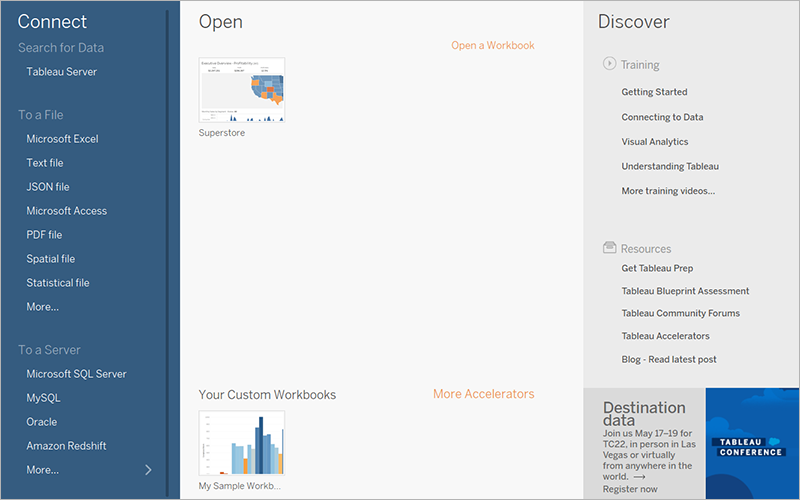
When you launch Tableau Desktop, you should see your custom samples on the Start page.
Post install from the registry
To configure the custom samples directory after install is complete, follow the steps below. Restart the application to see your changes.
-
As an administrator on the computer where Tableau is installed, make a backup of the registry file before you make any changes to it.
-
Open the registry editor (
regedit.exe). -
Navigate to the following registry path:
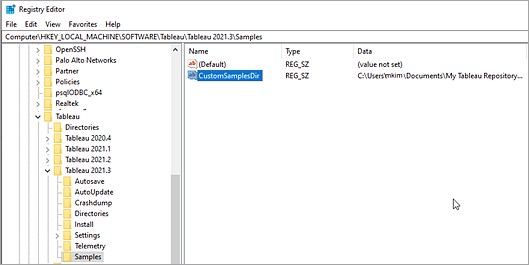
Computer\HKEY_LOCAL_MACHINE\SOFTWARE\Tableau\Tableau <version>. For exampleComputer\HKEY_LOCAL_MACHINE\SOFTWARE\Tableau\Tableau 2021.3 -
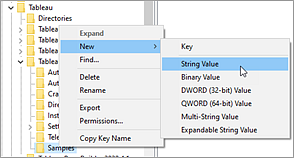
Create a new folder named Samples. Right-click on the Tableau version folder, select New > Key then rename the new folder.
-
Right-click on the Samples folder that you just created and select New > String Value and name it CustomSamplesDir.
-
Right-click on the new CustomSamplesDir string value and select Modify. Then in the Edit String dialog, in the Value data field, enter the full Windows file path to the directory that you set up previously.
-
Restart Tableau Desktop to see your changes. The section is now titled Your Custom Workbooks.
-
To reset back to the Tableau Desktop default content, modify the CustomSamplesDir value and clear the directory path that you entered, leaving the Value data field blank. When you restart Tableau Desktop the Accelerators section on the Start page will show the default Tableau content.
Mac
Modify the /Users/<local user>/Library/Preferences/com.tableau.Tableau-<version>.plist by adding a Samples.CustomSamplesDir key and the sample directory path value. Restart the application to see your changes.
-
Set the value to your custom samples directory by running the following command from the Terminal command prompt. Use the same capitalization as shown below.
defaults write com.tableau.Tableau-<version> Samples.CustomSamplesDir <your directory path>For example, in Tableau Desktop 2021.3, use this command:
defaults write com.tableau.Tableau-2021.3.0 Samples.CustomSamplesDir "/Users/mkim/Documents/My Tableau Repository/CustomSamples" -
To reset back to the Tableau Desktop default content, run this command:
defaults write com.tableau.Tableau-<version> Samples.CustomSamplesDir “ ”When you restart Tableau Desktop the Accelerators section on the Start page will show the default Tableau content.
Manage custom workbooks
When you add custom sample workbooks to Tableau Desktop, a custom.manifest file and worksheet thumbnail images are automatically generated in the custom samples folder that you created when you first open the application.
When replacing custom sample workbooks with new workbooks, you'll need to delete the custom.manifest file so a new file can be generated. Deleting the worksheet thumbnail images is optional.
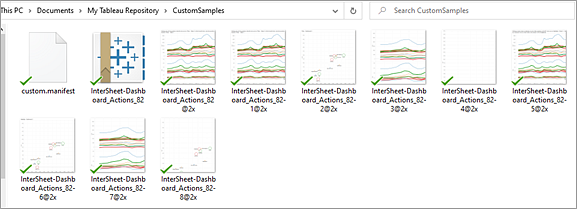
- Navigate to the custom samples folder in your local directory.
- Delete the custom.mainfest file.
- Delete or move the workbooks and any worksheet thumbnail images (optional) for those workbooks from the custom samples folder.
- Add your new packaged (.twbx) workbooks to your custom samples folder.
- Restart the application.
Turn off product updates
The Product Updates feature lets users receive product updates automatically or check for and install maintenance updates as they become available. To turn off Product Updates after Tableau Desktop is installed, you must update the AutoUpdateAllowed key in the registry (Windows) or in the .plist file (Mac) for each computer where Tableau is installed.
Windows
-
As an administrator on the computer where Tableau is installed, make a backup of the registry file before you make any changes to it.
-
Open the registry editor (
regedit.exe). -
Set the
AutoUpdateAllowedregistry key to0. The following table lists the location of the key for different products.
| Product | Location (64-bit Tableau and Windows) |
|
Tableau Desktop |
HKEY_LOCAL_MACHINE\SOFTWARE\Tableau\Tableau <version>\AutoUpdate
|
|
Tableau Desktop Public Edition |
HKEY_LOCAL_MACHINE\SOFTWARE\Tableau\Tableau Public <version>\AutoUpdate
|
|
Tableau Reader |
HKEY_LOCAL_MACHINE\SOFTWARE\Tableau\Tableau Reader <version>\AutoUpdate
|
To enable product updates again, follow the same procedure but set the registry key to 1 instead of 0.
Mac
Run one of the following commands from the Terminal command prompt.
| Product | Command |
|---|---|
| Tableau Desktop | defaults write com.tableau.Tableau-<version> AutoUpdate.AutoUpdateAllowed "0"
For example, in Tableau Desktop 2019.1, use this command:
|
| Tableau Desktop Public Edition | defaults write com.tableau.Tableau-Public-<version> AutoUpdate.AutoUpdateAllowed "0"
|
| Tableau Reader | defaults write com.tableau.Tableau-Reader-<version> AutoUpdate.AutoUpdateAllowed "0"
|
To enable product updates again, run the same command but specify 1 instead of 0.
Turn off file recovery
The file recovery feature enables Tableau Desktop and Tableau Prep Builder (version 2020.3.3 and later) to save your user's workbooks or flow files so that they don't lose work in the event that the application stops unexpectedly. When the user reopens Tableau, a dialog box is shown with a list of the recovered files to select from. The user can open their recovered files and continue where they left off, or they can delete any files they don't want. If they delete the files, then any changes they made since the last time they saved are discarded.
If they delete all of the recovered files in the list for Tableau Desktop or from the Recovered Flows folder for Tableau Prep Builder, the recovery dialog box no longer shows until new recovered files are generated.
The file recovery feature is enabled by default. If you want to disable it, you can change the setting for the AUTOSAVE property (Tableau Desktop) or the maestro.appSettings.autosave setting (Tableau prep Builder). Click the tab for your product to view the steps to turn off file recovery.
When you turn off the file recovery feature, the Enable Autosave menu option will not be available to the user. If you want to re-enable the feature after install, you can deploy a registry (or .plist for Mac) update to change the AUTOSAVE property setting for each computer where Tableau is installed. For more information about how to control this setting during install from the command line, see Install From the Command Line(Link opens in a new window).
To turn off file recovery after Tableau Desktop is installed, you must update the AutosaveAllowed key in the registry (Windows) or in the .plist file (Mac) for each computer where Tableau is installed.
Windows
-
As an administrator on the computer where Tableau Desktop is installed, make a backup of the registry file before you make any changes to it.
-
Open the Registry Editor (
regedit.exe). -
Set the
AutosaveAllowedregistry key to0.Registry key location:
HKEY_LOCAL_MACHINE\SOFTWARE\Tableau\Tableau <version>\Autosave
To enable file recovery again, follow the same procedure but set the AutosaveAllowed registry key to 1 instead of 0.
Mac
Run the following command from the Terminal command prompt.
defaults write com.tableau.Tableau-<version> Autosave.AutosaveAllowed "0"
For example, in Tableau Desktop 2020.3, use this command:
defaults write com.tableau.Tableau-2020.3 Autosave.AutosaveAllowed "0"
To enable file recovery again, run the same command but specify Autosave.AutosaveAllowed "1" instead of "0".
During install, you can turn off the file recovery feature from the command line (Windows) or by clearing the Enable crash recovery check box on the Installation Type step in the custom install section (MacOS). For information about how to turn off the file recovery feature during install, see Before you begin.
To enable or turn off the file recovery feature after Tableau Prep Builder is installed, you must change the property for the maestro.appSettings.autosave setting for each computer where Tableau Prep Builder is installed.
Windows
-
As an administrator on the computer where Tableau Prep Builder is installed, navigate to the app folder. For example:
C:\Program Files\Tableau\Tableau Prep Builder 2020.3\resources\app -
In the app folder open the
application.propertiesfile. -
Set
maestro.appSettings.autosave=false
To enable file recovery again, follow the same procedure but set maestro.appSettings.autosave=true.
Mac
-
Navigate to
/Library/Application Support/Tableau Prep Builder/ -
Open the
application.propertiesfile in a text editor. -
Change
maestro.appSettings.autosave=truetomaestro.appSettings.autosave=false -
Save your changes and close the file.
To enable file recovery again, follow the same procedure, except change maestro.appSettings.autosave=false to maestro.appSettings.autosave=true.
Turn off usage reporting
Tableau collects data that helps us learn how our products are being used so we can improve existing features and develop new ones. All usage data is collected and handled according to the Privacy Policy(Link opens in a new window). If you don't want to participate in this option, you can opt out during or after install.
For information about the types of data we collect, see Tableau Product Usage Data(Link opens in a new window).
If you don't want to participate in this option, you can opt out by selecting the opt out check box during installation or from the command line (Windows) by adding a command line that includes the property SENDTELEMETRY="0".
For information about disabling this option in the user interface see Install From the User Interface(Link opens in a new window). For information about disabling this option from the command line, see Install From the Command Line.
Even when you disable the sending of product usage data, certain basic product data is sent to Tableau. If you don't want to send basic product data to Tableau, you can also disable this option. For more information, see Basic Product Data.
To opt out of this option after installation do one of the following:
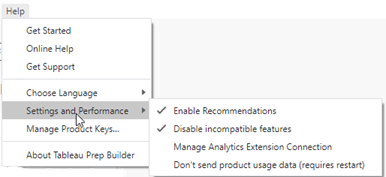
From the product
-
Open Tableau Desktop.
-
From the top menu, select Help >Settings and Performance.
-
Click on Don't send product usage data.
From the registry
To turn off usage reporting at the system level, follow the instructions for your operating system.
Windows
Open a command prompt and run the following command:
REG ADD "HKLM\Software\Tableau\<Tableau Version>\Telemetry" /v TelemetryEnabled /t REG_DWORD /d 0
Alternatively, follow these steps:
-
As an administrator on the computer where Tableau Desktop is installed, make a backup of the registry file before you make any changes to it.
-
Open the Registry Editor (
regedit.exe). -
Set the
TelemetryEnabledregistry key to0.Registry key location:
HKEY_LOCAL_MACHINE\SOFTWARE\Tableau\Tableau <version>\Telemetry
To enable usage reporting again, follow the same procedure but set the registry key to 1 instead of 0.
Mac
Run the following command from the Terminal command prompt.
defaults write com.tableau.Tableau-<version> Telemetry.TelemetryEnabled "0"
For example, in Tableau Desktop 2019.4, use this command:
defaults write com.tableau.Tableau-2019.4 Telemetry.TelemetryEnabled "0"
To enable usage reporting again, run the same command but specify 1 instead of 0.
To opt out of this option after installation do one of the following:
From the product
-
Open Tableau Prep Builder as an administrator.
- Windows: Right-click the application and select Run as Administrator.
- MacOS: From the Terminal command prompt, run
sudo /Applications/Tableau\ Prep\ Builder\ <version>.app/Contents/MacOS/Tableau\ Prep\ Builder.
-
From the top menu, select Help >Settings and Performance.
-
Click on Don't send product usage data.
Note: In version 2019.3.2 and earlier, click on Share Usage Data To Improve Tableau Prep Builder to clear the check mark
From the properties file
Windows
-
Navigate to the app folder in the directory where Tableau Prep Builder is installed. For example
C:\Program Files\Tableau\Tableau Prep Builder <version>\resources\app -
Open the telemetryConfig.properties file in a text editor.
-
Change
maestro.telemetry.enabled=truetomaestro.telemetry.enabled=false -
Save your changes and close the file.
Mac
For Mac, this setting is user-specific. This setting doesn't apply to any other users on the system unless they reinstall the application.
-
Navigate to
~/Library/Application Support/Tableau Prep Builder/ -
Open the telemetryConfig.properties file in a text editor.
-
Change
maestro.telemetry.enabled=truetomaestro.telemetry.enabled=false -
Save your changes and close the file.
Turn off error reporting
If Tableau Desktop or Tableau Prep Builder has a problem and shuts down unexpectedly, crash dump files and logs are generated and placed in the Logs folder in your My Tableau or My Tableau Prep Builder repository. This option is enabled by default.
The data in these files can include machine-specific information, a snapshot of the contents of the memory at the time of the crash (this can include application activity details, data connection information, actions taken by the user or data being worked on in Tableau), and customer-identifiable information.
If your organization is subject to data privacy regulations, you can disable this option. You will need to complete different steps to disable this option for Tableau Desktop versus Tableau Prep Builder. Click on the tabs below to view the instructions for your application.
For Tableau Desktop, the next time the user opens the application, a dialog prompt opens that enables the user to take one of the following actions:
-
Upload the crash files.
-
Decline to upload the crash files.
-
Permanently opt out from uploading the crash files.
If the user uploads the files, they are zipped together into an encrypted package using a 2048-bit RSA key and sent to Tableau so that an engineer can analyze and identify the issues that caused the crash.
The encrypted package includes:
-
Crash dump files (.dmp)
-
Error log files related to the crash (.log)
-
Manifest files related to the crash (.maifest)
If your organization is subject to data privacy regulations, you can disable this prompt from showing by editing the registry (Windows) or running a script (Mac) on each desktop to prevent users from uploading the crash dump files and logs.
Windows
-
As an administrator on the computer where Tableau is installed, make a backup of the registry file before you make any changes to it.
-
Open the Registry Editor (
regedit.exe) -
Set the
CrashReportUploadregistry key to2.Registry key location:
HKEY_CURRENT_USER\Software\Tableau\<version>\Prompts
Mac
Run the following command from the Terminal command prompt:
defaults write com.tableau-<TABLEAU VERSION>.plist Prompts.CrashReportUpload -string 2
For example in Tableau Desktop 2019.1, use this command:
defaults write com.tableau.Tableau-2019.1.plist Prompts.CrashReportUpload -string 2
For Tableau Prep Builder on Windows, you can turn off the error reporting option during install by either clearing the Enable error reporting check box on the Customize dialog or from the command line by including the property CRASHDUMP="0".
To turn this option off after install add the line maestro.enable_fault_reporting=false to the application properties section of the application.properties file.
This file is located in C:\Program Files\Tableau\<Tableau Prep Builder version>\resources\app .
Turn off Web Page objects for dashboards (Tableau Desktop only)
Web Page objects display targeted URLs in a section of a dashboard. During installation, see Install From the Command Line to disable the display of URLs in these objects. After installation, complete the steps below.
Windows
-
As an administrator on the computer where Tableau is installed, make a backup of the registry file before you make any changes to it.
-
Open the Registry Editor (
regedit.exe) -
Set the
WebViewToggleWebZonesEnabledregistry key to0.Registry key location:
HKEY_LOCAL_MACHINE\SOFTWARE\Tableau\<version>\Settings
Mac
Run the following command from the Terminal command prompt.
defaults write /Library/Preferences/com.tableau.Tableau-<version>.plist Settings.WebViewToggleWebZonesEnabled -integer 0
For example, in Tableau Desktop 2020.4 use this command:
defaults write /Library/Preferences/com.tableau.Tableau-2020.4.plist Settings.WebViewToggleWebZonesEnabled -integer 0
To enable Web Page objects again, run the same command but specify -integer 1 instead of -integer 0.
Disable Dashboard and Viz extensions (Tableau Desktop only)
Dashboard and viz extensions expand the dashboard and native visual capabilities of Tableau with the help of web applications created by Tableau and third-party developers.
Tableau supports two standards of extensions: Tableau Trusted extensions, which run on Tableau web servers and undergo Tableau-led reviews before they are deployed, or network-enabled extensions, which run on third-party web servers. Network-enabled extensions support scenarios including instances where the extensions are hosted directly inside your local network or hosted by non-Tableau third-party service outside your local network, such as as a production service provided by a Partner developer... For more information about dashboard and viz extensions, see Use Dashboard Extensions(Link opens in a new window) and Add Viz Extensions to Your Worksheet(Link opens in a new window). For more information about deployment options, see Extension Security - Best Practices for Deployment(Link opens in a new window).
Extensions are enabled by default, allowing the use of Tableau Trusted extensions and network-enabled extensions on Tableau Desktop. Tableau Trusted extensions run automatically, while network-enabled extensions require user permission before running.
If you want to disable extensions during install, set the following properties. For more information, see Install From the Command Line(Link opens in a new window).
DISABLEEXTENSIONS="1": Disables all extension types.-
DISABLENETWORKEXTENSIONS="1": Disables only network-enabled extensions. -
DISABLESANDBOXEXTENSIONS="1": Disables only sandboxed extensions hosted by Tableau -
DISABLETABTRUSTEDEXTENSIONS="1": Disables only Tableau-built extensions hosted by Tableau -
DISABLE3PTRUSTEDEXTENSIONS="1": Disables only Tableau Trusted Partner-built extensions hosted by TableauThese configurations will disable use of extensions or specific types of extensions from use for the Tableau Desktop install. Users will still see options to load dashboard and viz extensions, and have access to Tableau Exchange, but Tableau Desktop will block the use of extensions from running based on the configurations applied.
Disable all extensions after install
To disable all extensions after install, edit the registry (Windows) or run a script (MacOS) on each desktop using the following instructions.
Windows
-
As an administrator on the computer where Tableau is installed, make a backup of the registry file before you make any changes to it.
-
Open the Registry Editor (
regedit.exe) -
Set the
DisableExtensionsregistry key to 1.Registry key location:
HKEY_LOCAL_MACHINE\SOFTWARE\Tableau\Tableau <version>\Settings\Extensions\DisableExtensions
Mac
Run the following command from the Terminal command prompt:
defaults write com.tableau.tableau-<TABLEAU VERSION>.plist Settings.Extensions.DisableExtensions "1"
For example in Tableau Desktop 2019.4, use this command:
defaults write com.tableau.tableau-2019.4.plist Settings.Extensions.DisableExtensions "1"
Disable specific types of extensions after install
Starting in Tableau Desktop 2025.3, desktop administrators may enable and disable specific types of extensions after install. Edit the registry (Windows) or run a script (MacOS) on each desktop using the following instructions.
Windows
As an administrator on the computer where Tableau is installed, make a backup of the registry file before you make any changes to it.
Open the Registry Editor (regedit.exe)
Update any of the following registry keys to 1 to disable use for each type of extension:
-
DISABLENETWORKEXTENSIONS="1": Disables only Network-enabled extensions. -
DISABLESANDBOXEXTENSIONS="1": Disables only sandboxed extensions hosted by Tableau -
DISABLETABTRUSTEDEXTENSIONS="1": Disables only Tableau-Built extensions hosted by Tableau -
DISABLE3PTRUSTEDEXTENSIONS="1": Disables only Tableau Trusted Partner-built extensions hosted by Tableau
Registry key location: HKEY_LOCAL_MACHINE\SOFTWARE\Tableau\Tableau <version>\Settings\Extensions\
Mac
Run any of the following command from the Terminal command prompt:
-
To disable only Network-enabled extensions:
defaults write com.tableau.tableau-<TABLEAU VERSION>.plist Settings.Extensions.DisableNetworkExtensions"1" -
To disable only Sandboxed extensions hosted by Tableau:
defaults write com.tableau.tableau-<TABLEAU VERSION>.plist Settings.Extensions.DisableSandboxExtensions"1" -
To disable only Tableau-Built extensions hosted by Tableau:
defaults write com.tableau.tableau-<TABLEAU VERSION>.plist Settings.Extensions.DisableTabTrustedExtensions"1" -
To disable only Tableau Trusted Partner-built extensions hosted by Tableau :
defaults write com.tableau.tableau-<TABLEAU VERSION>.plist Settings.Extensions.Disable3PTrustedExtensions"1"
For example, to disable use of only network-enabled extensions in a Mac Tableau Desktop 2025.3, use this command:
defaults write com.tableau.tableau-2025.3.plist Settings.Extensions.DisableNetworkExtensions "1"
Change the log folder location
To change the default log folder location on Tableau Desktop see the Knowledge Article, Changing the log folder location on Tableau Desktop(Link opens in a new window).