
Turn On AI in Your Tableau Server Site
Supported in Tableau Server version 2025.3 and later.
Note: Additional capacity for core-based environments is not required when using Tableau Agent in Tableau Server.
For information about how to set up Tableau Agent for Tableau Cloud see Turn On AI in Your Tableau Cloud Site(Link opens in a new window).
As a Tableau Server administrator, you can configure generative AI capabilities for your site. Enabling AI in Tableau allows users to interact with Tableau Agent across Web Authoring, Tableau Prep, and Dashboards (version 2026.3 and later) to simplify data analysis, build calculations, and learn about their dashboard, get insights and ask questions about their data.
Starting in version 2025.3, Tableau Server supports connecting to AI models directly and starting in version 2026.3, you can also route requests through a Custom Gateway (Beta).
For more information about using Tableau Agent see the following resources:
-
Build Views and Explore Data with Tableau Agent(Link opens in a new window)
-
Build Tableau Prep flows with Tableau Agent(Link opens in a new window)
-
Tableau Agent in Dashboards (Beta)(Link opens in a new window)
Considerations
AI in Tableau in Tableau Server relies on connecting to and using your own LLM provider. When configuring AI in Tableau for Tableau Server, consider the following:
PII and data security
Unlike Tableau Cloud, in Tableau Server AI in Tableau connects directly from your Tableau Server deployment to the selected LLM provider or via a custom gateway (version 2026.3 and later). Your requests don’t use the Einstein Trust Layer and its associated data governance features, including built-in PII masking. Tableau sends your user question and a small random sample of values per field to your LLM provider account. For more information, see AI in Tableau and Trust(Link opens in a new window).
Billing
When connecting to Tableau Agent in Tableau Server, you'll use your own LLM provider instance. Because your data is flowing through this dedicated connection, your requests don't go through the Einstein Trust Layer or incur any associated billing. Your usage will be billed directly, according to your specific LLM provider agreement.
Enterprise compliance
Instead of connecting directly to your LLM provider, starting in Tableau Server version 2026.3, you can configure a Custom Gateway (Beta). This enables you to route AI traffic to the model of your choice, and enforce policies such as custom logging, rate limiting, and zero-trust network policies.
To support usage tracking and auditing, Tableau sends the requesting user's identity to your gateway as custom HTTP headers on every /chat/completions and /embeddings request so you can measure usage and active-user population directly from what the gateway receives, without relying on Tableau Server logs.
Note: The identity is carried in the request headers, not the body. In this Beta, the request body uses a custom API spec, which has no user field. Aggregate your logs on the headers, not the payload.
For Beta, you will need to add an intermediate gateway that complies with the Beta API spec so that your LLM gateway can consume requests from Tableau Agent. For more information, see https://github.com/tableau/rest-api-samples/bring-your-own-llm-gatewayREADME.md(Link opens in a new window)
Tableau includes the following user identity request headers:
| Request header | Description |
Tableau-User
|
The user's display name |
Tableau-UserEmail
|
The user's email |
Tableau-SiteName |
The Tableau site name |
Tableau-LLMModel
|
The model being invoked |
Best effort lookup: Tracking requires a successful lookup. For example Tableau-UserEmail is a best-effort lookup. If this header isn't present and is omitted based on your server configuration, the lookup fails but the request still succeeds. To get accurate tracking, build your usage/active-user statistics using a header that is always present, such as Tableau-User.
Prerequisites for enabling AI in Tableau Server
To configure and turn on Tableau Agent for Tableau Server you will need the following:
-
Tableau Server Administrator role. The AI in Tableau site setting is site specific and when turned on, enables all users with access to that site to use the AI feature.
-
Active LLM provider account or Custom Gateway endpoint. Depending on our authentication method, an active deployment with API keys, endpoint URLs, or OAuth credentials
-
Your API key. You'll need this to connect Tableau Server to your OpenAI, Azure OpenAI LLM provider, or your custom gateway when using API key authentication mode. We recommend following standard security best practices and rotating the API key on a regular basis.
-
If you are using Azure OpenAI, a deployed chat/completion and embeddings model in Azure.
-
The LLM models that you want Tableau Agent to use to complete tasks like understanding user requests and returning relevant output. Starting in version 2026.3, if using an OpenAI direct connection, you can accept the suggested defaults. You can also select your own models. If using Azure OpenAI or a custom gateway connection, you’ll need to select your models.
Tableau recommends the following models for best results:
-
Understand user requests (small/quick task model): gpt-4o-mini or later
-
Perform analytic tasks (complex reasoning or large model): gpt-4o or later or Claude Sonnet 4.6 or later
-
Process data context (embedding model): text-embedding-3-small or similar small embedding model supported by your LLM provider.
-
-
If you are using a forward proxy with Tableau Server, you need to configure it for communication with the LLM. For details, see Configure a forward proxy below.
Supported connections
| Connection type | Supported host/provider | Supported authentication modes |
| OpenAI | OpenAI API | API Key |
| Azure OpenAI (Tableau Server version 2026.2 and later) | Microsoft Azure OpenAI Service | API Key |
| Custom Gateway (beta) (Tableau Server version 2026.3 and later) | Any model | No Authentication, API Key, OAuth |
Available features
The following AI in Tableau features are available in Tableau Server:
-
Tableau Web in Authoring: Builds visualizations or completes tasks for you using a conversational UI: Enable users to explore data, create visualizations and calculations, and uncover insights with the assistance of Tableau Agent in Tableau Server web authoring and in Tableau Desktop (version 2025.3 and later). For more information about Tableau Agent, see Explore Your Data with Tableau Agent(Link opens in a new window).
-
Tableau Agent in Dashboards (Beta):Requires Tableau Server+. Not available if using a custom gateway with OAuth authentication. You must opt into the Beta to turn on this feature. Enable Dashboard consumers and authors to quickly get an overview about their dashboard or insights about the visualizations in their dashboard. They can also ask questions about their data using Dashboard Q&A. As a dashboard author you can turn each capability on or off at the dashboard level. You can also configure the dashboard insights to include or exclude certain worksheets, or focus on only certain types of insights. For more information, see Tableau Agent in Dashboards (Beta)(Link opens in a new window).
Note: Tableau Agent in Dashboards requires users to have the AI Access and Full Data Query permission capabilities on all workbooks where they want to use Tableau Agent. The Full Data Query permission ensures Tableau Agent has access to the underlying data needed to function. For more information, see Permissions(Link opens in a new window).
-
Tableau Agent in Tableau Prep: Suggests steps to clean and transform your data: Enable users to clean their data, create calculated fields, and build flows with the help of Tableau Agent. This feature is available in Tableau Prep web authoring in Tableau Server and in Tableau Prep Builder (version 2025.3 and later). For more information about Tableau Agent in Tableau Prep, see Build Tableau Prep flows with Tableau Agent(Link opens in a new window).
Configure AI in Tableau
The steps for configuring AI in Tableau and the information you need to enter differs, based on the LLM provider you select. Configuring a different LLM provider per site is supported.
Step 1: Connect to your LLM provider or Custom Gateway
-
Sign in to Tableau Server as a Server administrator.
-
On the site where you want to turn on generative AI features, select Settings.
-
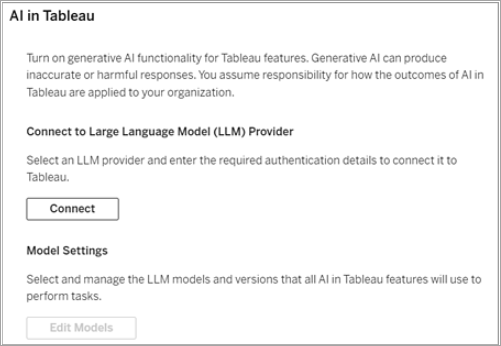
Under AI in Tableau, click Connect.
-
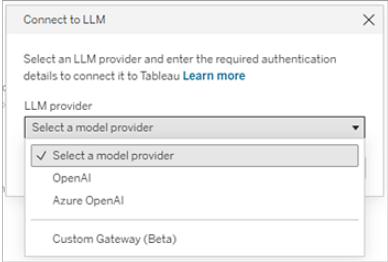
In the Connect to LLM dialog, select your provider from the LLM provider drop-down.
-
Based on your selection, do the following:
-
OpenAI: Enter your API Key.
-
Azure OpenAI: Enter your API Key and Resource Name.
-
Custom Gateway (beta): Accept the disclaimer to opt into the Beta.
-
Enter the Custom Gateway URL (example: https://gateway.example.com/v1).
-
Select the Authentication mode:
-
No authentication: Select when the gateway is secured via internal network rules (e.g., IP whitelisting or VPC/VPN perimeter).
-
API Key: Enter the token/key required by your internal API gateway.
-
OAuth: Provide the required OAuth client details:
-
Client ID & Client Secret: Application credentials generated by your identity provider.
-
Redirect URL: The callback endpoint required by Tableau Server. Enter a valid URL ending with
/auth/add_oauth_token(example:https://<your-server-name>/auth/add_oauth_token). If using HTTP instead of HTTPS, the domain name must belocalhost. -
OAuth Config File: Upload a custom XML configuration file configured for your IDP. For more information, see XML elements(Link opens in a new window) in the Tableau Connector SDK.
-
-
-
-
-
Click Connect.
Step 2: Configure model settings
If using OpenAI, select the recommended models (selected by default), then click Apply. Tableau recommends these models for optimal performance. The models are automatically updated whenever Tableau changes the recommended model.
If you are using Azure OpenAI or a Custom Gateway, you’ll need to select your models. For Azure OpenAI, the models you select must first be deployed and named. Whatever name you use for the deployed model is the same name you’ll type in the model fields. Then you can enter that name in the field.
Manually selected models must also be maintained by you, and the setting updated when models are no longer supported to avoid users losing access to Tableau Agent.
-
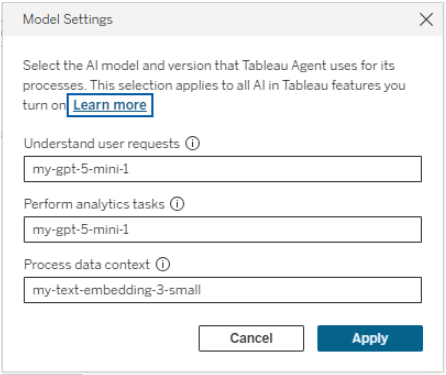
Click Edit Models.
-
In the Model Settings dialog, select or enter the specific Model IDs provided by your LLM host or gateway:
-
Understand user requests: Select or enter the small model identifier (for example, gpt-4o-mini or later).
-
Create visualizations, calculated fields, and build flows: Select or enter the primary reasoning model identifier (for example, gpt-4o or claude Sonnet 4.6).
-
Process data context: Select or enter the embedding model identifier (for example, text-embedding-3-small).
-
-
Click Apply.
Step 3: Turn on AI features for users
Note: Tableau Agent in Dashboards requires Tableau Server version 2026.3 or later, Tableau Server+ and is not available if using a custom gateway with OAuth authentication.
-
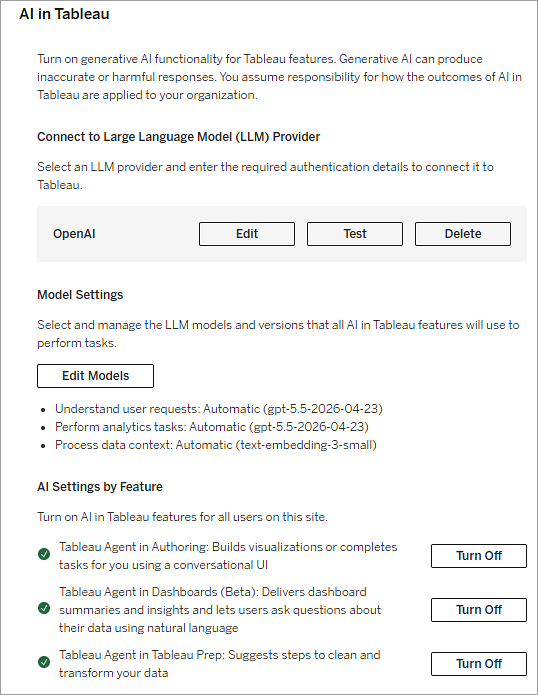
Under AI Settings by Feature, click Turn on for each capability you want to make available to users on this site (Tableau Agent in Web Authoring, Tableau Agent in Tableau Prep, Tableau Agent in Dashboards (Beta)).
-
Click Save at the top of the Settings page.
End-User authentication experience (OAuth gateways)
When a Custom Gateway is configured using OAuth, end users accessing Tableau Agent will be prompted to sign into the LLM gateway and allow access to Tableau Agent.
-
When opening Tableau Agent in a workbook or authoring session, after typing a question, the agent pane will show Sign in to LLM Gateway.
-
Clicking Sign in opens your organization's OAuth/Identity Provider login screen in a separate browser window.
-
Once authenticated, the user is redirected back to Tableau and can interact with Tableau Agent.
Configure a forward proxy
If Tableau Server is configured to use a forward proxy to connect to the internet, then you can configure Tableau Server to use the proxy host and port settings to contact the LLM.
Use the command, tsm configuration set(Link opens in a new window), to make the changes.
-
For HTTPS proxy hosts, use the following key-value pairs:
-k tomcat.https.proxyHost -v host.domain-k tomcat.https.proxyPort -v port_numberFor example, if your proxy server is at https://proxy.example.lan:8443, then run the following commands:
tsm configuration set -k tomcat.https.proxyHost -v proxy.example.lantsm configuration set -k tomcat.https.proxyPort -v 8443tsm pending-changes applyThis will restart Tableau Server. Be aware of this when you are configuring your production environment.
-
For HTTP proxy hosts, use the following key-value pairs:
-k tomcat.http.proxyHost -v host.domain-k tomcat.http.proxyPort -v port_numberAfter you have set these keys, run
tsm pending-changes applyThis will restart Tableau Server. Be aware of this when you are configuring your production environment.