Manage Data Labels
Starting in Tableau Cloud October 2023 and Tableau Server 2023.3, if you have a Data Management license and are an administrator, you can use the label manager to create or edit label names and label categories. These customizations affect the way that labels appear throughout Tableau when users interact with labels.
Note: You can also use the REST API's labelValues methods and labelCategories methods to create and edit labels and label categories. (Tableau Cloud administrators have been able to create and modify label names and descriptions using the labelValues methods since Tableau Cloud June 2023.) For more information, see the Metadata Methods in the REST API Reference(Link opens in a new window).
Label Manager
To use the label manager, log in as an administrator and select Data Labels from the left navigation pane.

Alternatively, if you're logged in as an administrator and you open the Data Labels dialog to label an asset, a Manage labels link shows in the lower-left corner. The Manage labels link leads to the Data Labels page. (In Tableau Server 2023.3 and earlier, the Manage labels link shows in the label selection dropdowns of the individual certification, data quality warning, sensitivity label, and custom label dialogs instead.)

The label manager page shows a row for each label, sorted by label category. Each row includes the label category, name (here known as the value), an Actions menu (...) to perform actions on that label, visibility, and description.

Use the label manager to:
- Edit built-in labels
- Example: You change the name of the built-in "Under maintenance" quality warning to "Maintenance mode".
- Example: You change the visibility of extract refresh monitoring labels from standard visibility to high visibility so that they show in views.
- Create new labels for the existing, built-in categories
- Example: You add a new sensitivity label called "Confidential".
- Revert a built-in label to its default name, description, and visibility
- Example: You previously changed the "Stale data" quality warning name to "Outdated", and you want to revert it to its default name.
- Create custom categories
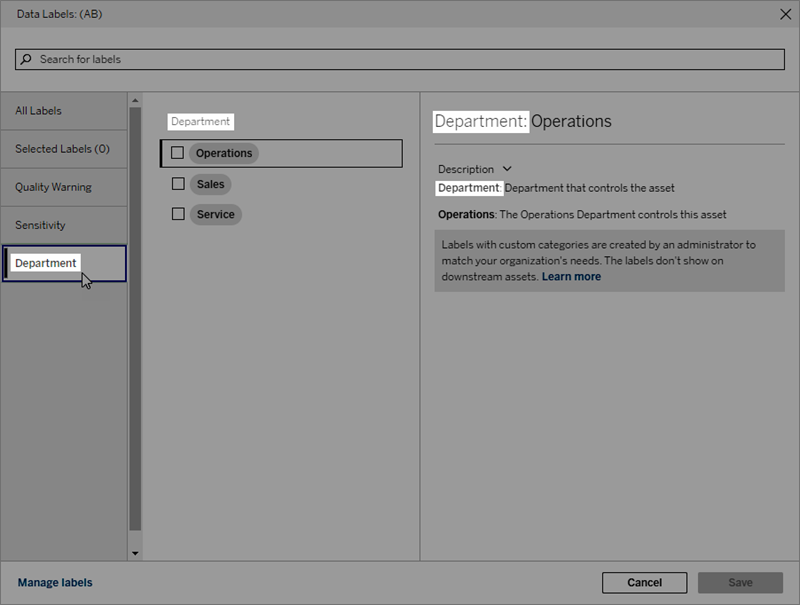
- Example: You create a new label category called "Department" with the intention of adding labels for different business units.
- Create new labels in custom categories
- Example: You create new "Sales", "Service", and "Operations" labels for your newly created "Department" category.
Properties of Data Labels
A label has a name, a category, and a description. Labels with a Quality Warning or Sensitivity category also have a visibility level.
Name
The label name is the common name for the label as it appears in various places. For example, here the label name "Deprecated" is selected in the Quality Warning tab of the Data Labels dialog.

Here the label name "Warning" shows at the top of the "Batters" table page, and again in the label details.

Category
The label category affects where and how the label appears, whether it appears on assets that are downstream from the one it's attached to, and which parts are customizable, among other things. For example, quality warnings and sensitivity labels appear on downstream assets, but other labels with other categories don't. Another example: You can change the description of a certification label, but not the name.
The built-in categories are certification, quality warning, and sensitivity.
For custom categories, users see the category name in the vertical category tabs of the Data Labels dialog, among other places. For example, here the category name "Department" appears in the vertical category tabs, the top of the label name list, and other places.
Description
The label description appears in various places, including in the Data Labels dialog, and helps the user understand what the label is used for. For example, the label description for this quality warning says "This asset is no longer maintained and shouldn't be used."

Visibility
The visibility of a label determines its appearance. High-visibility labels appear in more places and may appear more urgent to the user. You can only set the visibility level on Quality Warning or Sensitivity labels. Furthermore, if a label has a category of Quality Warning, users with permissions can override the default visibility on each asset that they attach a Quality Warning label to. For more information, see the Set a Data Quality Warning and Sensitivity Labels topics.
Create a data label
To create a label:
- From the Data Labels page, select New Label.
- Select a category from the Label category dropdown.
- Enter the label name in the Label value field.
- Enter the label description in the Label description field. You can format the text with bold, underline, and italics, and include a link or an image. To see text formatting tips, hover over the information (i) icon above the Save button.
- If the label has a category of Quality Warning or Sensitivity, set the visibility level. For more information, see Visibility.
- Select Save.

Limitations for creating labels
- You can't create a label in the certification category. The certification category allows only the single, built-in label.
- You can't create new monitoring warnings. However, the extract refresh failure warning and flow run failure warning can be edited in limited ways, as described in the "Edit a label" section.
- The maximum length for a label name is 128 characters in Tableau Cloud and Tableau Server 2024.2 and later. The maximum length for a label name is 24 characters in Tableau Server 2023.3 and earlier.
- The maximum length for a label description is 500 characters.
Edit a data label
To edit an existing label:
- From the Data Labels page, select the Actions (...) menu in the label's row. Or select the row using its checkbox on the left and click the Actions dropdown at the top of the label list.
- Select Edit.
- (Optional) Change the label name using the Label value field.
- (Optional) Change the label description using the Label description field.
- (Optional) If the label has a category of Quality Warning or Sensitivity, set the visibility level. For more information, see Visibility.
- Select Save.
Limitations for editing labels
- You can't change the category on an existing label.
- The maximum length for a label name is 128 characters in Tableau Cloud and Tableau Server 2024.2 and later. The maximum length for a label name is 24 characters in Tableau Server 2023.3 and earlier.
- The maximum length for a label description is 500 characters.
The different label categories allow different degrees of label editing. The following table lists the editable properties of labels with the given categories:
|
Label category |
Can edit label category |
Can edit label names |
Can edit label descriptions |
Can edit label visibility |
|
Certification |
No |
No |
Yes |
N/A |
|
Quality Warning |
No |
Yes1 |
Yes |
Yes2 |
|
Sensitivity |
No |
Yes |
Yes |
Yes |
|
Custom |
No |
Yes |
Yes |
N/A |
1 You can't edit the label name (label value) of the extract refresh or flow run monitoring warnings.
2 The visibility level you set for quality warnings is the default visibility. Users with permission can override the default visibility when they attach a quality warning to an asset. For more information, see Visibility.
Delete a data label
To delete an existing label:
- From the Data Labels page, select the Actions (...) menu in the label's row. Or select the row using its checkbox on the left and click the Actions dropdown at the top of the label list.
- Select Delete.
Limitations for deleting labels
- You can't delete a built-in label. Built-in labels are the default labels in Tableau Server.
Revert a built-in data label to its defaults
If an administrator previously edited a built-in label, the Actions menu for that label contains Revert to default label. Reverting a label to its defaults returns the label's name (value), description, and visibility to its built-in defaults.

Create a data label category
To create a label category:
- From the Data Labels page, select New Label.
- In the New Label dialog, select New Category.
- Enter the category name in the Category name field.
- Enter the category description in the Category description field. You can format the text with bold, underline, and italics, and include a link or an image. To see text formatting tips, hover over the information (i) icon above the Save button.
- Select Save.

Limitations for creating label categories
- The maximum length for a category name is 128 characters in Tableau Cloud and Tableau Server 2024.2 and later. The maximum length for a category name is 24 characters in Tableau Server 2023.3 and earlier.
- The maximum length for a category description is 500 characters.
Edit a data label category
To edit a label category:
- From the Data Labels page, select the label category, then select the pencil icon. Or from the New Label or Edit Label dialogs, select the category in the Label category dropdown and then select the pencil icon next to Category description.
- (Optional) Change the category name using the Category name field.
- (Optional) Change the category description using the Category description field.
- Select Save.
Limitations for editing label categories
- You can't edit a built-in category.
- The maximum length for a category name is 128 characters in Tableau Cloud and Tableau Server 2024.2 and later. The maximum length for a category name is 24 characters in Tableau Server 2023.3 and earlier.
- The maximum length for a category description is 500 characters.
Delete a data label category
Currently, there isn't a method to delete a label category through the regular Tableau Server interface. To delete a category using the REST API, see the Delete Label Category method(Link opens in a new window) in the REST API Reference.
Scenarios for customization
Scenario: Customize a built-in data label
Suppose you decide that the data quality warning called "Warning" could be more specific. As an administrator, you change the label name from the default ("Warning") to something you think is more useful to your organization: "Not approved". The label name "Not approved" now appears in label dialogs when users are selecting labels.
Alternatively, you could change the label description so that the user learns more about the warning in the label dialog. For example: "This asset doesn't meet quality standards required by the marketing department."
Scenario: Create a custom data label
Suppose you want users to have more granular control over classifying the sensitivity of assets. You create two sensitivity labels with the names "Public" and "PII". The custom label names "Public" and "PII" now appear in the label dialog dropdowns and descriptions, alongside the built-in sensitivity label.
Scenario: Create a new data label category and associated data labels
Suppose you need a way to identify the business units that are responsible for assets. You create a label category called "Department". Then you create three labels – "Sales", "Service", and "Operations" – with "Department" as their category. The category "Department" and the three associated labels now appear in the More Data Labels dialog for users to attach to assets.