Configure Tableau Server for OpenID Connect
This topic describes how to configure Tableau Server to use OpenID Connect (OIDC) for single-sign on (SSO). This is one step in a multi-step process. The following topics provide information about configuring and using OIDC with Tableau Server.
-
OpenID Connect Overview
-
Configure Tableau Server for OpenID Connect (you are here)
Notes:
- Before you perform the steps described here, you must configure the OpenID identity provider (IdP) as described in Configure the Identity Provider for OpenID Connect.
- The procedures described in this topic might apply to OIDC authentication configured with identity pools. However, first follow Provision and Authenticate Users Using Identity Pools and refer back to this topic if necessary.
- The Tableau REST API and tabcmd do not support OIDC single-sign (SSO). To use tabcmd or the REST API(Link opens in a new window), users must sign in to Tableau Server using a TableauID account.
-
Open TSM in a browser:
https://<tsm-computer-name>:8850. For more information, see Sign in to Tableau Services Manager Web UI.
-
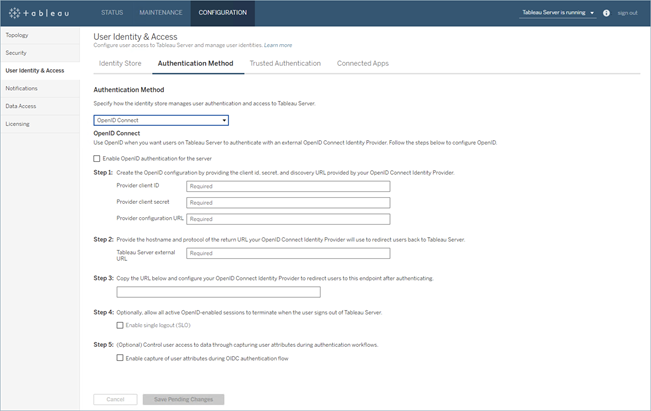
On the CONFIGURATION tab, select User Identity & Access > Authentication Method.
-
Under Authentication Method, select OpenID Connect in the drop-down menu.
-
Under OpenID Connect, select Enable OpenID authentication for the server.
-
Enter the OpenID configuration information for your organization:
Notes:
-
For Step 3: If your provider relies on a configuration file hosted on the local computer (rather than a file hosted at a public URL), you can specify the file with the tsm authentication openid <commands>. Use the
--metadata-file <file_path>option to specify a local IdP configuration file. -
For Step 4: Beginning in Tableau Server 2025.3, you can enable single logout (SLO) and specify a URL to redirect your users to after being signed out.
-
For Step 5: Beginning in Tableau Server 2026.2, you can enable user attributes and its functions as part of the OIDC authentication workflow. For more information, see User attributes in OIDC claims.
-
-
Click Save Pending Changes after you've entered your configuration information.
-
Click Pending Changes at the top of the page:

-
Click Apply Changes and Restart.
The procedure in this section describes how to use TSM command line interface to configure OpenID Connect. You can also use a configuration file for the initial configuration of OpenID Connect. See openIDSettings Entity.
-
Use the
configurecommand of tsm authentication openid <commands> to set the following required options:-
--client-id <id>: Specifies the provider client ID that your IdP has assigned to your application. For example,“xxxkjwdlnaoiloadjkwha".
-
--client-secret <secret>: Specifies the provider client secret. This is a token that is used by Tableau to verify the authenticity of the response from the IdP. This value is a secret and should be kept securely. For example,“xxxhfkjaw72123=".
-
--config-url <url>or--metadata-file <file_path>: Specifies location of provider configuration json file. If the provider hosts a public JSON discovery file, then use--config-url. Otherwise, specify a path on the local computer and file name for--metadata-fileinstead.
-
--return-url <url>: The URL of your server. This is typically the public name of your server, such as"http://example.tableau.com".
For example, run the command:
tsm authentication openid configure --client-id “xxxkjwdlnaoiloadjkwha" --client-secret “xxxhfkjaw72123=" --config-url "https://example.com/openid-configuration" --return-url "http://tableau.example.com"Note:
-
There are additional, optional configurations that you can set for Open ID Connect using openIDSettings Entity. Alternatively, you can use tsm authentication openid <commands>. In addition, if you need to configure IdP claim mapping, see Options for openid map-claims.
-
Beginning in Tableau Server 2025.3, you can use the tsm authentication openid <commands> to optionally enable single logout (SLO).
-
-
Type the following command to enable Open ID Connect:
tsm authentication openid enable -
Run
tsm pending-changes applyto apply changes.If the pending changes require a server restart, the
pending-changes applycommand will display a prompt to let you know a restart will occur. This prompt displays even if the server is stopped, but in that case there is no restart. You can suppress the prompt using the--ignore-promptoption, but this does not change the restart behavior. If the changes do not require a restart, the changes are applied without a prompt. For more information, see tsm pending-changes apply.
Customize and control data access using user attributes
User attributes are user metadata defined by your organization. User attributes can be used to determine access in a typical attribute-based access control (ABAC) authorization model. User attributes can be any aspect of the user profile, including job roles, departmental membership, management level, etc. They might also be associated with run-time user contexts like where the user is signed in or their language preference.
By including user attributes in your workflow, you can control and customize the user experience through data access and personalization.
- Data access: User attributes can be used to enforce data security policies. This ensures that users only see the information they are authorized to see.
- Personalization: By passing user attributes like location and role, your content can be customized to display only the information relevant to the user accessing it, making it easier for them to find the information they need.
Summary of steps to pass user attributes
The process of enabling user attributes in a workflow is summarized in the following steps:
- Enable the user attributes setting
- Include user attributes in the assertion
- Ensure the content author includes user attribute functions and relevant filters
- Review the content
Step 1: Enable the user attributes setting
For security purposes, user attributes are only validated in an authentication workflow when the user attribute setting is enabled by a
-
Open TSM in a browser:
https://<tsm-computer-name>:8850. For more information, see Sign in to Tableau Services Manager Web UI.
-
On the CONFIGURATION tab, select User Identity & Access > Authentication Method.
-
Under Authentication Method, select SAML in the drop-down menu.
-
Under Step 8, select the Enable capture of user attributes during SAML authentication checkbox.
-
When done, do the following:
-
Click Save Pending Changes.
-
Click the Pending Changes button at the top of the page.
-
Click Apply Changes and Restart.
-
Step 2: Include user attribute in the assertion
Make sure the assertion contains the user attributes.
Note: Attributes in the SAML response are subject to 4096 character limit, with the exception of scope or scp attributes. If the attributes in the response, including user attributes, exceed this limit, Tableau removes the attributes and passes the ExtraAttributesRemoved attribute instead. The content author can then create a calculation with the ExtraAttributesRemoved attribute to determine how to display the content to users when the attribute has been detected.
Example
Suppose you have an employee, Fred Suzuki, who is a manager located in the South region. You want to ensure that, when Fred reviews reports, he is only able to see data for the South region. In a scenario like this, you might include the Region user attribute in the SAML response like in the example below.
<saml:Assertion xmlns:saml="urn:oasis:names:tc:SAML:2.0:assertion"
	<saml;Issuer">https://myidp.okta.com/saml</saml:Issuer">
   <saml;Subject">
	  <saml:NameId Format="urn:oasis:names:tc:SAML:1.1:nameid-format:emailAddress"fsuzuki@example.com</saml:NameID">
   <saml:AttributeStatement xmlns:saml="urn:oasis:names:tc:SAML:2.0:assertion">
  		<saml:Attribute Name="Region" NameFormat="urn:oasis:names:tc:SAML:2.0:attrname-format:unspecified">
  			<saml:AttributeValue">South</saml:AttributeValue">
    	</saml:Attribute">
   </saml:AttributeStatement">
</saml:Assertion">
Step 3: Ensure the content author includes attribute functions
Ensure the content author includes the user attribute functions and related filters to control what data can display in their content. To ensure the user attribute assertions are passed to Tableau, the content must contain one of the following user attribute functions:
USERATTRIBUTE('attribute_name')USERATTRIBUTEINCLUDES('attribute_name', 'expected_value')
The function that the content author uses depends on whether the user attributes are expected to return a single value or multiple values. For more information about these functions and examples of each, see User Functions(Link opens in a new window) in the Tableau Help.
Notes:
- Preview of the content with these functions are not available when authoring in Tableau Desktop or in Tableau Cloud. The function will return NULL or FALSE. To ensure the user functions work as expected, we recommend the author review the functions after making the content available.
- To ensure content renders as expected, the content author might consider including a calculation that uses the
ExtraAttributesRemovedthat 1) checks for this attribute and 2) determines what to do with the content if it does, such as show a message. Tableau will only add theExtraAttributesRemovedattribute and removes all other attributes (exceptscporscope) when the attributes in the SAML XML exceed 4096 characters. This is to ensure optimal performance and to respect storage limitations.
Example
Continuing the example introduced in Step 2: Include user attribute in the assertion above, to pass the “Region” user attribute assertion to a workbook, the author can include USERATTRIBUTEINCLUDES. For example, USERATTRIBUTEINCLUDES('Region', [Region]), where ‘Region’ is the user attribute and [Region] is a column in the data. Using the new calculation, the author can create a table with Manager and Sales data. When the calculation is added, the workbook returns “False” values as expected.
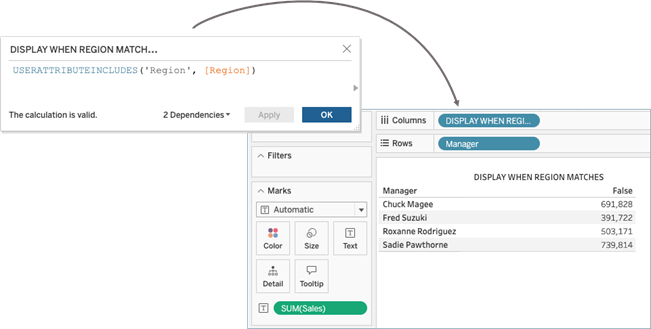
To show only the data associated with the South region in the embedded workbook, the author can create a filter and customize it to show values when the South region is “True.” When the filter is applied, the workbook becomes blank as expected because the function is returning “False” values and the filter is customized to show “True” values only.

Step 4: Review the content
Review and validate the content.
Example
To conclude the example from Step 3: Ensure the content author includes attribute functions above, you can see the Sales data in the view is customized to Fred Suzuki because his user context is the South region.
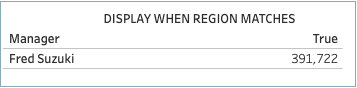
Managers from the regions represented in the workbook should see the value associated with their region. For example, Sawdie Pawthorne from the West region sees data specific to her region.

Managers whose regions are not represented in the workbook see a blank workbook.
Known issues and limitations
There are a few known issues and limitations you should consider when working with user attribute functions.