Pivot Your Data
Note: Starting in version 2020.4.1, you can now create and edit flows in Tableau Server and Tableau Cloud. The content in this topic applies to all platforms, unless specifically noted. For more information about authoring flows on the web, see Tableau Prep on the Web in the Tableau Server(Link opens in a new window) and Tableau Cloud(Link opens in a new window) help.
Sometimes analysing data from a spreadsheet or crosstab format can be difficult in Tableau. Tableau prefers data to be "tall" instead of "wide", which means that you often have to pivot your data from columns to rows so that Tableau can evaluate it properly.
However you may also have scenarios where your data tables are tall and narrow and are too normalised to properly analyse. For example, a sales department that tracks advertising spend in two columns, one called Advertising that contains rows for radio, television and print and one column for total spent. In this type of scenario, to analyse this data as separate measures you would need to pivot that row data to columns.
But what about pivoting larger data sets or data that changes frequently over time? You can use a wildcard pattern match to search for fields that match the pattern and automatically pivot the data.
Use one of the following options when pivoting your data:
Pivot columns to rows
Use wildcard search to instantly pivot fields based on a pattern match (Tableau Prep Builder version 2019.1.1 and later and on the web).
- Pivot rows to columns (Tableau Prep Builder version 2019.1.1 and later and on the web).
No matter how you pivot your fields, you can interact directly with the results and perform any additional cleaning operations to get your data looking just the way you want it. You can also use Tableau Prep's smart default naming feature to automatically rename your pivoted fields and values.
Pivot columns to rows
Use this pivot option to go from wide data to tall data. Pivot from columns to rows on one or more groups of fields. Select the fields that you want to work with and pivot the data from columns to rows.
Connect to your data source.
Drag the table that you want to pivot to the Flow pane.
Do one of the following:
- Tableau Prep Builder Version 2019.4.2 and later and on the web: In the Profile pane, select the fields that you want to pivot, then right-click or Ctrl-click (MacOS) and select Pivot Columns to Rows from the menu. If using this option, skip to step 7.
All versions: Click the plus
 icon, and select Add Pivot from the context menu.
Select Fields (Tableau Prep Builder version 2019.4.2 and later and on the web) Flow Step Menu (all versions) 

(Optional) In the Fields pane, enter a value in the Search field to search the field list for fields to pivot.
- (Optional) Select the Automatically rename pivoted fields and values tick box to enable Tableau Prep to rename the new pivoted fields using common values in the data. If no common values are found, the default name is used.
Select one or more fields from the left pane, and drag them to the Pivot1 Values column in the Pivoted Fields pane.
(Optional) In the Pivoted Fields pane, click the plus
icon to add more columns to pivot on, then repeat the previous step to select more fields to pivot. Your results appear immediately in both the Pivot Results pane and the data grid.Note: You must select the same number of fields that you selected in Step 5. For example if you selected 3 fields to initially pivot on, then each subsequent column that you pivot on must also contain 3 fields.
If you didn't enable the default naming option or if Tableau Prep couldn't automatically detect a name, edit the names of the fields. You can also edit the names of the original fields in this pane to best describe the data.
(Optional) Rename the new Pivot step to keep track of your changes. For example "Pivot months".
To refresh your pivot data when data changes, run your flow. If new fields are added to your data source that need to be added to the pivot, manually add them to the pivot.
Example: Pivoting on multiple fields
This example shows a spreadsheet for pharmaceutical sales, taxes and totals by month and year.

By pivoting the data you can create rows for each month and year and individual columns for sales, taxes and totals so that Tableau can more easily interpret this data for analysis.

Watch "pivot on multiple field" in action.
Use wildcard search to pivot
If you work with large data sets or if your data frequently changes over time, starting in Tableau Prep Builder version 2019.1.1 and on the web, you can use a wildcard search when pivoting columns to rows to instantly pivot your data based on a wildcard pattern match.
If new fields are added or removed that match the pattern, Tableau Prep detects the schema change when the flow is run and the pivot results are automatically updated.
Connect to your data source.
Drag the table that you want to pivot to the Flow pane.
Click the plus
icon, and select Add Pivot from the context menu.In the Pivoted Fields pane, click on the link Use wildcard search to pivot .

Enter a value or partial value that you want to search for. For example, enter Sales_ to match fields that are labelled as sales_2017, sales_2018 and sales_2019.
Do not use asterisks to match the pattern unless they are part of the field value that you are searching for. Instead, click the Search Options
 button to select how you want to match the value. Then press Enter to apply the search and pivot the matching values.
(Optional) In the Pivoted Fields pane, click the plus
icon to add more columns to pivot on, then repeat the previous step to select more fields to pivot.If you didn't enable the default naming option or if Tableau Prep couldn't automatically detect a name, edit the names of the fields.
To refresh your pivot data when data changes, run your flow. Any new fields added to your data source that match the wildcard pattern are automatically detected and added to the pivot.
If the results aren't what you expect, try one of the following options:
Enter a different value pattern in the Search field and press enter. The pivot will automatically refresh and show the new results.
Manually drag additional fields to the Pivot1 Values column in the Pivoted Fields pane. You can also remove fields that were added manually by dragging them off the Pivot1 Values column and dropping them in the Fields pane.
Note: Fields that were added from the wildcard search results can't be removed by dragging them off the Pivot1 Values column. Instead try using a more specific pattern to match the search results you are looking for.
Pivot rows to columns
In Tableau Prep Builder version 2019.1.1 and later and on the web, pivot rows to columns if your data is too normalised and you need to create new columns – going from tall data to wider data.
For example if you have advertising costs for each month that includes all advertising types in one column, if you pivot the data from rows to columns you can then have a separate column for each advertising type instead, making the data easier to analyse.

You can select one field to pivot on. The field values for that field are then used to create the new columns. Then, select a field to use to populate the new columns. These field values are aggregated and you can select the type of aggregation to apply.
Because aggregation is applied, pivoting columns back to rows won't reverse this pivot action. To reverse a row to column pivot type, you will need to undo the action. Either click the Undo button on the top menu, remove the fields from the Pivoted Fields pane or delete the pivot step.
Connect to your data source.
Drag the table that you want to pivot to the Flow pane.
Click the plus
icon, and select Add Pivot from the context menu.In the Pivoted Fields pane, select Rows to Columns from the drop-down list.
- (Optional) In the Fields pane, enter a value in the Search field to search the field list for fields to pivot
Select a field from the left pane, and drag it to the Field that will pivot rows to columns section in the Pivoted Fields pane.
Note: If the field you want to pivot on has a data type of date or datetime, you will need to change the data type to string to pivot it.
The values in this field will be used to create and name the new columns. You can change the column names in the Pivot Results pane later.

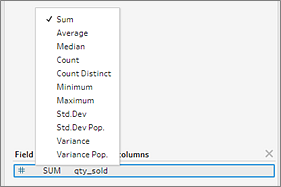
Select a field from the left pane and drag it to the Field to aggregate for new columns section in the Pivoted Fields pane. The values in this field are used to populate the new columns created from the previous step.

A default aggregation type is assigned to the field. Click the aggregation type to change it.
In the Pivot Results pane, review the results and apply any cleaning operations to the new columns that you created.

If the field being pivoted has a change in its row data, right-click or Ctrl-click (MacOS) on the Pivot step in the flow pane and select Refresh.