Connect to Private Cloud Data
This topic describes how a data source owner can publish a data source that connects to cloud data, such as Amazon Redshift and Snowflake, that can only be accessed from a private network.
Data sources that connect to private cloud data rely on Tableau Bridge to keep data fresh. In most cases, Tableau Cloud will automatically detect that Bridge is required as part of the publishing process. However, in some cases, you might need to manually configure your connection to ensure that Bridge is used.
No additional steps are required to use Bridge when publishing virtual connections(Link opens in a new window) that connect to cloud data.
The tasks described in this topic assume Bridge has already been set up and is being maintained by your site admin.
Bridge supports keeping data fresh for data sources embedded in workbooks. See Using Embedded Data Sources.
Limitations
Bridge doesn't support live connections for some private cloud-based data sources. These include Google Drive, Box, OneDrive, Dropbox, and Azure Data Lake Storage Gen2. Use extract connections to keep data fresh. Use Bridge client version 20224.23.0209.1653 or higher when connecting to these private cloud-based data sources. After upgrading the client, republish your data sources.
Set up schedules for private cloud-based data sources
Use the following procedure to ensure that Bridge schedules are used to keep extracts of your private cloud-based data sources up to date.
-
Follow steps 1-7 in the Publish a Data Source(Link opens in a new window) topic in the Tableau User Help.
-
If not already signed in to Tableau Cloud, sign in and navigate to your data source.
-
From the data source page, click the Connections tab and select the check box next to the connection.
-
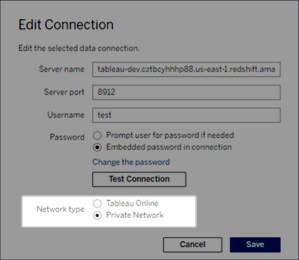
From the Actions drop-down menu next to the connection, select Edit Connection.
-
In the dialog box next to Network type, select the Private Network radio button and click Save.
Changing the network type does not change the network type used by existing schedules for the data source.
If you change the network type for a data source that has an existing schedule associated with it, you must create a new schedule. This also means, if you created a refresh schedule prior to changing the network type, you must delete it before using the Run Now option. For more information about deleting a refresh schedule, see Delete a refresh schedule.
You can proceed to the next step so that a previous Bridge refresh schedule is automatically deleted when you create a new Bridge-dependent refresh schedule.
-
Follow one of the steps below depending on the schedule you need to configure:
-
For a Bridge refresh schedule, follow the steps described here: Add or update an existing schedule.
-
For a Bridge legacy schedule, follow the steps described here: Add a new or update an existing Bridge legacy schedule.
Note: If you had previously set up a Tableau Cloud refresh schedule, it will be deleted automatically when you save the Bridge-dependent schedule.
-
- Click the Schedule Refresh button.
Publish private cloud-based data sources that use live connections
Use the following procedure to ensure that Bridge live queries are used to keep private cloud-based data sources up to data.
Bridge doesn't support refreshing live connections with pools for some private cloud-based data sources. For more information, see Limitations
-
In Tableau Desktop, create your data source.
- Select Server > Publish Data Source to begin the publishing process. If you haven't already signed in to Tableau Cloud, you will be prompted to.
-
In the Publish Data Source to Tableau Cloud dialog box, configure the various options for your data source and ensure you do the following:
- Under Authentication, click Edit and select Embedded password.
- Depending on the data that the data source is connected to or how you've configured the data source, the dialog can default to publishing a live connection or give you the option to publish a live connection or extract. If you are provided with options, select Maintain a live connection.
-
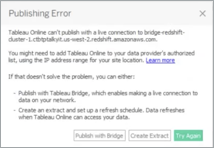
Click the Publish button. This opens a dialog box.
-
In the dialog box, click the Publish with Bridge button. This opens a browser window to Tableau Cloud.
- In the Publishing Complete dialog box, click the Done button.
-
From the data source page, click the Connections tab and select the check box next to the connection.
-
In the dialog box next to Network type, if not selected automatically, select the Private Network radio button and click Save.
Publish OAuth enabled private cloud-based data sources
Tableau Bridge supports OAuth when connecting to private data that uses OAuth and public data that uses OAuth when it’s joined to private data. For most data sources, live connections and extracted data are supported. For a list of OAuth-supported Bridge connectors see Authentication.
Note: For Azure data sources, the data source must be published through Tableau Cloud instead of Tableau Desktop when using OAuth as the authentication type.
Both saved credentials or managed keychain connectors are supported by OAuth. The type of functionality is dependent on the connector that you use.
- In Tableau Desktop, connect to your data housed in a private cloud database.
- Depending on the connector, you may be prompted to choose the authentication type. If you are provided with options, select Sign in using OAuth.
- The Data Source page opens so that you can prepare the data for analysis and begin building your view.
- Choose whether to publish as a live connection or an extract. Some data sources, such as Salesforce, don’t support live connections.
- For extracts, click the Sheet tab to create and save the extract.
- Select Server > Publish Data Source to begin the publishing process. If you haven't already signed in to Tableau Cloud, you will be prompted to.
- Under Authentication, click select the authentication type. The options displayed are dependent on the data source. In most cases, Saved Credentials are recommended. For more information, see Refresh Data Using Saved Credentials.
- If you have saved credentials data source in My Account Settings, select Embed <data source name>.
- For extracted data, choose whether to allow refresh access. When you allow refresh access for extracts, you are prompted to set up a schedule. To schedule for a refresh, you must use embedded credentials.
-
When Bridge is required, your connection will be detected as Private during the publish operation. To change your network connection status, click the Actions menu, and select Edit Connection.