Windows Client Settings

For Windows clients, the default location of the Configuration file is C:\Users\jsmith\Documents\My Tableau Bridge Repository\Configuration\TabBridgeClientConfiguration.txt. The client must be restarted for any changes made to the configuration file to take effect.

Configuration Configuration Option Configurable for Windows? Description
serviceConnectionSettings serviceUrl No Tableau site URL.
  proxyServer Yes Proxy Server and port. See Configure a proxy server.
connection connectTimeout Yes The Bridge client wait time when trying to connect to Tableau Cloud.

Default value: 1 minute

  operationTimeout Yes The Bridge client wait time for each server (such as VizPortal) API call after successfully connecting to Tableau Cloud.

Default value: 15 minutes

  maxAttemptsToRedirectHttpRequests Yes An API call to a server can be redirected from POD to POD. This number specifies the maximum number of redirects per server API call.

Default value: 20

connectionPool Size Yes Applies to Online schedules.

The number of refresh tokens generated at the time of login. The Bridge client uses refresh tokens when a connection to Tableau Cloud is needed. Refresh jobs are processed simultaneously and each job needs a token.

Default value: 10

Minimum value: 1

Maximum value: 100.

Changing this value requires unlinking the client.

dataSourceRefreshSettings shutdownTimeoutInSeconds N/A Obsolete. Not supported.
  downloadDataSourcesInterval Yes The time interval for the temporary downloading the names of live data sources and extract data sources that are assigned to the client for Legacy schedules.

Default value: 30 minutes.

  checkRefreshDataSourcesInterval Yes The time interval for the Bridge client to check data sources assigned to the client to establish if a refresh is needed for Legacy schedules.

Default value: 5 seconds

  extractRefreshTimeout Yes Enforces a time limit for refreshes performed by the client. The timeout limit is the longest allowable time for a single extract to complete a refresh before it's canceled by the client. If an extract refresh is canceled as a result of reaching the timeout limit, you will see a message in the client and an email alert will be sent to the data source owner.

Default value: 24 hours.

For virtual connections, the default extract refresh timeout limit is 2 hours and is controlled on by Tableau Cloud The time limit can’t be controlled by the Bridge client.

  maxRemoteJobConcurrency Yes Applies to Online schedules.

Maximum number of remote refresh jobs allowed by the client. The value for this configuration must be the same or less than connectionPool. Adjust the maximum value to your machine's capabilities such as CPU and RAM. Requires a restart of the client.

Default value: 10

Minimum: 1

Maximum: The value for conectionPool

  JSONLogForExtractRefresh Yes When set to true, the client generates an additional log file in JSON format. The log captures the metrics of extract refreshes, for both Legacy and Remote refreshes, with one line per extract.

The format of the JSON log file is readable by Tableau Desktop and can be used as a data source to create live vizzes. For more information, see JSON File.

An example of the log file is:

ExtractRefreshMetrics_<timestamp>.json

Changing the value of this configuration option requires a restart of the Bridge client.

The loggerSettings configuration options apply to the JSON log file.

Default value: false

  dataSources No Applies to Legacy schedule refresh jobs. Not user editable.

Provides a list of mapped local file locations for file-based data sources.

loggerSettings maxLogFileSizeInMB Yes Maximum size of the log files in MB. When a log file exceeds the size limit, a new log file is created.

Default value: 25 MB.

  maxBackupLogFileCount Yes Maximum number of allowed Bridge log files. When the number of log files exceed the limit, the oldest log file is deleted.

Default is 40.

  remoteRequestLogFileLifeSpan Yes For each Bridge Refresh job that is sent to the client, a new set of log files is created: tabbridgeclijob_<process_id, and if the data source is JDBC-based: fjprotocolserver_<process_id>, and stdout_jprotocolserver_<process_id>.

By default, the maximum amount of time the log files remain in the Logs folder before being deleted is 8 hours if the number of log files exceeds maxBackupLogFileCount. Otherwise, these log files remain indefinitely while the number of log files is less than or equal to maxBackupLogFileCount.

<process_id> represents the Windows process ID.

Default value: 8 hours

dataSyncRestartInterval   N/A Obsolete. Not supported.
internetConnectionMonitorInterval   Yes Interval for Bridge to ping the internet to determine if there is a valid connection.

Default value: 30 seconds

secureStorageMonitorInterval   N/A Obsolete. Not supported.
cleanUpTempDirOnStartUp   Yes Determines whether to remove the temp files when the Bridge client starts.

Default value: true

JSONLogForLiveQuery   Yes When set to true, the client generates an additional log file in JSON format. The log captures the metrics of live query request, with one line per extract.

The format of the JSON log file is readable by Tableau Desktop and can be used as a data source to create live vizzes. For more information, see JSON File.

An example of the log file is:

LiveQueryMetrics_<timestamp>.json

Changing the value of this configuration option requires a restart of the Bridge client.

The loggerSettings configuration options apply to the JSON log file.

Default value: true

Configure a proxy server

The client must be restarted for any changes made to the configuration file to take effect.

  1. On the machine where the client is installed, go to the Configuration folder in the My Tableau Bridge Repository.

  2. Open the TabBridgeClientConfiguration.txt file.

  3. Add proxyServer and provide the URL and port number..

    "serviceConnectionSettings" : {
    "serviceUrl" : "https://online.tableau.com",
    "proxyServer" : {
    "serverName" : "http://localhost",
    "serverPort" : 8888
    },
    "connection" : {
    "connectTimeout" : "00:01:00",
    "operationTimeout" : "00:15:00",
    "maxAttemptsToRedirectHttpRequests" : 20
    },
    "connectionPool" : {
    "size" : 20
    }
    },
  4. Save and close the file.

  5. Exit and restart the client for the changes to take effect.

    The way you restart the client depends on whether the client is running in Application or Service mode.

    • For Application mode: from the client menu, select Exit.

    • For Service mode: from the Mode drop-down menu, select Application; from the client menu, select Exit.

Configure a timeout limit for refreshes

To govern the misuse of extracts or refreshes, you can enforce a time limit, also known as a timeout limit, for refreshes performed by a client. The timeout limit is the longest allowable time for a single extract to complete a refresh before it's canceled by the client.

Note: For extracts of virtual connections, the default extract refresh timeout limit is 2 hours and can’t be controlled by the Bridge client. As an alternative, you can modify the virtual connection to refresh within the default 2 hour window or switch to a published data source.

By default, the timeout limit for a client is set to 24 hours. You can change the timeout limit for a client through the Bridge configuration file. If an extract refresh is canceled as a result of reaching the timeout limit, you will see a message in the client and an email alert will be sent to the data source owner.

The client must be restarted for any changes made to the configuration file to take effect.

  1. On the machine where the client is installed, go to the Configuration folder in the My Tableau Bridge Repository.

  2. Open the TabBridgeClientConfiguration.txt file.

  3. Next to extractRefreshTimeout, change the time allowed for a refresh task to complete.

    Note: If you don't see the parameter in the configuration file, you can add "extractRefreshTimeout" and the desired refresh time to the dataSourceRefreshSettings setting.

  4. Save and close the file.

  5. Exit and restart the client for the changes to take effect.

    The way you restart the client depends on whether the client is running in Application or Service mode.

    • For Application mode: from the client menu, select Exit.

    • For Service mode: from the Mode drop-down menu, select Application; from the client menu, select Exit.

Manage Bridge log files

The client creates logs of activities as part of its normal operation. You can use these logs to monitor refreshes, troubleshoot issues with Bridge, or if Tableau Support requests logs from you to help resolve an issue.

You can manage the size of Bridge log files or increase the time log files remain before being deleted in the TabBridgeClientConfiguration.txt file.

Note: Log files named tabprotosrv* vary from other Bridge log files. The maximum size is 1 MB and the maximum number of allowed log files is 8,192. These values are also not configurable.

  1. On the machine where the client is installed, go to the Configuration folder in the My Tableau Bridge Repository.

  2. Open the TabBridgeClientConfiguration.txt file.

  3. Next to loggerSettings, you can change the values for the following parameters:

    "maxLogFileSizeInMB" : 25

    "maxBackupLogFileCount" : 40

    "remoteRequestLogFileLifeSpan" : "08:00:00"

  4. Save and close the file.

  5. Exit and then restart the client for the changes to take effect.

    The way you restart the client depends on whether the client is running in Application or Service mode.

    • For Application mode: from the client menu, select Exit.

    • For Service mode: from the Mode drop-down menu, select Application; from the client menu, select Exit.

Manage the size of the Bridge pool

By default, each client in a pool can load balance up to 10 refresh jobs at one time. If the number of refresh jobs running at a given time exceeds the capacity of your client pool or you have the hardware resources to support it, consider increasing each client's capacity.

On windows, this procedure requires unlinking the client. Unlinking removes the association between the site and the client. This means for data sources that are refreshed using Bridge (legacy) schedules, unlinking the client removes associations to those data sources, its schedules, and any connection information from the client. As part of modifying the size of the Bridge pool, we recommend you click the Bridge icon in the Windows System tray and note the data sources listed (step 5) to aid the rescheduling process (step 10).

  1. On the machine where the client is installed, go to the Configuration folder in the My Tableau Bridge Repository.

    The default location of the Configuration folder is C:\Users\jsmith\Documents\My Tableau Bridge Repository\Configuration.

  2. Open the TabBridgeClientConfiguration.txt file.

  3. Edit the value next to ConnectionPool.

  4. Save and close the file.

  5. Right-click the Bridge icon in the Windows System tray and select Unlink.

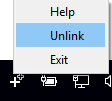
    For more information about the Unlink option, see Stop Keeping Data Fresh Through Bridge.

  6. Exit the client for the changes to take effect.

    The way you exit the client depends on whether the client is running in Application or Service mode.

    • For Application mode: from the client menu, select Exit.

    • For Service mode: from the client menu, select Exit. In the dialog box, select the Exit client and stop activities check box and click Close.

  7. Start Bridge again.

  8. When prompted, sign in Tableau Cloud using your site admin credentials.

Changing maxRemoteJobConcurrency configuration

  1. On the machine where the client is installed, go to the Configuration folder in the My Tableau Bridge Repository.

  2. Open the TabBridgeClientConfiguration.txt file.

  3. Edit the value next to maxRemoteJobConcurrency.

  4. Save and close the file.

  5. Exit the client for the changes to take effect.

    The way you exit the client depends on whether the client is running in Application or Service mode.

    • For Application mode: from the client menu, select Exit.

    • For Service mode: from the client menu, select Exit. In the dialog box, select the Exit client and stop activities check box and click Close.

  6. Start Bridge again.

  7. When prompted, sign in Tableau Cloud using your site admin credentials.

Change the Windows client service

In order for a client to be included in a pool, the client should run as a Windows service (Service mode). By default, a client is set to run as a Windows service so that it can load balance live queries and refreshes in the background without requiring a dedicated user to be logged in to the machine. For a client to run as a Windows service, the Windows user account that runs the client must be a member of the local Administrator group on the machine.

Note: If you're a data source owner and managing the client yourself, your client will not be included in the pool. However, if you want the Bridge (legacy) schedule to run in the background even when you're not logged on to your machine, your client must be running as a Windows service (Service mode).

  1. Open the Windows system tray and click the Bridge icon to open the client.

  2. From the Mode drop-down menu, select Service. A sign-in windows displays.

    Run Tableau Bridge continuously as a Windows service.

  3. Enter your local admin credentials.

    In your list of Windows services, Bridge appears as Tableau Bridge service. You can see this in the Windows Services console or on the Services tab in the Task Manager.

Stop running Bridge as a Windows service

To stop the client from running as a service, change its mode.

  1. Open the Windows system tray and click the Bridge icon to open the client.

  2. From the Mode drop-down menu, select Application.

    Run Tableau Bridge as an application instead of a service.

When the client is running in Application mode, live queries and scheduled refreshes can only run when the user is logged in to the Windows user account on the machine where the client is running from.

Switch the site a Client is associated with

When you want to use a client to keep content published to a different Tableau Cloud site fresh, you can unlink the existing client and authenticate to the new site from the client.

  1. Open the Windows system tray and click the Bridge icon to open the client.
  2. From the drop-down menu, select Unlink.

    Unlink to remove all data information and stop sending refreshes to Tableau Cloud

    Unlink removes the list of data sources that use Bridge (legacy) schedules, schedules, and connection information from the client.

  3. Open the Windows system tray and click the Bridge icon to open the client.

  4. When prompted, sign in to the new site with your site admin credentials.

  5. Do one or both of the following to configure the client:

    • If this client refreshes data sources associated with a specific client, ask data source owners to reconfigure their data sources and refresh schedules.

    • If you want this client to facilitate live connections or extract connections that use Online schedules, ensure that the new client is part of the pool. For more information, see Configure the Bridge Client Pool

When you unlink a client, you might also need to remove the Bridge (legacy) schedules for the data sources that the client was refreshing. The other data sources continue to have data freshness tasks performed by other registered clients in the pool.

For more information, see Stop Keeping Data Fresh Through Bridge.

Thanks for your feedback!