Step 4: Enable Tableau Next AI Features
As of October 14, 2025, Data Cloud has been rebranded to Data 360. During this transition, you may see references to Data Cloud in our application and documentation. While the name is new, the functionality and content remains unchanged.
Who does this step? Tableau Next Admin, Slack Admin
About this step: While optional, these features are integral to Tableau Next.
Set up Agentforce for Analytics
Note: To get started with the Analytics and Visualization Agentforce template, contact your Salesforce representative. For more information, see Explore Metrics and Insights With and Without Agentforce for Analytics(Link opens in a new window).
Why: Agentforce for Analytics includes multiple useful features. Data Pro helps you create and refine calculated fields in Tableau Next. Semantic Model Curation helps you get relationship suggestions and create relationships in Tableau Semantics. Concierge: Analytics Q&A lets you ask questions to explore your data in the Agentforce panel (in a metric details page or in a dashboard view).
This step has four parts.
Activate Agentforce for Analytics
-
From Setup, in the Quick Find box, type
Tableau Next, and select Tableau Next Features. -
Turn on Agentforce for Analytics.
-
Turn on agent capabilities:
-
Concierge: Analytics Q&A: Includes the Data Analysis topic
-
Data Pro: Semantic Model Creation: Includes the Semantic Model Curation topic
-
Create an Agent with the Analytics and Visualization Template
The Tableau Next Admin needs to create this agent only once.
-
Add the Manage AI Agents and Manage Agentforce Employee Agents permission set to the Tableau Next Admin user.
-
From Setup, in the Quick Find box, type and select Users.
-
Select a user and click Permission Set Assignments.
-
Click Edit Assignments.
-
Select a Tableau Next permission set for that user. For information about Tableau Next permissions sets, see Assign Data 360 and Tableau Next permission sets to users.
-
Select the Data Cloud Architect permission set and click Add.
-
Select the Tableau Next Admin permission set and click Add.
-
Save your work.
-
-
Create an Analytics and Visualization Agent and add Data Analysis and Semantic Model Curation topics.
-
From Setup, in the Quick Find box, type Agent, and select Agentforce Agents.
-
Click New Agent.
-
Select Create from a Template, select the Analytics and Visualization template, and then click Next.
-
Review the agent's topics and actions that come with your template.
-
Add Data Analysis and Semantic Model Curation topics.
-
On the Topics panel, click New, and then select Add from Asset Library.
-
Select Data Analysis and Semantic Model Curation topics, and then click Finish.
The topics you’ve added are assigned to your agent and visible on the Topics panel in Agentforce Builder.
-
-
Click Next.
-
Define your agent's settings, such as system messages(Link opens in a new window) and language settings(Link opens in a new window). These settings determine how agents behave and present themselves in conversations.
-
Select a data source to ground your agent's responses with the Answer Questions with Knowledge action, and then click Create. See Assign a Data Library to Your Agent(Link opens in a new window) for more information.
-
Test your agent in Agentforce Builder to confirm that your agent performs as expected and meets your security standards(Link opens in a new window).
-
When you're ready, activate your agent(Link opens in a new window).
-
-
Create a new permission set or profile for Agent access.
You can create permission sets or profiles to control which users can access your new Analytics and Visualization agent. If you already have a permission set that will work for the Analytics and Visualization Agent, you don't need to create a new one.
To create a new permission set:
-
From Setup, in the Quick Find box, type and then select Permission Sets.
-
Click New.
-
Enter your permission set information.
-
Add the required permissions and settings to the permission set. For more information, see Create Permission Sets(Link opens in a new window) and Configure Permissions and Access in Permission Sets(Link opens in a new window) in Salesforce Help.
-
-
Give access to the agent.
-
From Setup, in the Quick Find box, type
Agents, and then select Agentforce Agents. -
On the Agentforce Agents Setup page, click the name of your agent to open its Details page.
-
From the Agent Details page, select the Agent Access tab.
-
The Agent Access tab appears only for Agentforce Employee agents.
-
In Permission Sets with Agent Access, click Add.
-
Search for the permission set you created in the previous step.
-
Click Add.
-
The agent is assigned to the selected permission sets. You can now view the updated access in the Agent Access tab.
For more information, see Manage Employee Agent Access(Link opens in a new window)
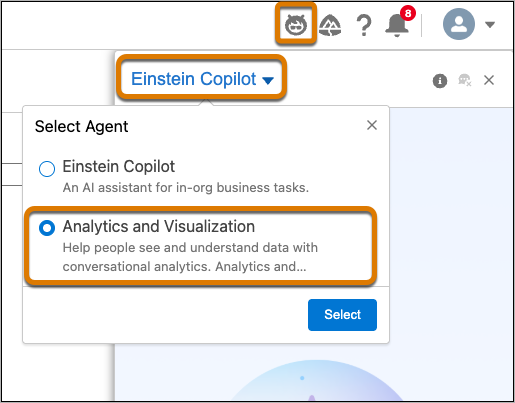
With those steps complete, users can Select Agent and choose the new agent from Agentforce in Tableau Next.
Learn more: Set up Agentforce for Analytics(Link opens in a new window)
Enable Semantics AI
Why: Required for AI-assisted modeling in Tableau Semantics, which includes Create a Calculated Field Action with Agentforce.
-
In Tableau Next, click Administration, and then click Settings.
-
On the General page, enable Data Pro - Semantic Model Curation.
You’re done!
Congratulations! You've configured Tableau Next with powerful Agentic features for analysis in the flow of your work.
Continue to Step 5: Set up and Manage Slack and Metric Insight Summaries