Configure SAML with OneLogin
If you use OneLogin as your SAML identity provider (IdP), you can use the information in this topic to set up SAML authentication for Tableau Cloud
These steps assume that you have permissions for modifying your organization’s OneLogin portal, and you are comfortable reading XML and pasting values into attributes.
Notes:
- These steps reflect a third-party application and are subject to change without our knowledge. If the steps described here do not match the screens you see in your IdP account, you can use the general
- Beginning February 2022, multi-factor authentication (MFA) through your SAML SSO identity provider (IdP) is a Tableau requirement.
- The configuration steps in the IdP may be in a different order than what you see in Tableau.
Step 1: Get started
In Tableau Cloud, do the following:
-
Sign in to your Tableau Cloud site as a site administrator, and select Settings > Authentication.
-
On the Authentication tab, click the New Configuration button, select SAML from the Authentication drop-down, and then enter a name for the configuration.

Note: Configurations created before January 2025 (Tableau 2024.3) can't be renamed.
Alternatively, in TCM, do the following:
-
Sign in to TCM as a cloud administrator, and select Settings > Authentication.
-
Select the Enable an additional authentication method check box, and select SAML from the Authentication drop-down.
-
Click the Configuration (required) drop-down arrow.
In OneLogin, do the following:
-
Open a new browser tab or window, sign in to your OneLogin admin portal, and then do the following:
-
On the Applications page, select Add Apps. Search for Tableau, and in the results, select Tableau Cloud SSO. In this area you configure the SAML connection.
Note: The Tableau Cloud SSO option for OneLogin does not work with Tableau Server.
-
On the Info page, set up your portal preferences. If you have more than one Tableau Cloud site, include the site name in the Display Name field to help users know which site to select.
-
On the SSO page, select and copy the URI shown in the SLO Endpoint (HTTP) field.
Note: Although the label indicates HTTP, the URI provided is an https address, because the SLO (single logout) endpoint uses SSL/TLS encryption.
-
On the same page, select More Actions > SAML Metadata, and save the OneLogin metadata file to your computer.
Step 2: Configure SAML in Tableau Cloud or TCM
Complete the following steps after you download the SAML metadata file from OneLogin, as described in the section above.
For Tableau Cloud
-
Back in Tableau Cloud, on the New Configuration page, under 2. Upload metadata to Tableau, click the Choose a file button and navigate to the SAML metadata file you downloaded from OneLogin.
Important: If you encounter any issues with uploading the OneLogin metadata file, consider using a non-default certificate with OneLogin. To create a new certificate, from the Onelogin admin portal, select Security > Certificates. If you create a new certificate, ensure the Tableau Cloud application in OneLogin uses this new certificate.
-
Continue to 3. Map attributes and set the values as follows:
-
For Username, enter Email. This is the email address the users use to sign in to Tableau Cloud.
-
For Email address, enter the optional attribute value according to the IdP's documentation. This attribute is the email address where the user should receive notifications if different from username. The email address attribute is used for notifications purposes only and not used for sign-in.
-
For Display name, select the First and last name radio button.
-
For First name, enter FirstName.
-
For Last name, enter LastName.
-

-
-
Under 4. Choose default for embedding views (optional), select the experience you want to enable when users access embedded content. For more information, see the About enabling iFrame embedding section below.
-
Click the Save and Continue button.
For TCM
-
Back in TCM, on the Authentication page, under 2. Upload metadata to Tableau, click the Choose a file button and navigate to the SAML metadata file you downloaded from OneLogin.
Important: If you encounter any issues with uploading the OneLogin metadata file, consider using a non-default certificate with OneLogin. To create a new certificate, from the Onelogin admin portal, select Security > Certificates. If you create a new certificate, ensure the TCM application in OneLogin uses this new certificate.
-
Continue to 3. Map attributes and set the values as follows:
-
For Username, enter Email. This is the email address the users use to sign in to TCM.
Note: The Email address field shown above will not appear for TCM.
-
For Email address, enter the optional attribute value according to the IdP's documentation. This attribute is the email address where the user should receive notifications if different from username. The email address attribute is used for notifications purposes only and not used for sign-in.
-
For Display name, select the First and last name radio button.
-
For First name, enter FirstName.
-
For Last name, enter LastName.
-
-
-
Click the Save and Continue button.
Step 3. Configure "Tableau Cloud application" in your IdP
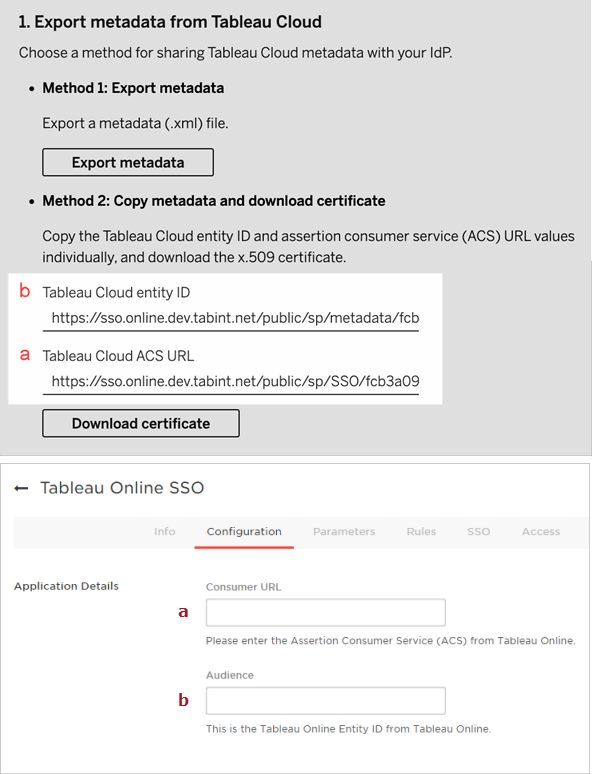
For Tableau Cloud, the procedure in this section will use the information from 5. Get Tableau Cloud Metadata, under Method 2: Copy metadata and download certificate on the New Configuration page in Tableau Cloud.
For TCM, the procedure in this section will use the information from 4. Get Tableau Cloud Metadata, under Method 2: Copy metadata and download certificate on the Authenticaiton page in TCM.
-
Back in the OneLogin portal, in the Tableau Cloud
-
For Consumer URL in the OneLogin portal, paste the Tableau Cloud ACS URL value from Tableau Cloud
-
For Audience in the OneLogin portal, paste the Tableau Cloud entity ID value from Tableau Cloud
-
-
Navigate to the SSO page, select SHA-256 for the SAML Signature Algorithm.
-
Navigate to the Parameters and make sure the values appear as follows:
Tableau Cloud Value Username Email First Name First Name Last Name Last Name
Step 4: Test the SAML configuration
In OneLogin, do the following:
-
Add a sample user to OneLogin and assign them to the "Tableau Cloud application".
In Tableau Cloud
-
Add that OneLogin user to Tableau to test the SAML configuration.
-
To add users in Tableau Cloud, see the Add Users to a Site topic.
-
To add users in TCM, see Manage Users With Tableau Cloud Manager topic.
-
-
Do one of the following:
-
In Tableau Cloud, on the New Configuration page, under 7. Test configuration, click the Test Configuration button.
-
In TCM, on the Authentication page, under 6. Test configuration, click the Test Configuration button.
-
We highly recommend that you test the SAML configuration to avoid any locked out scenarios. Testing the configuration helps ensure that you have configured SAML correctly before changing the authentication type of your users to SAML. To test the configuration successfully, make sure that there is at least one user who you can sign in as who is already provisioned in the IdP and added to your Tableau Cloud
Step 5: Add additional users to the SAML-enabled Tableau Cloud site or TCM
Use the steps below to add additional users to your site. The procedure described in this section is performed on the Tableau Cloud's
-
After you complete the steps above, from the left pane, navigate to the Users page.
-
Follow the procedure described in:
-
Add Users to a Site topic for Tableau Cloud
-
Manage Users With Tableau Cloud Manager topic for TCM
-
About enabling iFrame embedding
Note: Applies to Tableau Cloud only.
When you enable SAML on your site, you need to specify how users sign in to access views embedded in web pages. These steps configure Okta to allow authentication using an inline frame (iFrame) for embedded visualization. Inline frame embedding may provide a more seamless user experience when signing on to view embedded visualizations. For example, if a user is already authenticated with your identity provider and iFrame embedding is enabled, the user would seamlessly authenticate with Tableau Cloud when browsing to pages that contain embedded visualizations.
Caution: Inline frames can be vulnerable to a clickjack attack. Clickjacking is a type of attack against web pages in which the attacker tries to lure users into clicking or entering content by displaying the page to attack in a transparent layer over an unrelated page. In the context of Tableau Cloud, an attacker might try to use a clickjack attack to capture user credentials or to get an authenticated user to change settings. For more information about clickjack attacks, see Clickjacking(Link opens in a new window) on the Open Web Application Security Project website.
-
Open a new browser tab or window, and sign in to your OneLogin admin portal.
-
On the Settings menu, click Account Settings.
-
On the Basic page, in Framing Protection, select the Disable Framing Protection (X-Frame-Options) check box.