Create and Test Data Policies
Use a data policy to filter data in any view, data source, or flow that uses the virtual connection. Use a column in a policy table or an entitlement table to filter the data to only what a user should see.
- Policy table - the tables that are filtered.
- Policy column - column used to filter the data.
- Entitlement table - a table that includes a column you can use to filter the data. Use when policy tables don't include a policy column.
To create a data policy:
- Click

- Click the default name on the tab to rename the policy.
- Double-click the table name in the left pane to add tables to the data policy.
For each policy table, map a column in the policy table to either a policy column or an entitlement table.
Map to a policy column
- Click
 to add one or more columns to use to filter data.
 - Name the policy column. You'll use this name in the policy condition.
- For each policy table, use the drop-down menu to select the table column that maps to the policy column.
- Repeat this process for as many policy columns as you want to use in the policy condition.
Quick clip: Map a table column to a policy column and write a policy condition for a data policy that filters invoices by Salesperson.
Read full topic(Link opens in a new window)
Map to an entitlement table
- Select the entitlement table, drag it to the right and drop it on Add as Entitlement Table. You can use a table from any connection or database as a central entitlement table that secures tables across many other databases.
- For each policy table, click the drop-down menu and select the columns to map the policy table to the entitlement table.
Quick clip: Map an entitlement table (with EmployeeId and Full Name columns) to policy table columns and write a policy condition for the data policy.
A policy condition is a calculation that often uses a user function to define row-level access. More about User Functions(Link opens in a new window) in help online.
A policy condition:
- Is required in a data policy.
- Must evaluate to true or false.
- Shows rows when the policy condition is true.
Example:
FULLNAME() = [EmployeeName]
Test your policy to see the data as the user sees it and ensure that your policy is working as expected.
- Select a table.
- In the Table Details section, select
- Click Preview as user, select a Group (optional) and a User.
- Verify the policy shows the correct data for that user in the table details.
- Repeat for other users as needed.
Save a draft or publish a connection
Your connection is automatically saved as a draft while you work. Manually save the draft by clicking  .
.
To share a new virtual connection with other users, you need to publish it.
- Click
 in the upper right corner of the editor.
 - Type a name for the connection in the Name field.
- Select a project to save the connection to.
- Click
When you edit an existing connection, it remains available to users in its current published state.
- To save updates to a draft, click .
- To make the updated connection available to users, click
Set permissions so others can use the connection
You've published the connection, and you're ready to let others use it. To do this, set the Connect capability to Allowed.
- Navigate to the virtual connection.
- Open the Actions menu (...) and click Permissions.
- Select the box under the Connect icon so that connect is allowed for all users.
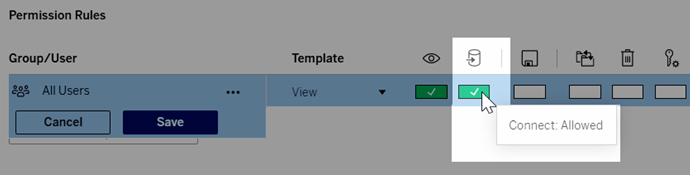
- Click Save.
Read publish and permissions topic(Link opens in a new window)
Related tasks
Not finding what you need?
Go online to see all Tableau help(Link opens in a new window)