Add Tables to the Connection
On the Tables tab:
Add tables
Choose an option:
- On the left, under Tables, double-click table names or select and drag them to the Tables pane on the right. Include an entitlement table, if you're using one.
- Select
 to create a custom table schema, or select Convert to Custom SQL on an existing table and use it as a starting point for Custom SQL.
Select ![]() to get the latest data from the database for all the connections.
to get the latest data from the database for all the connections.
View and edit table details
- Select a table in the Tables tab.
- In the Table Details section, select a column value to make edits like hide or rename a column, or change the data type.
Set individual tables to either live or extract mode:
- Live Only- Queried directly from the database. (Live is the default.)
- Extracts Only- Extracted and saved to Tableau.
Under Tables, select the table or tables you want to change the mode for and select Actions, and Change to Live or Change to Extract.
- Select Create Pending Extracts to create extracts, or Refresh All Extracts to refresh them after creation.
- Select a table's Actions menu (...) > Extract Settings to configure the extract for incremental refresh.
- Schedule extract refreshes on the virtual connection page after you publish the connection.
Read schedule extract topic(Link opens in a new window)
Use the Visibility toggle to show or hide tables from users.
 Users can see table data. Create a policy to govern which data users can see. (Visible is the default.)
 Users can’t see table data. You can use hidden tables in a data policy and as an entitlement table.
Select a table at the top of the Tables tab to see its details below.
Switch the table information you see using these icons:
 Data type for each column.
 Sample data for each column.
 Range of values in a histogram for each column selected.
Quick clip: View your table details.
See Linked keys by selecting to see which columns link to other tables. Linked keys show only when databases have primary and foreign key information.
Save a draft or publish a connection
Your connection is automatically saved as a draft while you work. Manually save the draft by clicking  .
.
To share a new virtual connection with other users, you need to publish it.
- Click
 in the upper right corner of the editor.
 - Type a name for the connection in the Name field.
- Select a project to save the connection to.
- Click
When you edit an existing connection, it remains available to users in its current published state.
- To save updates to a draft, click .
- To make the updated connection available to users, click
Set permissions so others can use the connection
You've published the connection, and you're ready to let others use it. To do this, set the Connect capability to Allowed.
- Navigate to the virtual connection.
- Open the Actions menu (...) and click Permissions.
- Select the box under the Connect icon so that connect is allowed for all users.
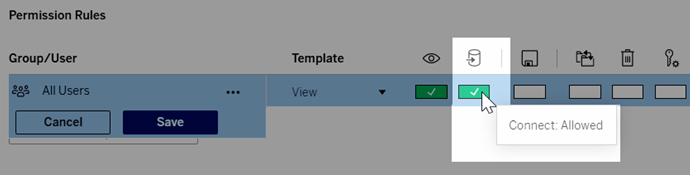
- Click Save.
Read publish and permissions topic(Link opens in a new window)
Read virtual connections topic(Link opens in a new window)
Related tasks
Not finding what you need?
Go online to see all Tableau help(Link opens in a new window)