Set up the Tableau Add-On for Google Workspace
The Tableau add-on for Google Workspace allows you to securely view and interact with Tableau content directly within your workflow. You can embed image snapshots of Tableau visualizations and Pulse metrics into Google Docs and Slides. You can also connect your Tableau Cloud data sources directly to Google Sheets and export data from your Google Sheets to Tableau Cloud.
The add-on is available for Tableau Cloud and Tableau Server and is available through the Google Workspace Marketplace. Tableau administrators are responsible for installing and setting up the app to connect a Tableau site with a Google Workspace environment.
For information about using the Tableau add-on for Google Workspace, see Access Tableau Content in Google Workspace.
Prerequisites
To set up the Tableau add-on for Google Workspace, you need these apps and accounts:
-
Tableau Cloud or Tableau Server
-
A site admin account for Tableau Cloud or a server admin account for Tableau Server
-
A Google Workspace subscription
-
A Google Workspace admin account
-
User licenses for both Tableau and Google Workspace, where each user's Google Workspace email address matches their Tableau username
Install the Tableau add-on
Open the Google Workspace Marketplace and search for the Tableau Add-on listing.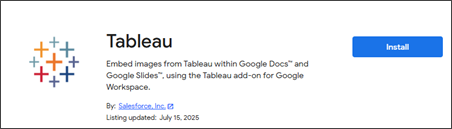
If the install button is unavailable, your Google Workspace admin may have a defined allow-list of available add-ons. Make sure that your Google Workspace admin has added the Tableau Add-on to the allow list. It’s also possible for the Google Workspace admin to auto-install the add-on for users based on Google user groups.
If the install button is active, select it and then open up Google Docs or Slides in a new browser tab. After the add-on has been installed, you'll see a Tableau icon in the right side-panel.
Configure the Tableau add-on
The first time you open the Tableau add-on, you'll be prompted to authorize access. The Tableau add-on needs access to your Google Drive files (For example, Google Docs and Google Slides) to import and export content from Tableau.
Clicking the Authorize Access button will trigger an OAuth notification, which will outline the specific permissions required.
After granting access to the Tableau add-on, you may get one more prompt asking if the add-on can access this specific document of slide. Instead of asking for access to all the user’s Drive files, we only ask for permissions on files you want to use the add-on with. Select Allow.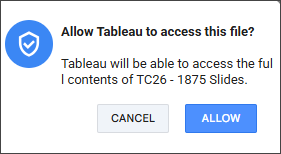
Configure your Tableau site
The first time you open the Tableau add-on, you're prompted to add a site configuration. Use this setting to specify the Tableau Cloud site that you want to integrate with Google Workspace.
Only users with admin permissions on the Tableau Cloud site can manage site configurations.
Step 1: Get your Tableau site details
-
To communicate with your Tableau site, make sure you have a direct trust connected app.
-
If you don't, your Tableau administrator should follow the guidelines for Configuring Connected Apps with Direct Trust.
-
Set the status to Enabled. You can bypass access level and domain allowlist settings because the add-on uses the Tableau REST API.
-
Gather your Tableau connected app’s Client ID, Secret ID, and Secret Value. You'll enter this information when configuring the Tableau add-on.
Step 2: Configure the Tableau add-on
-
Open the Tableau add-on in Google Docs or Google Slides.
-
Select Add new site configuration and enter your Tableau site information and connected app details.
-
Complete the configuration fields as described in the following table.
| Property | Description |
|---|---|
| Label | (Optional): Use this field to create a user-friendly label for the site. If you leave this property blank, the add-on defaults to using the site's name. |
| Tableau Base URL | This is the hostname for your Tableau site. For example, if your Tableau site is accessible at https://us-east-1.online.tableau.com/#/site/devplatembed/home, then the Base Url would be https://us-east-1.online.tableau.com. |
| Tableau Site | Your Tableau site name exactly as it appears in the URL, keeping in mind that this field is case-sensitive. For instance, in the URL example provided earlier, the site name is devplatembed. Note that characters restricted in URLs might cause the site name to differ slightly from its display label in Tableau Cloud. If you're configuring the default site for a Tableau Server instance, this field should remain empty. |
| User Mapping | This setting determines the method the add-on uses to authenticate Google Workspace users within Tableau.
Email: When this option is selected, the add-on uses the user's Google Workspace email address as their Tableau Cloud username. Other attributes: Any custom attributes you’ve established for your users will be listed here. The custom attributes must be set up for each Google user who wants to authenticate to Tableau. See User mapping for more details. |
| Domains checkbox | Each domain that is registered within Google Workspace will have a corresponding checkbox. For additional information, please refer to the section on Domains |
| Connected App Credentials | The Tableau Site details you gathered in step 1. Enter your Tableau connected app’s Client ID Secret ID, and Secret Value. |
-
Select Save and refresh the web page.
The next time you open the Tableau add-on, a dropdown menu shows the list of configured sites.
To start using the Tableau add-on, select the Home button in the top right.
To manage your site configurations, select Settings from the home screen.
User mapping
To authenticate the Tableau add-on with Tableau Cloud or Server, the Google user must be mapped to their corresponding Tableau username. For Tableau Cloud, usernames often correspond to email addresses. By selecting Email from the dropdown, the add-on uses the user's primary Google Workspace email for sign-in.
However, if your Tableau usernames don't align with Google Workspace primary emails, you can use Custom Attributes or External IDs. The add-on supports these alternative authentication methods by automatically including detected custom attributes or external IDs as options in the selection dropdown alongside the standard email choice.
Custom Attributes
You can establish custom attributes via the Google Admin Console. Go to the Directory > Users section, then from the More options menu, select Manage custom attributes.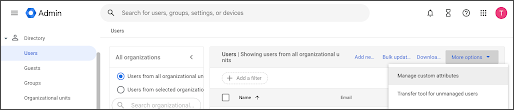
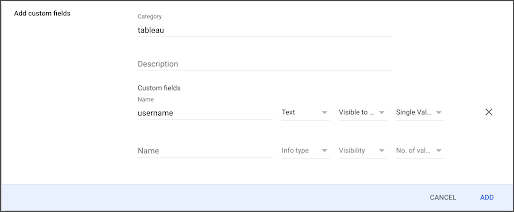
Define the category (schema) and attribute name by selecting the Add Custom Attribute button.
Ensure the following settings are selected from the dropdown menus:
Type: Text
Value: Single Value
Admins have the option to limit the visibility of this custom attribute so that it’s only accessible to themselves and the individual user.
After creating a custom attribute, you must define its value for every user of the Tableau add-on for Google Workspace.
For individual updates, go to the Google Admin Console's Users page, select a user, and enter the value in the User Information section where the new field appears.
To manage these values at scale or sync them with Active Directory, we recommend using the Directory Sync tool. Alternatively, you can automate these updates through the Google Directory API.
External IDs
If you've set up directory syncs that populate External IDs, you can use them in the add-on. However, because Google defines built-in external ID types as arrays, they aren't visible within the add-on. As these arrays can contain multiple values in varying orders for different users, the add-on can't determine which value to select. As a result, the add-on is restricted to supporting external IDs only when they're categorized as a custom type.
Domains
The add-on authenticates to Tableau via the /auth/signin endpoint by passing a JWT. This token includes connected app details and the Google user's Tableau username. To identify the correct site configuration for a specific user, the add-on uses the hostedDomain attribute provided by Google's API.
When site configurations are saved, they’re associated with specific domains. For example, if a user signs in as someuser@salesforce.com, the Google APIs tell the add-on the user’s domain is salesforce.com. The add-on then searches for site configurations associated with that domain to populate the site picker dropdown, a process that is effective for approximately 95% of customers.
In certain scenarios, end users within a single organization may be distributed across various domains, such as user1@salesforce.com and user2@tableau.com. Standard Google APIs don’t provide a mechanism to identify these users as part of the same company unless they’re granted administrative permissions.
To streamline this process, the add-on retrieves all domains linked to a customer during the site configuration setup or update. This allows you to provide Tableau site details one time and apply them across multiple domains simultaneously. The domains checklist will only display extra domains if the user has the necessary permissions to execute that specific API call and those domains are defined within Google Workspace.
Note: Only Super Admins or users that have Domain Management, Users Read permissions can set up the add-on within Google Docs, Slides, or Sheets for multiple domains, as the tool requires administrative directory scopes.