Cloud Admin: Set Up and Share a Private Connection
Private Connection Setup Overview
The private connection consists of Tableau Cloud (the endpoint), AWS (the endpoint service), and the AWS-hosted data provider.
- Tableau Cloud is configured by a cloud administrator.
- The AWS endpoint service and the AWS-hosted data provider are configured separately from Tableau Cloud. Depending on the data provider, you may be able to see information about them or configure them, or you may need to rely on a third party to do so.
Furthermore, both Tableau and AWS need information about each other.
- Tableau Cloud needs the AWS endpoint service name. Tableau Cloud may also need custom address information about the endpoint service if the data provider requires it.
- The AWS endpoint service needs to allow a connection from Tableau Cloud. This is done by adding Identity and Access Management (IAM) Amazon Resource Names (ARNs) as allowed principals to the endpoint service.
After both ends are configured correctly and the private connection is ready, creators can use the private connection to connect securely and privately to the AWS-hosted data provider.
Set up the AWS endpoint service and the AWS-hosted data provider
The setup for the AWS endpoint service and the AWS-hosted data provider varies. Whether you can configure the AWS endpoint service and the AWS-hosted data provider, or you need to rely on a third party, depends on the data provider.
For information on setting up AWS and the AWS-hosted data provider, see the topics for Private Connect AWS Setup.
Set up Tableau Cloud
Prerequisites
- The AWS endpoint service and AWS-hosted data provider is set up. For information on setting up AWS and the AWS-hosted data provider, see the topics for Private Connect AWS Setup.
- You're a cloud administrator, able to use Tableau Cloud Manager (TCM).
- TCM shows available private connection capacity. The top of the private connection table shows private connection capacity as X/Y, where X is current number of private connections, and Y is the maximum number. If there's no available capacity, delete a private connection or talk to your Tableau account manager about more capacity.
- You know the AWS endpoint service name. The endpoint service name begins with "com.amazonaws.vpce", and looks something like this: com.amazonaws.vpce.us-west-1.vpce-svc-0123456789abcdef0. The AWS endpoint name may be visible to you, or you may need to rely on a third party to get the endpoint service name. It depends on the data provider. For more information, see the topics under Private Connect AWS Setup.
- You are aware of allowances or requirements around connecting with a custom address. The group that administers the AWS endpoint service can help determine if you need or have options for a custom address in this field. For more information, see the topics under Private Connect AWS Setup.
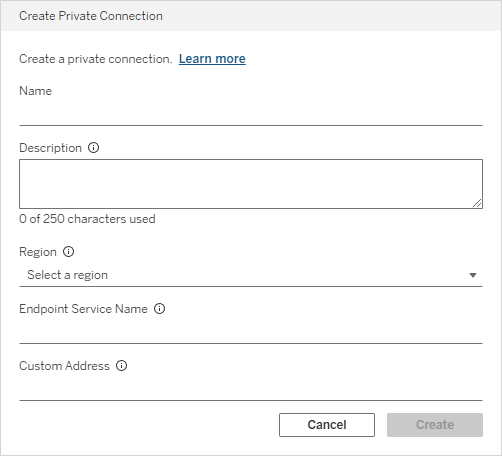
Create a Private Connection
- Log in to Tableau Cloud Manager (TCM).
- Go to Settings.
- Select the Private Connect tab.
- Select Create.
In the Creation Private Connection dialog:
- Enter a Name. Cloud administrators and site administrators can see the private connection name. It has no functional effect on the private connection, but can help administrators distinguish this private connection from others.
- Optionally, enter a Description. Cloud administrators and site administrators can see the private connection description. It has no functional effect on the private connection, but can help administrators distinguish this private connection from others.
- Select a Region. The region needs to match both the Tableau Cloud site's region and the IAM ARN that's allowed as a principal on the AWS endpoint service.
- Enter the Endpoint Service Name from AWS. The endpoint service name begins with "com.amazonaws.vpce".
- If required or allowed by the endpoint service, enter the endpoint service's Custom Address. The group that administers the AWS endpoint service can help determine if you need to use or have options for the Custom Address field.
- Select Create to create the private connection.
The new private connection is added to the table of private connections, and begins in the Allocating state.
Private Connection Status
Select Sync in the private connection's Actions menu (...) to check for updates in the private connection's status.
| Status | Description | Next Steps |
| Allocating | The private connection is being provisioned. This is a pending state that concludes with either success or failure. | Select Sync in the Actions menu (...) to check for updated status every few minutes until the status changes. If the status never changes from Allocating, check to make sure your Tableau Cloud site and the endpoint service are in the same AWS area. |
| PendingAcceptance | Provisioning is waiting because the private connection needs to be accepted by the endpoint service in AWS. | Accept the connection in AWS. Optionally configure the endpoint service in AWS so that it doesn't require acceptance. |
| RejectedRemotely | The private connection was rejected by the endpoint service in AWS. This is an error state. | Make sure that the endpoint service is configured to allow connections from Tableau. Verify the IAM ARN is an allowed principal on the AWS endpoint service. |
| Ready | Provisioning is complete and the private connection can be assigned to sites. | Select Assign to Sites in the Actions menu (...) to assign the private connection to sites. After a private connection is assigned to a site, site administrators can see it in the site settings Private Connect tab, and creators can use it to create content. |
| Inactive | The private connection is configured but inactive. After 30 days of being inactive, the private connection is deleted. | Delete the private connection if it's not being used, or resolve the reason it's inactive. |
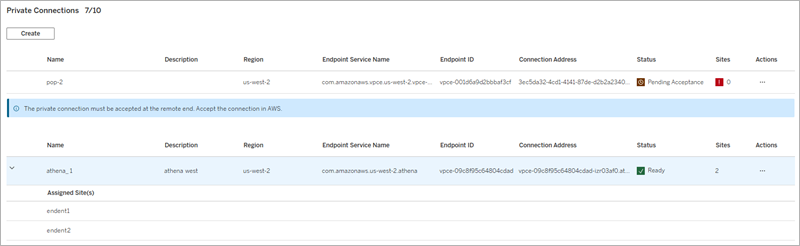
Assign a Private Connection to Sites
After a private connection's status is Ready, it can be assigned to sites. After a private connection is assigned to a site, site administrators can see it in the site settings Private Connect tab, and creators can use it to create workbooks and data sources. Data traffic that uses such a private connection never traverses the public internet.
To assign a private connection to sites:
- Find the private connection in the list of private connections.
- Select Assign to Sites in the Actions menu (...).
- Select or deselect sites to change the private connection assignment. You can search for sites using the search bar, or select the check box in the table heading to select or deselect all sites. The number in the Save Assignment button indicates the total number of sites that the private connection will be assigned to.
- Select Save Assignment.
Edit the Private Connection Description
To edit the description of a private connection:
- Find the private connection in the list of private connections.
- Select Edit Description in the Actions menu (...).
- Edit the description.
- Select Save.
The description has no functional effect on the private connection, but can help administrators distinguish this private connection from others.
Delete a Private Connection
To delete a private connection:
- Find the private connection in the list of private connections.
- Select Delete in the Actions menu (...).
- Select Delete in the Delete Private Connection dialog.
You can't undo a deletion. After the private connection is deleted, workbooks and data sources that use the private connection won't work. Furthermore, because every created private connection has a unique connection address, recreating the private connection won't repair the broken workbooks and data sources. If, however, both the deleted private connection and the recreated private connection use a custom address, and those addresses are the same, the workbooks and data sources will continue to work.
How Creators Use Private Connections
Creators need the private connection's Connection Address in order to use it. Cloud administrators and site administrators get the Connection Address from the private connections table and give it to creators or the group that supports them. The full address is often truncated due to length, and the easiest method to copy the Connection Address is to use the Actions menu (...):
- Log in to Tableau Cloud Manager (TCM).
- Go to Settings.
- Select the Private Connect tab.
- Find the private connection in the list of private connections.
- Select Copy Connection Address in the Actions menu (...) to copy the full Connection Address to your clipboard.
- Share the connection address with Creators.
In workbook and data source connection dialogs, creators enter the private connection's Connection Address like any other server name. Creators fill in the other connection dialog fields (for example, port, database name, or authentication) the same as the regular, non-private version of the connection.