Oracle JDBC Connections with SSL
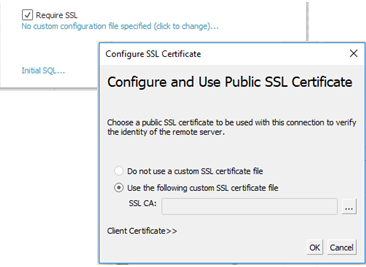
If you are connecting to an SSL (security socket layer) server, check the Require SSL check box.
Beginning in 2020.2, Oracle uses a JDBC connector. If your Oracle data source is configured to use SSL one-way or two-way authentication, you can include the appropriate certificates and/or key to connect.
Require SSL
If your connection requires SSL, do the following:
- From the connector dialog, click Require SSL.

- Configure SSL as appropriate for your connection:
- If you are using self-signed certificates or a certificate from signed by a private CA, you may need to configure trust for one-way SSL connections. See Configure one-way SSL for Oracle.
- If you are using two way SSL, you will need to configure your client keys. See Configure two-way SSL.
Configure one-way SSL for Oracle
To configure trust for your server certificate, see general instructions for JDBC connectors here: Configure One-Way SSL for JDBC Connections.
If you decide to use properties files to configure trust, then use the following properties for the Oracle JDBC driver.
javax.net.ssl.trustStore=C:\\My_Folder\\truststore.jks
javax.net.ssl.trustStoreType=JKS
javax.net.ssl.trustStorePassword=password
Note: To publish a workbook to Tableau Server, both the Tableau Desktop and Tableau Server computers must have copies of the same Oracle properties file and truststore.jks file.
Configure two-way SSL
There are two options for configuring two-way SSL support with an Oracle connection:
- Embed client certificates and private key in the data source
- Use a properties file to configure the client certificate and private key
Option 1: Embed client certificates and private key in the data source
To embed an SSL certificate, client certificate, and client key:
- Follow the steps in Configure one-way SSL for Oracle to configure server trust, if necessary.
- Click Client Certificate >>.

- Specify the locations for the client certificate and client key.
The certificate and private key should be in unencrypted PEM format. See instructions later in this document for suggestions on converting to the correct format.
Option 2: Use a properties file to configure the client certificate and private key
To use a properties file for certificate and key configuration:
- Modify the oracle.properties file to reflect the key store and trust store settings. Use the following as an example. Be sure to replace “My_Folder” for the location of your
files and “<password>” with your own password.
Paths on OSX and Linux need only a single "/" to separate.
javax.net.ssl.trustStore=C:\\My_Folder\\truststore.jks
javax.net.ssl.trustStoreType=JKS
javax.net.ssl.trustStorePassword=<password>
javax.net.ssl.keyStore=C:\\My_Folder\\keystore.jks
javax.net.ssl.keyStoreType=JKS
javax.net.ssl.keyStorePassword=password - Save oracle.properties to the <Document>\MyTableau Respository\Datasources folder.
- Copy oracle.properties, truststore.jks, and keystore.jks to the Tableau Server computer. This allows the workbook to be published to the Tableau Server.
If you use this method, you don't need to upload certificates and key via the SSL dialog. Instead, simply click Require SSL. This causes the Oracle JDBC connector to read the locations of the key store and trust store from oracle.properties file.
Publish a workbook
To publish a workbook to Tableau Server, be sure the following are true:
- If you use a properties file, both the Tableau Desktop and Tableau Server computers have copies of the same Oracle properties file, truststore.jks, and keystore.jks.
- The server uses the same Oracle JDBC connector as the Tableau Desktop computer.
- If you used the embedding option, select “embed password” option when you publish.
Convert key formats
There are several formats for storing SSL keys, including:
- Oracle Wallet
- JKS - Use this format if you want to configure SSL trust using properties files.
- PEM - Use this format if you want to embed the keys in the data source using Tableau interface.
The following are some suggested commands you can type at the command-line prompt to convert keys to the correct format. See the Oracle documentation for the more details.
To export server certificate from an Oracle wallet to PEM file:
orapki wallet export -wallet wallet_location -dn certificate_dn -cert output_certificate_filename.pem
To export server certificate and client keys from Oracle wallet to JKS:
orapki wallet pkcs12_to_jks -wallet ./ -pwd mypasswd -jksKeyStoreLoc ./ewalletK.jks -jksKeyStorepwd password -jksTrustStoreLoc ./ewalletT.jks -jksTrustStorepwd password
To export server certificate from JKS trust store to PEM file using keytool and OpenSSL:
- Export JKS format to PKCS12 format:
keytool -importkeystore -srckeystore truststore.jks -destkeystore truststore.p12 -srcstoretype JKS -deststoretype PKCS12 -srcstorepass "password" -deststorepass "password"
- Get the PEM file from PKCS12:
openssl pkcs12 -in truststore.p12 -out serverca.pem
To export server certificate and client keys from JKS trust store to PEM file using keytool and OpenSSL:
- Export the certificate from the trust store as follows.
- Export JKS format to PKCS12 format:
keytool -importkeystore -srckeystore truststore.jks -destkeystore truststore.p12 -srcstoretype JKS -deststoretype PKCS12 -srcstorepass "password" -deststorepass "password"
- Get the PEM file from PKCS12:
openssl pkcs12 -in truststore.p12 -out serverca.pem
- Export JKS format to PKCS12 format:
- Export the client key and client certificate from the key store as follows.
- Use keytool to transform JKS format to PCKS12 format:
keytool.exe -importkeystore -srckeystore keystore.jks -destkeystore keystore.p12 -srcstoretype JKS -deststoretype PKCS12 -srcstorepass "password" -deststorepass "password"
- Use OpenSSL to export the client certificate:
openssl pkcs12 -in keystore.p12 -nokeys -out clientcert.pem
- Use OpenSSL to export the client key:
openssl pkcs12 -in keystore.p12 -nocerts -out clientkeyEncrypted.pem
- Use OpenSSL to transform the encrypted version to PKCS8 format:
openssl pkcs8 -topk8 -nocrypt -in clientkeyEncrypted.pem -out clientkey.pem
- Use keytool to transform JKS format to PCKS12 format:
See also
- Configure SSL for JDBC Connections - More general information about installing trusted SSL certificates for JDBC connections.
