Create a User Filter and Secure it for Publishing
Prerequisites
To implement row-level security (RLS) with a live data source, follow the steps below.
To implement RLS with an extract, there are some extra steps and considerations. For more information see Requirements for RLS with extract data sources.
Note: For information on the alternatives you can use to implement RLS in Tableau, see an Overview of Row-Level Security Options in Tableau(Link opens in a new window).
Create a user filter and map users to values manually
User-based filtering is one option to help secure your data source or workbook using RLS. This procedure is best for a small and fairly static set of users or groups, and only a small number of workbooks that need user filters.
- In Tableau Desktop, open the workbook and connect to the data you want to filter.
- Navigate to the worksheet that you want to apply a filter to.
- Select Server > Create User Filter. Then select the field you want to use for filtering the view, such as Region.
- If prompted, sign in to your server or site.
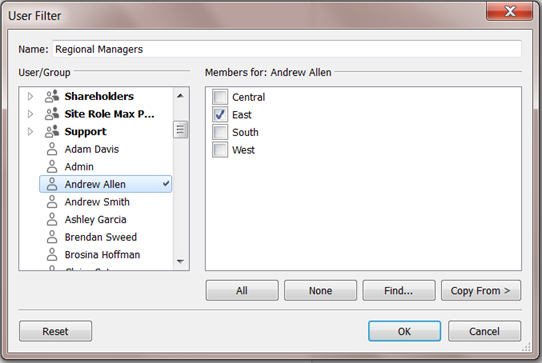
- In the User Filter dialog box, name the filter. We’ll use Regional Managers.
- Select a user or group on the left, then indicate which values on the right they should be able to see. Repeat this process for each user or group, and click OK when you’re done mapping users to values.
For this example, Andrew Allen is set up to see the East region.
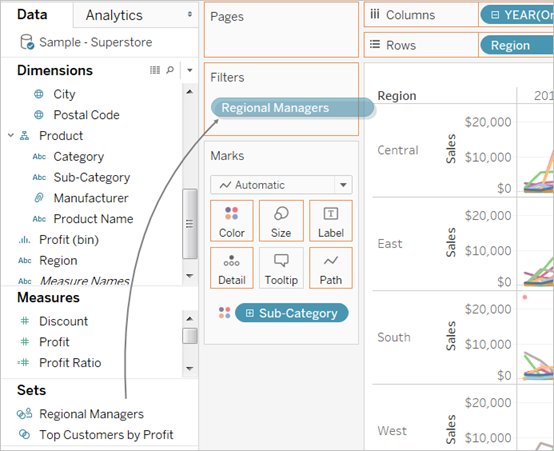
- After you create the user filter, it appears in the Sets area of the Data pane.
- Drag the user filter to the Filters shelf. The filter becomes a context filter, and the view adjusts to show data that you are allowed to see.
To test or fine-tune the filter:
- If the view appears as a blank canvas, you need to allow yourself or a group you are a member of to see a region. In the Sets area of the Data pane, open the drop-down menu on the user filter, and then select Edit Set.
- To preview how the filter works in the published view, in the lower-right corner of the workbook, open the Filter as User menu, and select the user or group from the list.
Note: Previewing is not available if the workbook connects to a published data source.
- To return to viewing the workbook as yourself, in the top right corner of the Filter as User menu, select Reset.
- To copy the mapping selections you set on one user or group to another (rather than manually mapping the same settings), see Copy selected field values from one user to another.
Known Limitations
If using Tableau Desktop and a published data source, note that calculations containing both an LOD expression and a user function can't be computed properly in Tableau Desktop. These calculations are stripped out.
Important: When you publish the workbook, you need to take additional steps to make sure users cannot edit the workbook and remove the filter. For information, see Secure user filters on published content.
Create a dynamic filter using a security field in the data
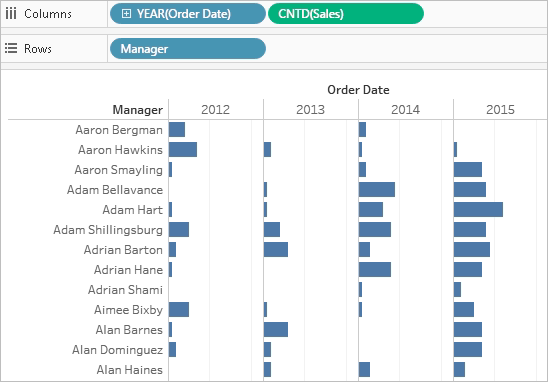
The steps below are based on the following view, which shows annual sales performance for a list of regional managers.
As described in Restrict Access at the Data Row Level, this approach requires the database to contain the field you want to use for filtering.
For this example, the data includes a reference table called People, which contains two columns: Region and Manager. Names in the Manager field match Tableau Cloud or Tableau Server user names, and we’ll use this field for filtering.
You can follow along using the Superstore data that comes with Tableau Desktop, although the fields and values do not match exactly.
Connect to the data and set up the user filter
- In Tableau Desktop, open the workbook and connect to the data you want to filter. In this example, we use a table called Orders.
- Double click the Orders table to open the join canvas. Add the reference table (People) with a left join. For this example, join on the field Region.
- On the worksheet, select Analysis > Create Calculated Field, and create the following field, named "User is a manager".
USERNAME() = [Manager]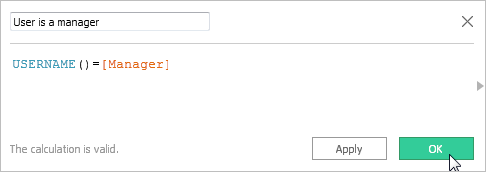
This calculation returns TRUE if the user name of the person signed in to the server exists in the manager column of the People table.
- Add the User is a manager field to the Filters shelf.
- In the Filter dialog box, select True, and then click OK.
This sets the filter so that only people who are managers can see the data in the view. If you are not listed in the Manager field, your view while authoring might appear as a blank canvas.
- See how the view looks to a particular person: in the lower-right, open the Filter as User menu, and select someone you know is a manager.
Important: As with a manual user filter, you need to take steps to Secure user filters on published content.
Filter a data source
Rather than maintain user filters and special permissions on each published workbook, you can filter a data source, and then publish the data source to make it available as a shared, one-to-many resource for anyone who uses that data.
This procedure builds from the dynamic-filter approach described in this topic.
- Complete the steps in Create a dynamic filter using a security field in the data.
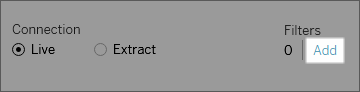
- In the lower-left area of Tableau Desktop, select the Data Source tab.
- In the upper-right area of the Data Source page, under Filter, click Add.
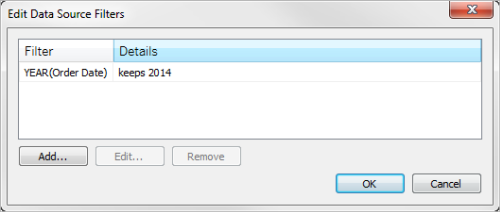
- In the Edit Data Source Filters dialog box, click Add, add the calculated field you created for the dynamic filter (User is a manager), and set the filter to True. Click OK until you get back to the Data Source page.
Global filters and data source filters
When you create a data source filter, any global filters that use that data source are automatically displayed in the Edit Data Source Filters dialog box to make it easy for you to promote a global filter to a data source filter. To promote the global filter to a data source filter, click OK.
If you promote a global filter to a data source filter, that global filter will no longer be visible in worksheets of the workbook (because it becomes a data source filter).
Note: Be aware that you do not need to select a global filter in the Edit Data Source Filters dialog box to promote it. When you click OK, all global filters in the list will be promoted. To prevent a global filter from being promoted to a data source filter, select the global filter in the Edit Data Source Filters dialog box and then click Remove.
Secure user filters on published content
When you publish a workbook or data source with user filters, you need to set permissions to make sure that users opening your workbook or connecting to your Tableau Server data source cannot remove the filter, thereby gaining access to all of the data.
Notes
- Before publishing, we recommend that you consult with your Tableau administrator regarding any existing policies in your organisation, particularly for setting permissions. See also Set Permissions as You Publish a Data Source or Workbook.
- This information applies to publishing data sources with live connections and extracts whose data is stored as multiple tables.
Permissions settings
To secure user filters, the following capabilities must be set to Deny, either during publishing, or afterward on the server.
| Workbooks | Data sources |
|---|---|
|
|
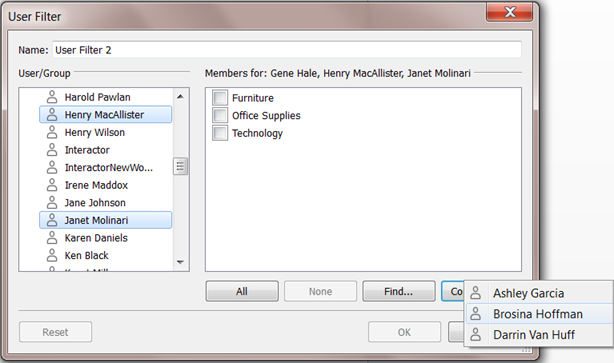
Copy selected field values from one user to another
When you’re creating a user filter manually, after you map a user or group to data values (members), you might want to map another user or group in the same way. You can do this by copying and pasting the settings.
- In the Data pane, under Sets, select a user filter. Click the drop-down arrow and select Edit Set.
- In the User Filter dialog box, select the user or group on which you want to paste settings from another user or group.
- Click Copy From, and select the user or group whose settings you want to copy.