Geocode Locations Tableau Does Not Recognise and Plot Them on a Map
If you have locations that Tableau can't map, such as street addresses, you can custom geocode those locations. Custom geocoding means that you assign latitude and longitude coordinates to your locations so Tableau can plot them accurately. It also allows you to create custom geographic roles that you can use as you create map views in Tableau.
For example, if your data contains country, state/province and street address data, Tableau Desktop geocodes your data to the country and state/province level, but won’t recognise the street address data. In this case, you can create a custom geographic role for the street address data so that you can plot it on a map view in Tableau.
Follow these steps to learn how to custom geocode your data.
Before you start: Custom geocoding your data can be tricky. We recommend that you check out the Assign Geographic Roles(Link opens in a new window) topic to learn more about geographic roles and the types of data Tableau recognises before you get started.
Step 1: Create a CSV file with your location data
The first step to custom geocoding your data is creating a CSV file to import into Tableau. The contents of this file differ depending on whether you’re extending an existing geographic hierarchy, adding a new geographic role or adding a new hierarchy to Tableau.
However, the following applies to all custom geocoding files:
The .csv file must contain Latitude and Longitude columns.
The latitude and longitude values you add must be real numbers. Make sure to include at least one decimal place when specifying these values.
Extend an Existing Role
The built-in geographic roles in Tableau contain hierarchies that can be extended to include locations relevant to your data. For example, the existing hierarchy of Country > State/Province may not contain all of the states or provinces in your data. You can extend this level to include missing states or provinces.
The import file for this type of geocoding should contain every level of the hierarchy above the level you are extending. For example, if you’re extending (adding data to) the State/Province geographic role, the existing State/Province hierarchy has a column for Country and State/Province, along with Latitude and Longitude.
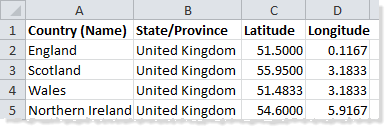
In the import file, the names of the columns define the geographic roles. When extending an existing role, the column names must match the existing geographic roles in the hierarchy that you’re extending. This ensures that the new locations are added to the proper roles and hierarchies.
See the following table for information on how to organise hierarchies in your import file.
| Built-In Hierarchy | Columns to include in the .csv file (in order; left to right) |
|---|---|
| Country (Name) | Country (Name) Latitude Longitude |
| Country (Name), State/Province | Country (Name) State/Province Latitude Longitude |
| Country (Name), State/Province, City | Country (Name) State/Province City Latitude Longitude |
| Country (Name), State/Province, County | Country (Name) State/Province County Latitude Longitude |
| Country (Name), ZIP Code/Postcode | Country (Name) ZIP Code/Postcode Latitude Longitude |
| Country (Name), Area Code | Country (Name) Area Code Latitude Longitude |
| Country (Name), CBSA | Country (Name) CBSA Latitude Longitude |
In addition to the Country (Name) column, you can optionally include the following columns: Country 2 char (ISO 3166-1), Country 3 char (ISO 3166-1), and Country (FIPS 10). If you include these columns, they should be just to the right of the Country (Name) column in any order.
Note: The highest level in the hierarchy is Country and can’t be extended to include higher levels such as Continent, etc.
Add New Roles
To add new geographic roles to the existing geographic hierarchy in Tableau, format your import file to include the new roles along with their parent roles.
When adding new roles to an existing hierarchy, the import file for those roles needs to contain the columns for each level in the existing hierarchy. For more information on the columns to include in each geographic hierarchy, see the built-in hierarchy table in the Extend an Existing Role section.
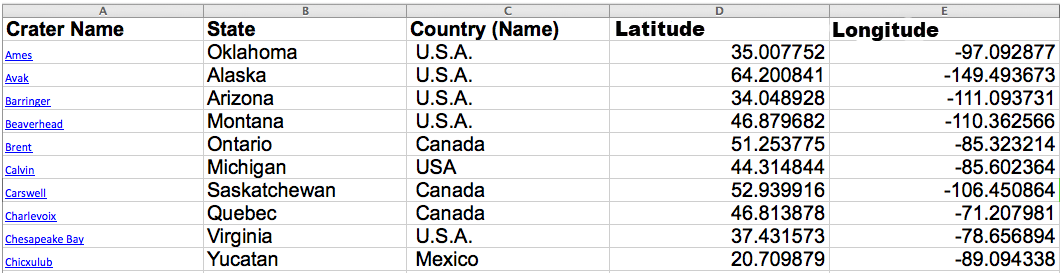
The following table is an example of an import file containing the locations of crater impacts in North America. Importing the following file would add the geographic role Crater Name to the existing Country (Name), State hierarchy. Notice that the column name for country matches the existing Country (Name) geographic role.
After you’ve created your import file, save the file as a Comma-Delimited (.csv) file (Windows Comma-Separated if on a Mac) in a folder on your computer.
Step 2: Import custom geocoding files into Tableau Desktop
After you’ve created a .csv file with custom geocoding, you can import that file into Tableau.
Open Tableau Desktop and navigate to a new or existing worksheet.
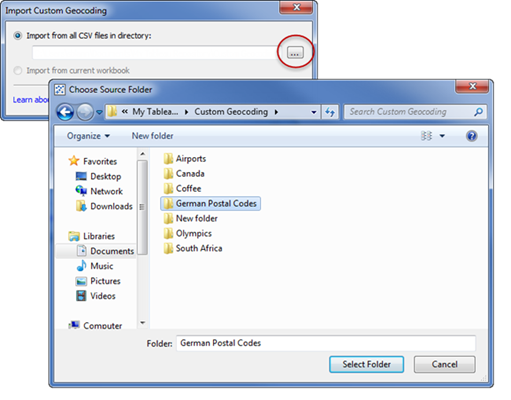
Select Map > Geocoding > Import Custom Geocoding.
In the Import Custom Geocoding dialog box, click the button to the right of the text field to browse to the folder your import file is saved in. All files in the folder will be imported into Tableau.
Click Import.
The custom geocoding data is imported into the workbook and the new geographic roles become available.
Where does Tableau store my custom geocoding data?
When you import custom geocoding, the data is stored in the Local Data folder in your Tableau Repository. To import custom geocoding, your Tableau Repository must be on a local hard drive. The custom geocoding is then available for all workbooks.
Save custom geocoding files in a separate folder on your local computer. If you have several different sets of custom geocoding files, save each of them under their own folder names.
You can remove the custom geocoding stored in your Tableau Repository by clicking Map > Geocoding > Remove Custom Geocoding. This won’t remove the geocoding from a packaged workbook, but it will remove it from the Local Data folder in your My Tableau Repository.
What happens to my custom geocoding data when I save my workbook?
When you save your workbook as a packaged workbook, the custom geocoding data is packaged with the workbook. When you open a packaged workbook you can import the custom geocoding from that workbook into your own Tableau Repository.
Note: Importing a new custom geocoding file will replace any custom geographic roles previously imported into Tableau.
Step 3: Assign geographic roles to your fields
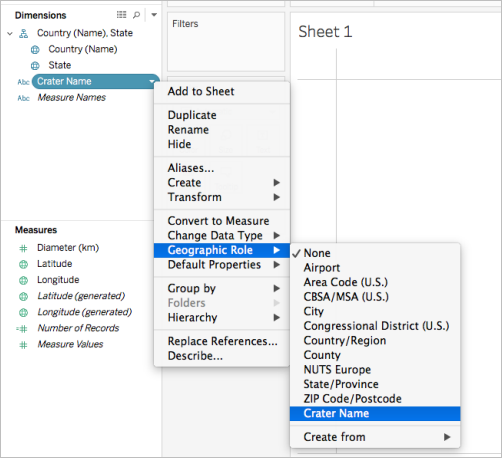
After you import custom geocoding into your workbook, the custom geographic roles become available. The next step is to assign those geographic roles to fields in your data source.
For example, if you decided to add a new geographic role that lists the latitude and longitude coordinates of crater impacts in North America, you can assign that geographic role to a field in your data source that lists the names of craters so when you create a map view with that field, the crater impacts are plotted in the correct locations on the map view.
To assign a custom geographic role to a field, in the Data pane, click the data type icon next to the field and select Geographic Role. Next, select a custom geographic role from the list.
You're now ready to start building a map view with your custom geographic roles. For more information on how to build a map view, see Mapping Concepts in Tableau(Link opens in a new window).
See also
Data Blending vs. Custom Geocoding(Link opens in a new window)