Publish a Flow to Tableau Server or Tableau Cloud
Important: Starting in version 2020.4.1, Data Management is no longer required to publish your flows to Tableau Server or Tableau Cloud, or run flows manually on the web. It is only required (with Tableau Prep Conductor enabled) if you plan to run your flows on a schedule.
Publish your flows to Tableau Server or Tableau Cloud to share them with others or automatically run them on a schedule and refresh the flow output using Tableau Prep Conductor. You can also manually run individual flows on the server. Flows created or edited on the web (version 2020.4 and later) must first be published before they can be run.
Starting in Tableau Cloud version 2026.2.4, as a Creator, you can also upload flows directly to your site. For more information, see Manage a Flow(Link opens in a new window).
For information about publishing flows on the web, see Publishing flows in the Tableau Server(Link opens in a new window) or Tableau Cloud(Link opens in a new window) help. For information about running flows, see Run your Flow.
Before you publish
To make sure that you can run your flow, check the following:
-
Verify that there are no errors in the flow.
Flows that contain errors will fail when you try to run them in Tableau Server or Tableau Cloud. Errors in the flow are identified by a red exclamation mark and a red dot with an Errors indicator in the upper right corner of the canvas.

-
Verify that your flow doesn't include input connectors or features that aren't compatible with your version of Tableau Server. Flows created on the web are always compatible with the server version they are created on.
You can still publish flows from Tableau Prep Builder that include connectors or features that aren't yet supported in your version of Tableau Server, but you can't schedule them to run.
For example, the SAP HANA connector was introduced in Tableau Prep Builder version 2019.1.4 but this connector isn't supported until Tableau Server version 2019.2 for Tableau Prep Conductor. When you publish the flow, you would see a message similar to the following:

Note: To schedule flows to run on Tableau Server, you must be using Tableau Server version 2019.1 or later and Tableau Prep Conductor must be enabled.
To run your flow in Tableau Server, you need to take the appropriate actions to make the flow compatible. For more information about working with incompatible flows, see Version Compatibility with Tableau Prep(Link opens in a new window).
-
Flows that include input or output steps with connections to a network share require safe listing. Tableau Cloud doesn't support this option and files must be packaged with the flow on publish.
Note: Currently, flows that are created on the web can only output to a published data source or a database.
Tableau Prep Builder
Flow input and output steps that point to files stored in a network share (UNC path) aren’t permitted unless the file and path is accessible by the server and are included in your organization's safe list. If you publish the flow without adding the file location to your safe list, the flow will publish, but you will get an error when you try and run the flow manually or using a schedule in Tableau Server.
If the files aren't stored in a safe listed location, you will see a warning message when you publish the flow.

Click the "list" link in the message to see a list of allowed locations. Move your files to one of the locations in the list, and make sure that your flow points to these new locations.

In Tableau Server, to configure the allowed network paths, use the tsm command options described in Step 4: Safe list Input and Output locations(Link opens in a new window) in the Tableau Server help.
If you don't want to move your files to a safe listed location, you will need to package the input files with the flow and publish the flow output to Tableau Server as a published data source. For more information about setting these options, see Publish a flow from Tableau Prep Builder in this topic.
-
(Tableau Prep Builder only) If your flow output steps are set to Publish as a data source, all flow output steps must point to the same server or site where the flow is published. They can point to different projects on that server or site, but only one server or site can be selected.
To set the publishing location for your output steps, do the following:
-
In the flow pane, select the output step.
-
In the publishing pane, select Publish as a data source.
-
Select the server or site and the project where you want to publish the flow. Sign in to the server or site if needed.
-
Enter a name and description for each output.
The output file name should be distinctive enough so that the person running the flow can easily identify which output files to refresh. The file name shows on the Overview and Connections page for the flow in Tableau Server or Tableau Cloud.
-
Save your flow.

For more information about how to configure output steps for publishing, see Create data extract files and published data sources.
-
-
Set your server authentication method (version 2025.3 and later)
To provide better support for single sign-on (SSO) and multi-factor authentication (MFA) when you sign into Tableau Server or Tableau Cloud from Tableau Prep Builder you can choose to authenticate using either the embedded browser packaged with Tableau Prep or your external browser. The default setting is Use server settings.
When you sign in, Tableau Prep Builder will check if the server's preferred authentication method is set to External browser. This is enabled by your administrator. If that setting is not enabled, then Tableau Prep defaults to the embedded browser. You can also manually select a different option from the menu, and Tableau Prep will use the selected method when authenticating.
To view or change your authentication method, do the following:
-
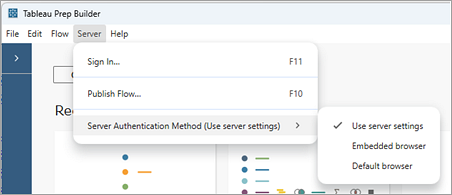
In Tableau Prep Builder, from the top menu, select Server > Server Authentication Method.
-
In the menu, click on one of the following options to set your authentication method:
-
Use server settings (default): Use the preferred authentication method set by your administrator. This can be either the default browser or the embedded browser. For more information about how to configure this setting as an administrator, see tsm configuration set Options(Link opens in a new window).
-
Embedded browser: Use the default version of Chromium packaged with Tableau Builder.
-
Default browser: Use the browser default set for your machine, such as Chrome, Edge, Firefox, Safari, and so on.
-
-
Publish a flow from Tableau Prep Builder
Note: When you publish a flow, you are automatically assigned as the default flow owner. If the flow connects to a published data source, the server uses the flow owner to connect to the published data source. Only the Site or Server Administrator can change the flow owner, and only to themselves.
-
Open your flow in Tableau Prep Builder.
-
From the top menu select Server > Publish Flow.

-
Complete the fields for your platform. Then click Publish. Tableau Server or Tableau Cloud opens automatically in your default browser on the flow Overview page.
- In the Publish to Tableau Server dialog, complete the following fields:
- Project: Click the drop-down option to select your project from the project hierarchy. This should be the same project that the output files are published to.
- Name: Enter a name for your flow. This name shows on the server on the Flow pages. If you want to overwrite an existing flow, click the drop-down option to select a name from the list.
- Description (optional): Enter a description for the flow.
- Tags (optional): Click Add to type in one or more tags to identify your flow so users can easily find it. Tags can also be added after publishing in the Flow pages in Tableau Server.
-
Click Edit in the Connections section to edit connections settings or change authentication.

Files
By default, file input connections are packaged with the flow. Packaged files aren't refreshed when the flow is run in Tableau Server. All files must have the same setting, either Upload or Direct Connection.
Direct Connection
To retrieve the most current data when refreshing the output files, select Direct Connection if Tableau Server can connect to the file location and the location is included in your organization's safe list.

Files stored in a network share
If your input or output steps point to files stored in a network share (UNC path) and the location isn't included in your organization's safe list, you will see a warning message. Click the link in the message to see a list of safe listed locations, move your files and point your input and output steps to the new file location. For more information, see Step 3 in Before you publish.
For information about how to add locations to your organization's safe list, see Step 4: Safe list Input and Output locations(Link opens in a new window) in the Tableau Server help.
Parameters in the input file path
Starting in version 2022.1.1, you can schedule and run flows on the web that include parameters in the input file path. This requires a direct file connection.
If your files are packaged with your flow or you are using an earlier version of Tableau Prep, any parameters included in the file paths are changed to the current (default) value and the file path is made static. For more information about using parameters in flows, see Apply parameters to input steps.
Databases
If your flow connects to one or more databases, select one of the following authentication types to use to connect to the flow input data sources.
-
Server Run As Account: The server’s Run As User account will authenticate all users.
- Prompt User: You must edit the connection in Tableau Server and enter the database credentials before running the flow.
-
Embedded Password: The credentials you used to connect to the data will be saved with the connection and used when the flow is run on a schedule. If you open the flow to edit it, you'll need to re-enter your credentials.

Add Credentials (version 2020.1.1 and later)
If you connect to cloud connectors, you can add your credentials directly from the Publish Flow dialog to embed them in the flow.
-
Click Edit in the Connections section, or click Edit credentials from the warning message. Then click Add credentials from the Authentication drop-down menu.

-
In the confirmation dialog, click Continue. Tableau Prep Builder automatically opens the Account Settings page for the server you are signed into.

-
Add your credentials, then navigate back to Tableau Prep Builder.

-
In the Finish adding credentials dialog, click Done.

-
Click Edit in the Connections section and verify that your credentials were added and embedded in your flow.

-
-
- In the Publish to Tableau Cloud dialog, complete the following fields:
- Project: Click the drop-down option to select your project from the project hierarchy. This should be the same project that the output files are published to.
- Name: Enter a name for your flow. This name shows on the server on the Flow pages. If you want to overwrite an existing flow, click the drop-down option to select a name from the list.
- Description (optional): Enter a description for the flow.
- Tags (optional): Click Add to type in one or more tags to identify your flow so users can easily find it. Tags can also be added after publishing in the Flow pages in Tableau Server.
-
Click Edit in the Connections section to edit connections settings or change authentication.
Files
Tableau Cloud doesn't support direct file connections for input step data and you must package your files with the flow. Packaged files aren't refreshed when the flow is run in Tableau Cloud.
Running Tableau Prep Conductor to refresh Tableau Prep flows that connect to flat files via Bridge isn't supported. To enable successful Prep Conductor flow refreshes, move the flat file to a location that is accessible by Tableau Cloud directly (Google Drive, Box, Dropbox, etc.)
Note: Scheduling and running flows that include parameters in the input file path isn't currently supported in Tableau Cloud because this requires a direct file connection. When you publish the flow, any parameters included in the file paths are changed to the current (default) value and the file path is made static.
As an alternative, you can run flows with parameters in the file path in Tableau Prep Builder or using the command line. For more information about using parameters in flows, see Apply parameters to input steps.Databases
To keep data fresh when publishing flows to Tableau Cloud, you can only connect directly to cloud-hosted data sources. For more information about direct connections supported by Tableau Cloud, see Allow Direct Connections to Data Hosted on a Cloud Platform(Link opens in a new window).
If you connect to on-premises data sources, starting in version 2025.1, you can use a Tableau Bridge Client to connect to and refresh your data in Tableau Cloud. To use the Tableau Bridge client:
-
The Tableau Bridge client must be configured to use a Bridge Client pool (not the default pool)
-
One or more connected bridge clients must be included in the pool and the clients must be active
-
The domain must be specified through the Private Network Allowlist and configured to be part of the pool.
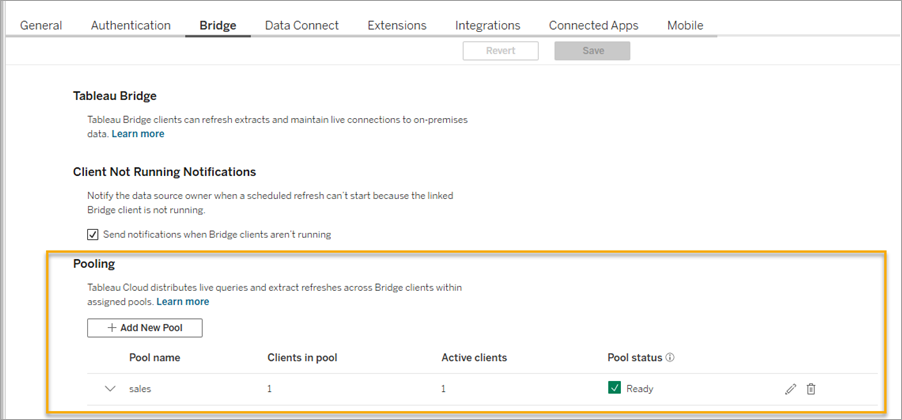
For more information, see Configure the Bridge Client Pool(Link opens in a new window) in the Tableau Cloud help.
Note: When connecting to on-premises data sources in previous versions of Tableau Prep, you must first convert the data sources to a published data source and Tableau Cloud can use a Tableau Bridge client to connect to your data if Tableau Bridge is configured for the data source.
For more information about using a Tableau Bridge, see Allow your Publishers to Maintain Live Connections to On Premises Data(Link opens in a new window).
If your flow connects to a cloud-based data source that supports a direct connection, select one of the following authentication types to use to connect to the flow input data sources.
-
Prompt User: You must edit the connection in Tableau Cloud and enter the database credentials before running the flow.
-
Embedded Password: The credentials you used to connect to the data will be saved with the connection and used when the flow is run on a schedule. If you open the flow to edit it, you'll need to re-enter your credentials.
- If you are not using a Tableau Bridge client to connect to your on-premises data source, select the Publish Data Source radio button. Selecting this option converts the data source input connection to a published data source when you publish the flow to Tableau Cloud.
- To replace the on-premises data source connections for the flow in Tableau Prep Builder with the published data source, select Update flow inputs to use published data sources in the More options section before publishing your flow.

If Tableau Bridge is configured for the data source and the data source is supported by Tableau Cloud, the data can be refreshed when the flow is run. See Allow Direct Connections to Data Hosted on a Cloud Platform(Link opens in a new window) for more information.
If you don't select the check box, the flow in Tableau Prep Builder remains connected to the local on-premises data source and the flow in Tableau Prep Builder can become out of sync with the published version of the flow. To continue working with your flow, you would need to download the flow from Tableau Cloud to edit it, then republish it.

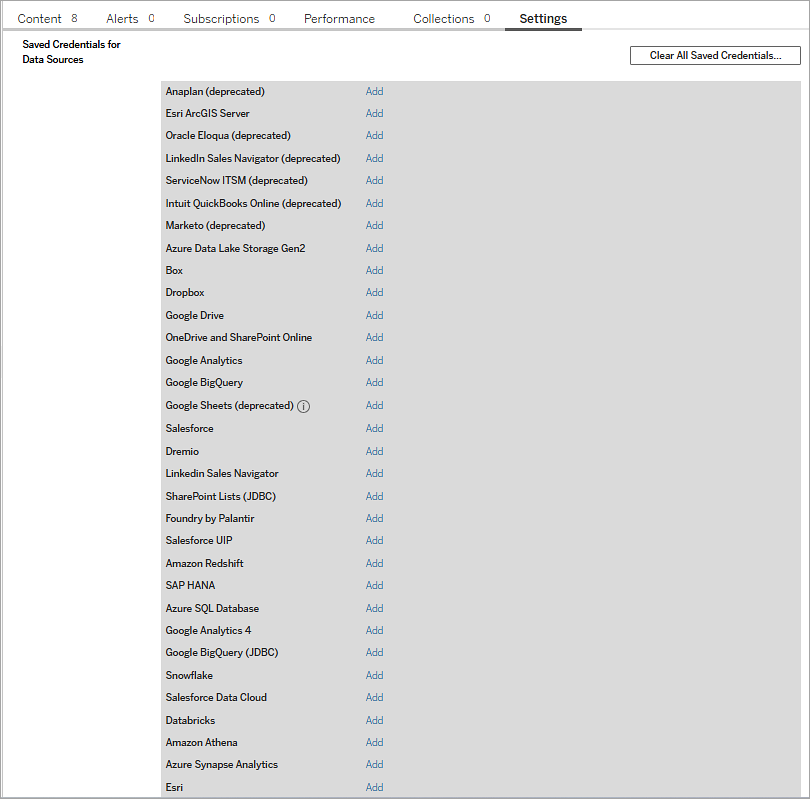
Add Credentials (version 2020.1.1 and later)
If you connect to cloud connectors, you can add your credentials directly from the Publish Flow dialog to embed them in the flow..
-
Click Edit in the Connections section, or click Edit credentials from the warning message. Then click Add credentials from the Authentication drop-down menu.

-
In the confirmation dialog, click Continue. Tableau Prep Builder automatically opens the Account Settings page for the server you are signed into.
-
Add your credentials, then navigate back to Tableau Prep Builder.
-
In the Finish adding credentials dialog, click Done.
-
Click Edit in the Connections section and verify that your credentials were added and embedded in your flow.

-
Who can do this
- Server Administrator, Site Administrator Creator, and Creator allow full connecting and publishing access.
- Creator can perform web authoring tasks.
- Explorer (can publish)