Clean and Shape Data
Note: Starting in version 2020.4.1, you can now create and edit flows in Tableau Server and Tableau Cloud. The content in this topic applies to all platforms, unless specifically noted. For more information about authoring flows on the web, see Tableau Prep on the Web in the Tableau Server(Link opens in a new window) and Tableau Cloud(Link opens in a new window) help.
Tableau Prep offers various cleaning operations that you can use to clean and shape your data. Cleaning up dirty data makes it easier to combine and analyze your data or makes it easier for others to understand your data when sharing your data sets.
You can also clean your data using a pivot step or a script step to apply R or Python scripts to your flow. Script steps aren’t supported in Tableau Cloud. For more information, see Pivot Your Data(Link opens in a new window) or Use R and Python scripts in your flow(Link opens in a new window).
About cleaning operations
You clean data by applying cleaning operations such as filtering, adding, renaming, splitting, grouping, or removing fields. You can perform cleaning operations in most step types in your flow. You can also perform cleaning operations in the data grid in a cleaning step.
You can apply limited cleaning operations in the Input step and can't apply cleaning operations in the output step. For more information about applying cleaning operations in the Input step, see Apply cleaning operations in an input step(Link opens in a new window).
Available cleaning operations
The following table shows which cleaning operations are available in each step type:
| Input | Clean | Aggregate | Pivot | Join | Union | New Rows | Output | |
| Filter | X | X | X | X | X | X | X | |
| Group Values | X | X | X | X | ||||
| Clean | X | X | X | X | X | |||
| Convert Dates | X | X | X | X | X | X | ||
| Split Values | X | X | X | X | X | |||
| Rename Field | X | X | X | X | X | X | ||
| Rename Fields (in bulk) | X | |||||||
| Duplicate Field | X | X | X | X | X | |||
| Keep Only Field | X | X | X | X | X | X | X | |
| Remove Field | X | X | X | X | X | X | X | |
| Create Calculated Field | X | X | X | X | X | |||
| Edit Value | X | X | X | X | X | |||
| Change Data Type | X | X | X | X | X | X | X |
As you make changes to your data, annotations are added to the corresponding step in the Flow pane and an entry is added in the Changes pane to track your actions. If you make changes in the Input step, the annotation shows to the left of the step in the Flow pane and shows in the Input profile in the field list.
The order that you apply your changes matters. Changes made in Aggregate, Pivot, Join, and Union step types are performed either before or after those cleaning actions, depending on where the field is when you make the change. Where the change was made is shown in the Changes pane for the step.
The following example shows changes made to several fields in a Join step. The change is performed before the join action to give the corrected results.

Order of operations
The following table shows where the cleaning action is performed in Aggregate, Pivot, Join, and Union step types depending on where the field is in the step.
| Action | Step Type: | Aggregate | Aggregate | Pivot | Pivot | Join | Join | Union | Union | New Rows |
|---|---|---|---|---|---|---|---|---|---|---|
| Field Location: | Grouped fields | Aggregated fields | Not in pivot | Created from pivot | Included in one table* | Included in both tables* | Mismatched fields | Combined fields | Field used to generate rows | |
| Filter | Before Aggregation | After Aggregation | Before Pivot | After Pivot | Before Join | After Join | Before Union | After Union | After New Rows | |
| Group Values | NA | NA | Before Pivot | After Pivot | Before Join | After Join | Before Union | After Union | After New Rows | |
| Clean | NA | NA | Before Pivot | After Pivot | Before Join | After Join | Before Union | After Union | After New Rows | |
| Convert Dates | Before Aggregation | After Aggregation | Before Pivot | After Pivot | Before Join | After Join | Before Union | After Union | After New Rows | |
| Split Values | NA | NA | Before Pivot | After Pivot | Before Join | After Join | Before Union | After Union | After New Rows | |
| Rename Field | NA | NA | Before Pivot | After Pivot | Before Join | After Join | Before Union | After Union | Before New Rows | |
| Duplicate Field | NA | NA | Before Pivot | After Pivot | Before Join | After Join | Before Union | After Union | After New Rows | |
| Keep Only Field | After Aggregation | After Aggregation | Before Pivot | After Pivot | Before Join | After Join | Before Union | After Union | After New Rows | |
| Remove Field | Removes from Aggregation | Removes from Aggregation | Before Pivot | After Pivot | Before Join | After Join | Before Union | After Union | After New Rows | |
| Create Calculated Field | NA | NA | Before Pivot | After Pivot | After Join | After Join | Before Union | After Union | After New Rows | |
| Edit Value | NA | NA | Before Pivot | After Pivot | Before Join | After Join | Before Union | After Union | After New Rows | |
| Change Data Type | Before Aggregation | After Aggregation | Before Pivot | After Pivot | Before Join | Before Join | Before Union | After Union | Before New Rows |
Note: For joins, if the field is a calculated field that was created using a field from one table, the change is applied before the join. If the field is created with fields from both tables, the change is applied after the join.
Apply cleaning operations
To apply cleaning operations to fields, use the toolbar options or click More options ![]() on the field profile card, data grid, or Results pane to open the menu.
on the field profile card, data grid, or Results pane to open the menu.
In Aggregate, Pivot, Join, and Union step types, the More options ![]() menu is available on the profile cards in the Results pane and corresponding data grid. If you perform the same cleaning operations or actions over and over throughout your flow, you can copy and paste your steps, actions, or even fields. For more information see Copy steps, actions and fields.
menu is available on the profile cards in the Results pane and corresponding data grid. If you perform the same cleaning operations or actions over and over throughout your flow, you can copy and paste your steps, actions, or even fields. For more information see Copy steps, actions and fields.
| Profile pane toolbar | Drop-down menu |
|---|---|
|
|
|

Select your view
You can perform cleaning operations outside of the profile or results pane in the data grid or in the list view. Use the view toolbar  (Tableau Prep Builder version 2019.3.2 and later and on the web) to change your view, then click More options
![]() on a field to open the cleaning menu.
on a field to open the cleaning menu.
-
Show profile pane:
 This is the default view. Select this button to go back to the Profile pane or Results pane view.
-
Show data grid:
 Collapse the profile or results pane to expand and show only the data grid. This view provides a more detailed view of your data and can be useful when you need to work with specific field values. After you select this option, this view state persists across all steps in your flow but you can change it at any time.
Note: Not all cleaning operations are available in the data grid. For example if you want to edit a value in-line, you must use the Profile pane.

-
Show list view
 (Tableau Prep Builder version 2019.3.2 and later and on the web): Convert the profile pane or results pane into a list. After you select this option, this view state persists across all steps in your flow but you can change it at any time.
In this view you can:
- Select and remove multiple rows using the X option.
- (version 2021.1.4 and later) Select and hide or unhide multiple rows using the
 option.
 - (version 2021.2.1 and later) Rename fields in bulk.
-
Use the More options
 menu to apply operations to selected fields.
If you assign a data role to the field, or select Filter, Group Values, Clean, or Split Values, you're returned to the Profile or Results view to complete those actions. All other options can be performed in the list view.

Use the view toolbar  to hide the Profile pane and show only the data grid. Then click More options
![]() on a field in the data grid to open the cleaning menu. This view shows a more detailed view of your data and can be useful when you need to work with specific field values. After you select this option, this view state persists across all steps in your flow but you can change it at any time.
on a field in the data grid to open the cleaning menu. This view shows a more detailed view of your data and can be useful when you need to work with specific field values. After you select this option, this view state persists across all steps in your flow but you can change it at any time.
Note: Not all cleaning operations are available in the data grid. For example if you want to edit a value in-line, you must use the Profile pane.
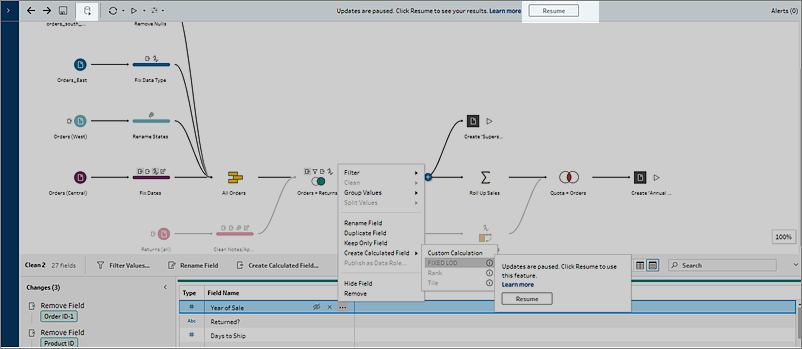
Pause data updates to boost performance
As you perform cleaning operations on your data, Tableau Prep applies your changes as you go to show you the results immediately. To save valuable processing time when you know the changes you need to make and don't need immediate feedback as you make each change, you can boost performance by pausing data updates.
When you pause data updates, you can make all your changes at once, then resume updates to see your results. You can resume data updates and enable all available operations at any time.
Note: When you pause data updates, any operations that require you to see your values are disabled. For example if you want to apply a filter to selected values, you need to see the values you want to exclude.
-
In the top menu, click Pause data updates to pause updates.

-
Tableau Prep converts the Profile pane into the List view. In List view, use the More options
menu to apply operations to selected fields. If the operation requires you to see your values, it is disabled. To enable the operation, you must resume data updates.For more information about using List view mode, see Select your view.

-
To see the results of your changes or enable a disabled feature, resume data updates. Click the Resume data updates button, click the Resume button in the menu dialog or in the message banner at the top of the Flow pane.
Note: Tableau Prep Builder gives you an option to resume updates directly from the menu. If editing flows on the web, you'll need to resume updates from the top menu.
Apply cleaning operations
To apply cleaning operations to a field, do the following:
Note: You can perform cleaning operations in a list view beginning in Tableau Prep Builder version 2019.3.2 and on Tableau Server and Tableau Cloud starting in version 2020.4.
-
In the Profile pane, data grid, Results pane, or list view, select the field you want to make changes to.
-
From either the toolbar or More options
menu for the field , select from the following options:-
Filter or Filter Values: Select from one of the filter options, right-click or Ctrl-click (MacOS) a field value to keep or exclude values. You can also use the Selected Values filter to pick and choose the values to filter, included values not in your flow sample. For more information about filter options, see Filter Your Data(Link opens in a new window).
-
Group Values (Group and Replace in prior versions): Manually select values or use automatic grouping. You can also multi-select values in the Profile card and right-click or Ctrl-click (MacOS) to group or ungroup values or edit the group value. For more information about using Group Values, see Automatically map values to a standard value using fuzzy match .
-
Clean: Select from a list of quick cleaning operations to apply to all values in the field.
-
Convert Dates (Tableau Prep Builder version 2020.1.4 and later and on the web): For fields assigned to a Date or Date & Time data type, select from a list of DATEPART quick cleaning operations to convert your date field values to an integer value representing year, quarter, month, week, day, or a date and time value.
Starting in version 2021.1.4, you can also select from two DATENAME quick cleaning operations, day of the week or month name, to convert your date field values.
-
Custom Fiscal Year (Tableau Prep Builder version 2020.3.3 and later and on the web): If your fiscal year doesn't start in January, you can set a custom fiscal month to convert the date using that month instead of the default month of January.
This setting is on a per field basis, so if you want to apply a custom fiscal year to other fields, repeat this same step.
To open the dialog, from the More options
menu, select Convert Dates > Custom Fiscal Year.
-
-
Split Values: Split values automatically based on a common separator or use custom split to specify how you want to split field values.
Automatic split and custom split work the same as they do in Tableau Desktop. For more information, see Split a Field into Multiple Fields(Link opens in a new window) in the Tableau Desktop and Web Authoring Help.
-
Rename Field: Edit the field name.
-
Duplicate Field (Tableau Prep Builder version 2019.2.3 and later and on the web): Create a copy of your field and values.
-
Keep Only Field(Tableau Prep Builder version 2019.2.2 and later and on the web): Keep only the selected field and exclude all other fields in the step.
-
Create Calculated Field: Write a custom calculation in the Calculation editor or use the Visual Calculation editor (Tableau Prep Builder version 2020.1.1 and later and on the web) to create level of detail, rank or row number calculations. For more information, see Create Level of Detail, Rank, and Tile Calculations .
- Publish as Data Role: Create custom data roles that you can then apply to your fields to validate the field values when cleaning data. For more information about this option, see Create custom data roles (Link opens in a new window).
- Hide Field: If you have fields you want to keep in your flow but don't need to clean, you can hide them out of the way instead of removing them. For more information, see Hide fields.
-
Remove (Remove Field in previous versions): Remove the field from the flow.
-
-
To edit a value, right-click or Ctrl-click (MacOS) one or more values and select Edit Value then enter a new value. You can also select Replace with Null to replace the values with a Null value or double-click in a single field to edit it directly. For more information about editing field values see Edit field values.
- Review the results of these operations in the Profile pane, Summary panes or data grid.
Rename fields in bulk
Supported in Tableau Prep Builder version 2021.2.1 and later. Supported in Tableau Prep on the web in Tableau Server and Tableau Cloud version 2021.2 and later.
Use the Rename Fields option to rename multiple fields in bulk. Search for parts of a field name to replace or remove it, or add prefixes or suffixes to all or selected fields in your data set.
You can also automatically apply the same change to any fields added in the future that match your criteria by selecting the Automatically rename new fields check box when making your changes.
Note: This option is only available in a Clean step type.
-
In a Clean step, from the toolbar, select Rename Fields.

Your view is automatically converted to the List view showing all the fields in your flow. You can use the Search option in the toolbar to narrow your results.

All fields are selected by default. Clear the top check box to clear the selection for all fields to manually select only the fields you want to change.
- In the Rename Fields pane, select from the following options:
Replace text: In the Find text field, find matching text using the Search options, then enter the replacement text in the Replace with field. To find blank spaces, press the space bar in the Find text field.
Note: Renaming fields can't result in blank or duplicate field names.

- Add prefix: Add text to the beginning of all selected field names.
Add suffix: Add text to the end of all selected field names.
As you make your entries, your results display in the List view pane.

- (optional) Select Automatically rename new fields to automatically apply these same changes to new fields that match your replacement criteria when your data is refreshed.
-
Click Rename to apply your changes and close the pane. The Rename button shows the number of fields that are impacted by your changes.

View your changes
The different types of cleaning operations are represented by icons over the steps in your flow. If more than four types of operations are applied to a step, an ellipsis displays over the step. Hover over these icons to view annotations showing applied operations and the order in which they are performed.
Starting in Tableau Prep Builder version 2019.1.3 and later and on the web, you can click on an annotation on the change icon on a step in the Flow pane or on a profile card in the Profile or Results pane and the change and field it impacts will be highlighted in the Changes pane and the Profile or Results pane.

|

|
You can also select a step and then expand the Changes pane to view the details for each change, edit or remove your changes, drag changes up or down to change the order in which they're applied and add a description to provide context to other users. For more information about adding descriptions to your changes, see Add descriptions to flow steps and cleaning actions(Link opens in a new window).
| Cleaning annotation | Changes pane |
|---|---|
|
|

|

When viewing changes in an Aggregation, Pivot, Join, or Union step, the order that the change is applied shows either before or after the reshaping action. The order of these changes is applied by the system and cannot be changed. You can edit and remove the change.

Merge fields
If you have fields that contain the same values but are named differently, you can easily merge them into a single field to combine them by dragging one field on top of the other. When you merge the fields, the target field becomes the primary field and the field name of the target field persists. The field that you merge to the target field is removed.
Example:
| Input union results in 3 fields with the same values | Merge 3 fields into 1 |

|

|
When you merge fields, Tableau Prep keeps all of the fields from the target field and replaces any nulls in that field with values from the source fields that you merge with the target field. The source fields are removed.
Example
| Name | Contact_Phone | Business_Phone | Cell_Phone | Home_Phone |
| Bob | 123-4567 | 123-4567 | null | null |
| Sally | null | null | 456-7890 | 789-0123 |
| Fred | null | null | null | 567-8901 |
| Emma | null | 234-5678 | 345-6789 | null |
If you merge the Business _Phone, Cell_Phone and Home_Phone fields with the Contact_phone field, the other fields are removed and results in the following:
| Name | Contact_Phone |
| Bob | 123-4567 |
| Sally | 456-7890 |
| Fred | 567-8901 |
| Emma | 234-5678 |
To merge fields, do one of the following:
-
Drag and drop one field onto another. A Drop to merge fields indicator displays.
-
Select multiple fields and right-click within the selection to open the context menu, and then click Merge Fields.
-
Select multiple fields, and then click Merge Fields on the toolbar.
For information about how to fix mismatched fields as a result of a union, see Fix fields that don’t match.
Apply cleaning operations using recommendations
Sometimes it can be hard to identify which cleaning operation you need to use to fix problems in your data. Tableau Prep can analyze your data and recommend cleaning operations that you can apply automatically to quickly fix problems in your data fields or help to identify problems so you can fix them. This feature is available in all step types except Input, Output and Join step types.
Note: In Tableau Prep Builder, if you don't want to use this feature, you can turn it off. From the top menu, go to Help > Settings and Performance. Then click on Enable Recommendations to clear the check mark next to the setting.
Recommendation types include:
-
Data roles
-
Filter
- Group values (also applies to fields with data roles starting in Tableau Prep Builder version 2019.2.3 and on the web)
-
Pivot columns to rows (Tableau Prep Builder version 2019.4.2 and later and on the web)
- Replace values with Null values
-
Remove fields
-
Split (Tableau Prep Builder version 2019.1.1 and later and on the web)
Note: This option works specifically with data in fixed-width type text files. To use the split recommendation with this file type, after you connect to the data source, in the Input step, in the Text Settings tab, select a Field Separator character that is not used in the data so the data loads as a single field.
-
Trim spaces
Apply recommendations
-
Do one of the following:
- Click the light bulb
 icon in the top right corner of the profile card.
 - From the toolbar, click the Recommendations drop-down arrow to view all recommendations for your data set and select a recommendation from the list.
This option only appears when recommended changes are identified by Tableau Prep.


- Click the light bulb
-
To apply the recommendation, hover on the Recommendations card and then click Apply.

The change is automatically applied and an entry is added to the Changes pane. To remove the change, click Undo in the top menu or hover over the change in the Changes pane and click the X to remove it.
If you apply a recommendation to pivot fields, a Pivot step is automatically created where you can then perform any additional pivot actions like renaming the pivoted fields or pivoting on additional fields.
-
If Tableau Prep identifies further recommendations as a result of the change, the light bulb icon remains on the Profile card until no further recommendations are found.
Repeat the steps above to apply any additional changes or ignore the suggested change and use the other cleaning tools to address the data problems.

Edit field values
Multiple variations of the same value can prevent you from accurately summarizing your data. You can quickly and easily correct these variations using the following options.
Note: Any edits that you make to the values must be compatible with the field data type.
Edit a single value
-
In the Profile card, click the value you want to edit, and enter the new value. A group icon
 shows next to the value.
Alternatively, right-click a value and click Edit Value. The change is recorded in the Changes pane on the left side of the screen.

-
View the results in the Profile pane, and data grid.
Edit multiple values
You have several options to edit multiple values at once. For example, use quick cleaning operations to remove punctuation for all values in a field, manually group values using multi-select, automatically group values together using fuzzy-match algorithms that find similar values or select multiple values and replace them with Null.
Note: When you map multiple values to a single value, the original field shows a group icon next to the value, showing you which values are grouped together.
Edit multiple values using quick cleaning operations
This option applies only to text fields.
-
In the Profile pane, Results pane or data grid, select the field you want to edit.
-
Click More options
, select Clean, and then select one of the following options:-
Make Uppercase: Change all values to uppercase text.
-
Make Lowercase: Change all values to lowercase text.
-
Make Titlecase: Change all values to title case text.
-
Remove Letters: Remove all letters and leave only other characters.
-
Remove Numbers: Remove all numbers and leave letters and other characters.
-
Remove Punctuation: Remove all punctuation.
-
Trim Spaces: Remove leading and trailing spaces.
- Remove Extra Spaces: Remove leading and trailing whitespace and replace extra whitespace in-between characters with a single space.
- Remove All Spaces: Remove all whitespace, including leading and trailing whitespace and any whitespace in between characters.

You can stack operations to apply multiple cleaning operations to the fields. For example first select Clean > Remove Numbers and then select Clean > Remove Punctuation to remove all numbers and punctuation from the field values.
-
-
To undo your changes, click the Undo arrow at the top of the Flow pane, or remove the change from the change list.
Group and edit multiple values inline
Use this option to manually select multiple values and group them under a standard value in the profile card. To use other methods to group values, see Manually map multiple values to a standard value and Automatically map values to a standard value using fuzzy match .
-
In the Profile card, select the field you want to edit.
-
Press Ctrl or Shift+click or Command or Shift+click (MacOS), and select the values that you want to group.
-
Right-click, and select Group from the context menu. The value in the selection that you right-click becomes the default name for the new group but you can edit this in-line.

-
To edit the group name, select the grouped field and edit the value or right-click or Ctrl+click (Mac) on the grouped field and select Edit Value from the context menu.
-
To ungroup the grouped field values, right-click on the grouped field and select Ungroup from the context menu.
Replace one or more values with Null
If you have data rows that you want to include in your analysis but you want to exclude certain field values you can change them to a Null value.
-
In the Profile card, press Ctrl or Shift+click or Command or Shift+click (on Mac), and select the values that you want to change
-
Right-click or Ctrl+click (Mac), and select Repace with Null from the menu. The values are changed to Null and the group icon
shows next to the value.
Manually map multiple values to a standard value
Use Group Values (Group and Replace in previous versions) to map the value of a field from one value to another or manually select multiple values to group them. You can even add new values to set up mapping relationships to organize your data.
For example, let’s say you have three values in a field: My Company, My Company Incorporated, and My Company Inc. All these values represent the same company, My Company. You can use Group Values to map the values My Company Incorporated and My Company Inc to My Company, so that all three values appear as My Company in the field.
Map multiple values to a single selected field
-
In the Profile pane or Results pane, select the field you want to edit.
-
Click More options
and select Group Values (Group and Replace in previous versions) > Manual Selection from the menu. -
In the left pane of the Group Values editor, select the field value that you want to use as the grouping value. This value now shows at the top of the right pane.
-
In the lower section of the right pane in the Group Values editor, select the values you want to add to the group.

To remove values from the group, in the upper section of the right pane in the Group Values editor, clear the check box next to the values.
Create a group by selecting multiple values
-
In the Profile pane or Results pane, select the field you want to edit.
-
Click More options
and select Group Values (Group and Replace in previous versions) > Manual Selection from the menu. -
In the left pane of the Group Values editor, select multiple values that you want to group.
-
In the right pane of the Group Values editor, click Group Values.

A new group is created using the last selected value as the group name. To edit the group name, select the grouped field and edit the value or right-click or Ctrl+click (MacOS) on the grouped field and select Edit Value from the menu.

Add and identify values that aren't in the data set
If you want to map values in your data set to a new value that doesn't exist, you can add it using Group Values (Group and Replace in previous versions). To easily identify any values that are not in the data set, these values are marked with a red dot next to the value name in the Group Values editor.
For example in the image below, Wyoming and Nevada aren’t in the data set.

Some reasons why a value might not be in the data set include the following:
-
You just added the new value manually.
-
The value is no longer in the data.
-
The value is in the data, but isn’t in the sampled data set.
To add a new value:
-
In the Profile pane or Results pane, select the field you want to edit.
-
Click More options
and select Group Values (Group and Replace in previous versions) > Manual Selection from the context menu. -
In the left pane of the Group Values editor, click the plus
 to add a new value.
 -
Type a new value in the field and press Enter to add it.

-
In the right pane, select the values that you want to map to the new value.

- (Optional) To add additional new values to your mapped value, click the plus button in the right pane in the Group Values editor.
-
Automatically map values to a standard value using fuzzy match
To search for and automatically group similar values, use one of the fuzzy match algorithms. Field values are grouped under the value that appears most frequently. Review the grouped values and add or remove values in the group as needed.
If you use data roles to validate your field values, you can use the Group Values (Group and Replace in previous versions) option to match invalid values with valid ones. For more information, see Group similar values by data role (Link opens in a new window)
Choose one of the following options to group values:
-
Pronunciation: Find and group values that sound alike. This option uses the Metaphone 3 algorithm that indexes words by their pronunciation and is most suitable for English words. This type of algorithm is used by many popular spell checkers. This option isn't available for data roles.
-
Common Characters: Find and group values that have letters or numbers in common. This option uses the ngram fingerprint algorithm that indexes words by their unique characters after removing punctuation, duplicates, and whitespace. This algorithm works for any supported language. This option isn't available for data roles.
For example, this algorithm would match names that are represented as "John Smith" and "Smith, John" because they both generate the key "hijmnost". Since this algorithm doesn't consider pronunciation, the value "Tom Jhinois" would have the same key "hijmnost" and would also be included in the group.
-
Spelling: Find and group text values that are spelled alike. This option uses the Levenshtein distance algorithm to compute an edit distance between two text values using a fixed default threshold. It then groups them together when the edit distance is less than the threshold value. This algorithm works for any supported language.
Starting in Tableau Prep Builder version 2019.2.3 and on the web, this option is available to use after a data role is applied. In that case, it matches the invalid values to the closest valid value using the edit distance. If the standard value isn't in your data set sample, Tableau Prep adds it automatically and marks the value as not in the original data set.
-
Pronunciation +Spelling: (Tableau Prep Builder version 2019.1.4 and later and on the web) If you assign a data role to your fields, you can use that data role to match and group values with the standard value defined by your data role. This option then matches invalid values to the most similar valid value based on spelling and pronunciation. If the standard value isn't in your data set sample, Tableau Prep adds it automatically and marks the value as not in the original data set. This option is most suitable for English words.
For more information see Clean and Shape Data. Want to read more about these fuzzy match algorithms? See Automated Grouping in Tableau Prep Builder(Link opens in a new window) on Tableau.com
Note: In Tableau Prep Builder version 2019.1.4 and 2019.2.1 this option was labeled Data Role Matches.
Group similar values using fuzzy match
-
In the Profile pane or Results pane, select the field you want to edit.
-
Click More options
and select Group Values then select one of these options:-
Pronunciation
-
Common Characters
-
Spelling

Tableau Prep Builder finds and groups values that match and replaces them with the value that occurs most frequently in the group.
-
-
Review the groupings and manually add or remove values or edit them as needed. Then click Done.

Adjust your results when grouping field values
If you group similar values by Spelling or Pronunciation, you can change your results by using the slider on the field to adjust how strict the grouping parameters are.
Depending on how you set the slider, you can have more control over the number of values included in a group and the number of groups that get created. By default, Tableau Prep detects the optimal grouping setting and shows the slider in that position.
When you change the threshold, Tableau Prep analyzes a sample of the values to determine the new grouping. The groups generated from the setting are saved and recorded in the Changes pane, but the threshold setting isn't saved. The next time the Group Values editor is opened, either from editing your existing change or making a new change, the threshold slider is shown in the default position, enabling you to make any adjustments based on your current data set.
-
In the Profile pane or Results pane, select the field you want to edit.
-
Click More options
and select Group Values (Group and Replace in previous versions) then select one of these options:-
Pronunciation
-
Spelling

Tableau Prep finds and groups values that match and replaces them with the value that occurs most frequently in the group.
-
-
In the left pane of the Group Values editor, drag the slider to one of the 5 threshold levels to change your results.

To set a stricter threshold, move the slider to the left. This results in fewer matches and creates less groups. To set a looser threshold, move the slider to the right. This results in more matches and creates more groups.
- Click Done to save your changes.