Configure SCIM with PingFederate
You can configure user management, provision groups, and assign Tableau Cloud site roles through PingFederate.
While you complete the steps described below, we recommend you have the PingFederate documentation available to you to accompany the procedures described below.
Important:
-
These steps reflect a third-party application and are subject to change without our knowledge. If the steps described here do not match the screens you see in your IdP account, you can use the general SCIM topic along with the IdP’s documentation.
- The configuration steps in the IdP may be in a different order than what you see in Tableau.
Step 1: Perform prerequisites
To perform the procedures described in this document, you must have the following prerequisites met:
-
SCIM Provisioner: The SCIM Provisioner application installed and configured. For more information, see SCIM Provisioner(Link opens in a new window) in the PingIdentity documentation.
-
Ping data store: A data store, like PingDirectory, configured. For more information, see Configuring an LDAP connection(Link opens in a new window) in the PingIdentity documentation.
-
SAML in Protocol Settings: Configure protocol settings for SAML federation.
Step 2: Start configuring SAML in Tableau Cloud
The SCIM functionality in Tableau Cloud requires that you configure your site to support SAML single sign-on (SSO). You will return to and update this SAML configuration later on in this topic.
-
Sign in to your Tableau Cloud site as a site administrator, and select Settings > Authentication.
-
On the Authentication tab, click the New Configuration button, select SAML from the Authentication drop-down, and then enter a name for the configuration.

Note: Configurations created before January 2025 (Tableau 2024.3) can't be renamed.
-
Skip 1. Export metadata from IdP. You will revisit this step later on in this topic.
-
Under 2. Upload metadata to Tableau, upload a placeholder .xml metadata file. You’ll replace this file with a valid .xml metadata file from PingFederate later on in this topic.
-
Click Save.
Step 3: Enable SCIM support in Tableau Cloud
Use the following steps to enable SCIM support in Tableau Cloud. You’ll use the information in this section to enable SCIM in PingFederate.
-
Sign in to your Tableau Cloud site as a site administrator, and select Settings > Authentication.
-
On the Authentication page, under System for Cross-domain Identity Management (SCIM), click the New Configuration button.
-
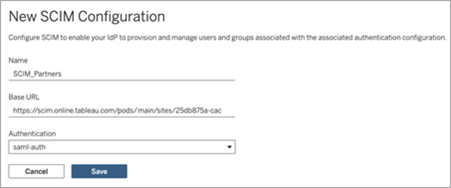
In the New SCIM Configuration dialog box, do the following:
-
Enter a name for the SCIM configuration.
-
Copy the Base URL to use in your IdP's SCIM settings.
-
From the Authentication drop-down, select the SAML authentication configuration to associate with SCIM.
-
Click Save.
Note: This populates the SCIM token section.
-
-
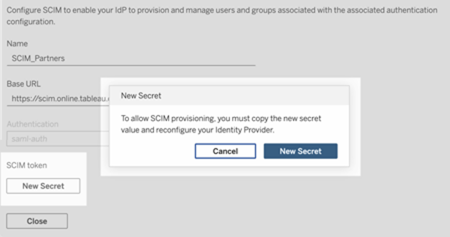
Under SCIM token, do the following:
-
Click the New Secret button.
-
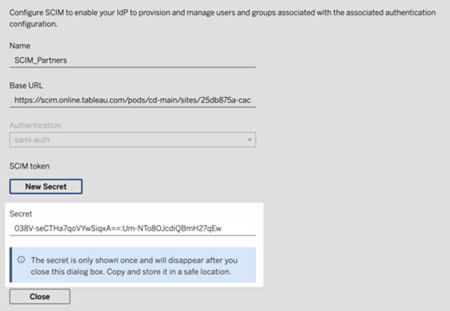
In the New Secret dialog box, click the New Secret button again. A newly generated secret will display.
-
Copy the secret and store it in a safe location. We'll use the secret in step 4.2.1.
Important:
-
If you close the SCIM configuration before you can add the secret to your IdP's SCIM settings, you can edit SCIM configuration but will be required to click New Secret again to generate a new secret.
-
The secret is tied to the Tableau site administrator user who created the SCIM configuration. If that user’s site role changes or the user is no longer a member of the site, the secret becomes invalid. In this case, another site administrator can generate a new secret for the existing SCIM configuration and add it to the IdP's SCIM settings or create a new SCIM configuration ensuring the base URL and secret is added to the IdP's SCIM settings.
-
-
Click Close.
-
Step 4: Enable single sign-on (SSO) in PingFederate
To enable SAML SSO in your PingFederate environment, you must do the following:
- Create an IdP adapter instance
- Configure an SP connection
- Map attributes in your Ping data store
- Configure SAML SSO
Important: As a reminder, the steps and examples described here are for demonstration purposes only.
Step 4.1: Create an IdP adapter instance
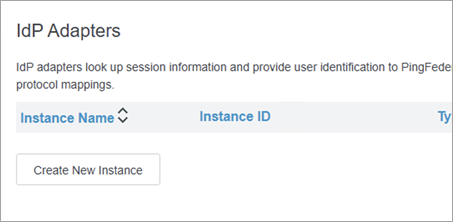
Follow each of the sections below to create the HTML Form Adapter(Link opens in a new window). PingFederate uses IdP adapters, such as the HTML Form Adapter, to authenticate users. An IdP adapter looks up session information and provides user identification to PingFederate.
-
Sign into the PingFederate administrative console.
-
Select Authentication > IdP Adapters.
-
On the IdP Adapters page, click Create New Instance button to start the Create Adapter Instance configuration.
Step 4.1.1: Create Adapter Instance (part 1)
-
On the Create Adapter Instance page, on the Type tab, do the following:
-
For INSTANCE NAME, enter a name. For example, "credentialsValidatoreInstance".
-
For INSTANCE ID, enter a value. For example, "3".
-
In the TYPE drop-down list, select HTML Form IdP Adapter.
-
Keep PARENT INSTANCE as-is (None).
-
Click the Next button.
-
Step 4.1.2: Create Credentials Validator
-
On the IdP Adapter tab, do the following:
-
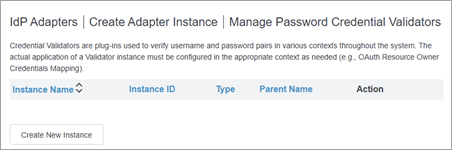
Scroll to the bottom of the page and click the Manage Password Credential Validators button.
-
On the Manage Password Credential Validators page, click the Create New Instance button.
-
-
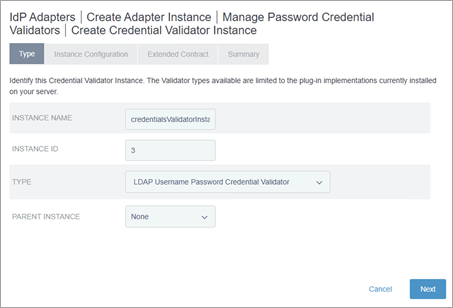
On the Create Credentials Validator Instance page, on the Type tab, do the following:
-
For INSTANCE NAME, enter a name. For example, "credentialsValidatorInstance".
-
For INSTANCE ID, enter a value. For example, "3".
-
From the TYPE drop-down list, select LDAP Username Password Credential Validator.
-
Keep PARENT INSTANCE as-is (None).
-
Click the Next button.
-
-
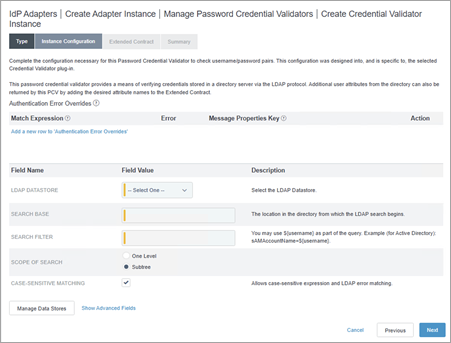
On the Instance Configuration tab, do the following:
-
From the LDAP DATASTORE drop-down, select Ping Directory data source that was previously configured.
-
In the SEARCH BASE field, enter the following: dc=example,dc=com.
-
In the SEARCH FILTER field, enter the following: mail=${username}
-
Keep the other settings as-is.
-
Click the Next button.
-
-
On the Summary tab, review the details and click the Save button.
-
Back on the Manage Password Credential Validators page, click the Done button.
-
Back on the Create Adapter Instance page, under the Password Credential Validator Instance section, do the following:
-
Click the Add a new row to `Credential Validators` link.
-
From the drop-down menu that displays, select the newly created validator instance you created. For example, "credentialsValidatorInstance".
-
Click the Update link.
-
Click the Next button.
-
Step 4.1.3: Create Adapter Instance (part 2)
-
Back on the Extended Contract tab, do the following:
-
Under the Extended the Contract section, do the following:
-
In the text box, enter "sn" and click the Add button.
-
-
Click the Next button.
-
-
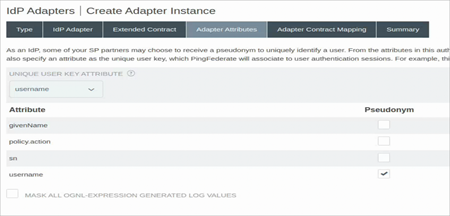
On the Adapter Attributes tab, do the following:
-
From the UNIQUE USER KEY ATTRIBUTE drop-down, select username.
-
For username, select the Pseudonym check box.
-
Click the Next button.
-
-
On the Adapter Contract Mapping tab, click the Configure Adapter Contract button.
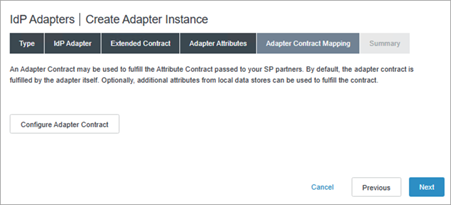
Step 4.1.4: Configure adapter contract mapping (part 1)
-
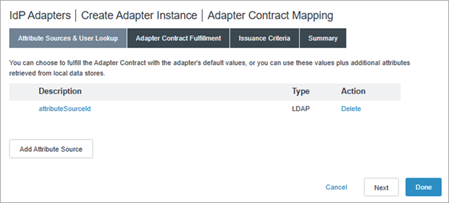
On the Adapter Sources & Users Lookup tab, click the Add Attribute Source button.
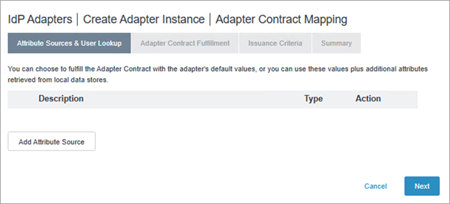
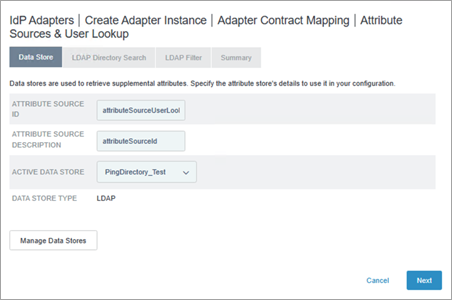
Step 4.1.5: Configure attribute sources & user lookup
-
On the Data Store tab, do the following:
-
For ATTRIBUTE SOURCE ID, enter a name. For example, "attributeSourceUserLookup".
-
For ATTRIBUTE SOURCE DESCRIPTION, enter a description. For example, "attributeSourceId".
-
From ACTIVE DATA STORE, select the Ping Directory data store that was previously configured.
-
Click the Next button.
-
-
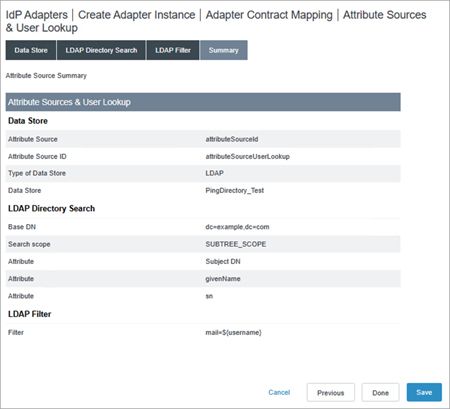
On the LDAP Directory Search tab, do the following:
-
For BASE DN, enter the following: dc=example,dc=com
-
Under the Attributes to return from search section, do the following:
-
In the ROOT OBJECT CLASS column, select Show All Attributes.
-
Under the Option column, in the text box, select givenName and then click the Add Attribute button.
-
In the text box, select sn and then click the Add Attribute button.
-
-
Click the Next button.
-
-
In the LDAP Filter tab, do the following:
-
In the FILTER text box, enter the following: mail=${username}
-
Click the Next button.
-
-
On the Summary tab, click the Save button
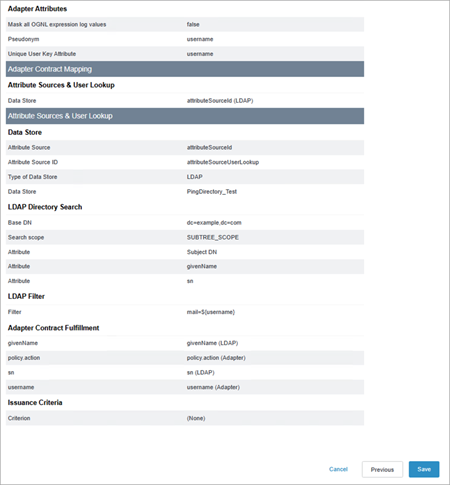
Step 4.1.6: Configure adapter contract mapping (part 2)
-
On the Attribute Sources & User Lookup tab, select the newly created adapter contract you created. For example, "attributeSourceId".
-
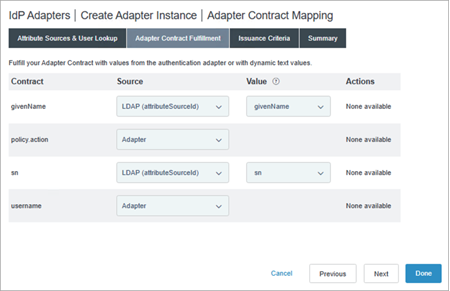
On the Adapter Contract Fulfillment tab, do the following:
-
For givenName, from the Source drop-down list, select LDAP (attributeSourceId); from the Value drop-down list, select givenName.
-
For policy.action, from the Source drop-down list, leave as-is (Adapter).
-
For sn, from the Source drop-down, select LDAP (attributeSourceId); from the Value drop-down list, select sn.
-
For username, keep the value as-is (Adapter).
-
Click the Next button.
-
-
On the Issuance Criteria tab, click Next button.
-
On the Summary tab, review the details and click the Save button.
Step 4.2: Create an SP connection
Follow each of the sections below to create an SP connection. PingFederate uses SP connections for IDP-initiated single sign-on (SSO).
-
From the PingFederate administrative console, navigate to Applications > SP Connections.
-
On the SP Connections page, click the Create Connection button.
-
On the Connection Template tab, keep the setting as-is (DO NOT USE A TEMPLATE FOR THIS CONNECTION) and click the Next button.
-
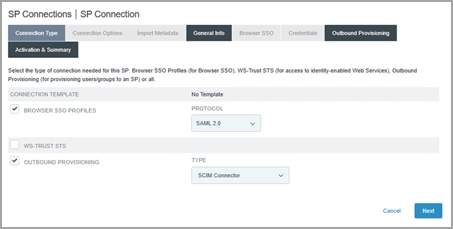
On the Connection Type tab, do the following:
-
Select the BROWSER SSO Profiles check box.
-
Under PROTOCOL drop-down list, keep the value as-is (SAML 2.0).
-
-
Select the OUTBOUND PROVISIONING check box.
-
Click the Next button.
-
-
On the Connection Options tab, click the Next button.
-
On the Import Metadata tab, keep the value as-is (NONE), and click the Next button.
-
On the General Info tab, do the following:
-
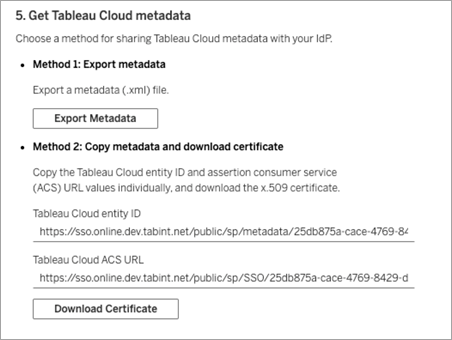
For PARTNERS ENTITY ID, enter the Tableau Cloud entity ID from the SAML configuration in Tableau Cloud that you started in Step 2. For example, "https://sso.online.tableau.com/public/sp/metadata/25db875a-cace-4769-8429-d7b210879ef2/36673dc4-e2c1-4970-976f-255bda6036cb".
-
For CONNECTION NAME, enter a name. For example, "SCIM Connector".
-
Click the Next button.

-
-
On the Outbound Provisioning tab, click the Configure Provisioning button.
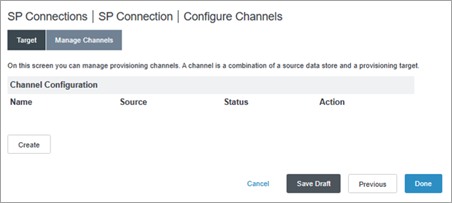
Step 4.2.1: Create Configure Channel
-
On the Target tab, do the following:
-
For SCIM URL, enter the Base URL from the SCIM configuration in Tableau Cloud that you created in Step 3. For example, "https://scim.online.tableau.com/pods/cd-main/sites/25db875a-cace-4769-8429-d7b210879ef2/scim/v2".
-
For SCIM VERSION, keep the value as-is (2.0).
-
From the AUTHENTICATION METHOD drop-down list, select OAUTH 2 BEARER TOKEN.
-
For ACCESS TOKEN, enter the SCIM token secret from the SCIM configuration in Tableau Cloud that you created in Step 3.
-
For UNIQUE USER IDENTIFIER, keep the value as-is (userName).
-
For RESULTS PER PAGE, enter the following value: 25. We recommend changing this value for better performance.
-
For PROVISIONING OPTIONS, ensure the following check boxes are selected:
-
USER CREATE
-
USER UPDATE
-
USER DISABLE /DELETE
-
PROVISION DISABLED USERS
-
-
For REMOVE USER ACTION, keep that value as-is (Disable). We recommend this option to change the user's role to Unlicensed in Tableau Cloud if they’re removed from PingFederate IdP.
-
For GROUP NAME SOURCE, do the following:
-
In the drop-down list, keep the value as-is (Common Name).
-
Select the USE PATCH FOR GROUP UPDATES check box.
-
-
For CUSTOM ATTRIBUTE SCHEMA URNS, enter the following value:
urn:ietf:params:scim:schemas:extension:tableau:3.0:User,urn:ietf:params:scim:schemas:extension:tableau:3.0
-
Click the Next button.
-
-
In the Configure Channels page, on the Target tab, click the Create button.
-
In the Channel Info tab, for CHANNEL NAME, enter a name and click the Next button.
-
In the Source tab, do the following:
-
From the ACTIVE DATA STORE drop-down list, select the Ping data store.
-
From the TYPE drop-down list, select LDAP.
-
Click the Next button.
-
-
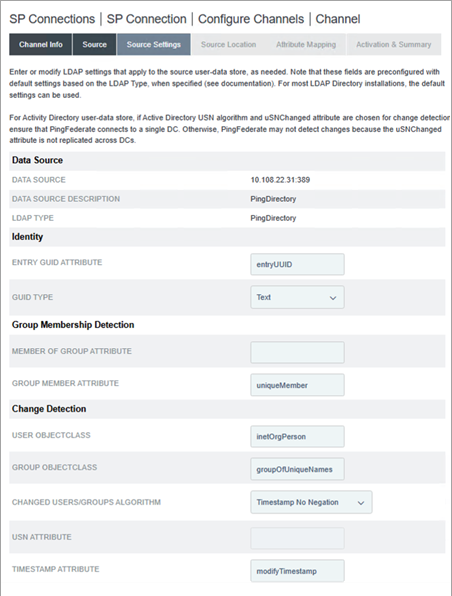
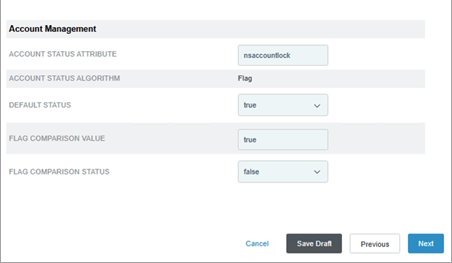
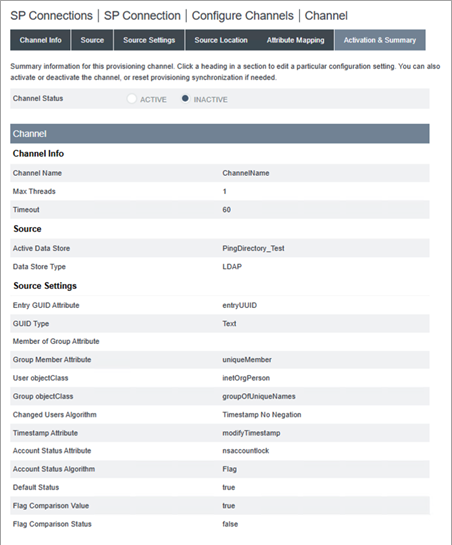
In the Source Settings tab, validate the following values:
-
For ENTRY GUID ATTRIBUTE, the value is entryUUID.
-
For GROUP MEMBER ATTRIBUTE, the value is uniqueMember.
-
For USER OBJECTCLASS, the value is inetOrgPerson.
-
For GROUP OBJECTCLASS, the value is groupOfUniqueNames.
-
Click the Next button.
-
-
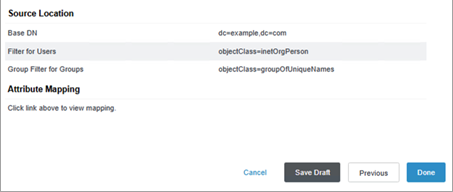
In the Source Location tab, do the following:
-
For BASE DN, enter the following: dc=example,dc=com
-
Under the Users section, for FILTER, enter the following: objectClass=inetOrgPerson
-
Under the Groups section, for FILTER, enter the following: objectClass=groupOfUniqueNames
-
Click the Next button.
-
-
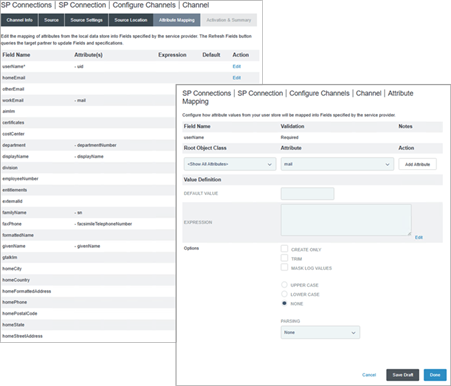
In the Attribute Mapping tab, do the following:
-
Edit the userName attribute to "mail" by doing the following:
-
In the userName row, click Edit.
-
Under the Root Object class, select <Show All Attributes>.
-
From the Attributes drop-down list, select mail.
-
Click the Add Attribute button.
-
Next to the uuid attribute, click the Remove link.
-
-
Keep the remaining attributes as-is.
-
Click the Next button.
-
-
In the Activation & Summary tab, do the following:
-
For Channel Status, select Active.
-
Click the Save Draft button.
-
Step 4.3: Map SCIM attributes to your Ping data store
Follow the steps below to map the SCIM attributes in the Ping data store through the PingData administrative console.
-
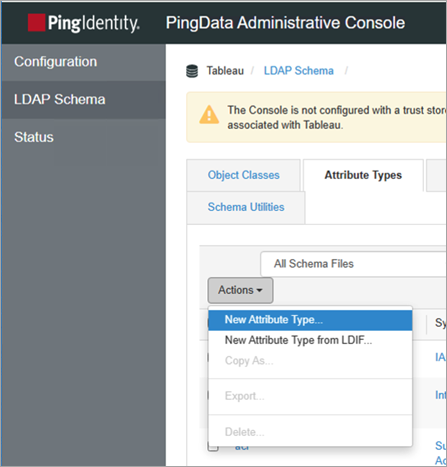
Sign in to the PingData administrative console.
-
From the left navigation pane, navigate to LDAP Schema and click the Attribute Types tab.
Step 4.3.1: Create new attribute types
-
Click the Actions button and select New Attribute Type.
-
In the New Attribute Type dialog box, do the following:
-
For Name, enter the following: siteRoles
-
For Description, enter a description. For example, "Custom attribute for site roles on Tableau Cloud."
-
Click Save.
-
-
Repeat the above step and do the following in the New Attribute Type dialog box:
-
For Name, enter the following: entitlements
-
For Description, enter a description. For example, "Custom attribute for entitlements on Tableau Cloud."
-
Click Save.
-
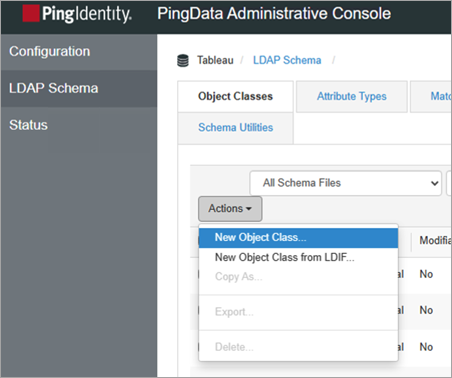
Step 4.3.2: Create new object class
-
From the top of the page, click the Object Class tab, click the Actions button, and then select New Object Class.
-
In the New Object Class dialog box, do the following:
-
For Name, enter the following: Tableau.
-
For Description, enter a description. For example, "Add siteRoles attribute as entitlements".
-
From the Parent drop-down list, select inetOrgPerson.
-
From the Type drop-down list, select Structural.
-
Under the Attributes section, do the following:
-
For Required Attribute, find and select sn and click the Add item arrow button.
-
For Required Attributes, find and select cn and click the Add item arrow button.
-
For Required Attributes, find and select objectClass and click the Add item arrow button.
-
For Optional Attributes, find and select siteRoles and in the click the Add item arrow button.
-
For Optional Attributes, find and select entitlements and click the Add item arrow button.
-
-
Click Save.
-
Step 4.4: Configure SAML
Follow the procedure below to edit the SP connection that you created earlier to support SAML SSO.
-
In the PingFederate administrative console, at the top of the page, select Applications > SP Connections.
-
On the SP Connections page, do the following:
-
Click the connection name you created in Step 4.2.
-
Click the Connection tab.
-
-
On the Connection tab, keep the selections as-is and click the Next button.
-
On the Connections Options tab, keep the selection as-is (BROWSER SSO) and click the Next button.
-
On the Import Metadata tab, keep the selection as-is (NONE) and click the Next button.
-
On the General Info tab, do the following:
-
For PARTNERS ENTITY ID, replace the text with the Tableau Cloud entity ID from the SAML configuration in Tableau Cloud that you started in Step 2. For example, https://sso.online.tableau.com/public/sp/metadata/25db875a-cace-4769-8429-d7b210879ef2/36673dc4-e2c1-4970-976f-255bda6036cb.
-
(Optional) Update the CONNECTION NAME.
-
Click the Next button.
-
-
On the Browser SSO tab, click the Configure Browser SSO button.

-
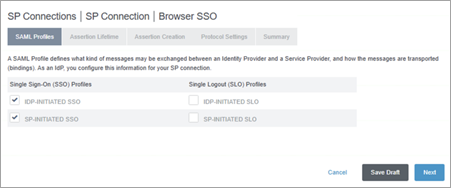
On the SAML Profiles tab, do the following:
-
Under the Single Sign-On (SSO) Profiles section, do the following:
-
Select IDP-INITIATED SSO check box.
-
Select SP-INITIATED SSO check box.
-
-
Click the Next button.
-
-
On the Assertion Lifetime tab, keep the values as-is and click the Next button.
-
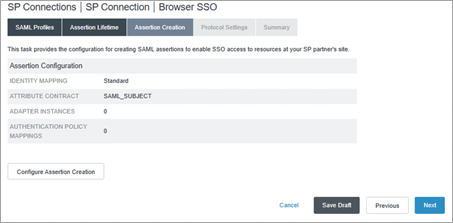
On the Assertion Creation tab, click Configure Assertion Creation button.
-
On the Identity Mapping tab, keep the selection as-is (STANDARD) and click the Next button.
-
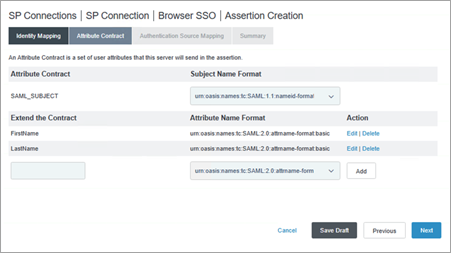
On the Attribute Contract tab, do the following:
-
Under Subject Name Format section, keep the value as-is (urn:oasis:names:tc:SAML:nameid-format:unspecified).
-
Under the Extend the Contract section, do the following:
-
In the text box, enter the following: FirstName
-
Under the Attribute Name Format, select urn:oasis:names:tc:SAML:2.0:attrname-format:basic.
-
Click the Add button.
-
In the text box, enter the following: LastName
-
Under the Attribute Name Format, select urn:oasis:names:tc:SAML:2.0:attrname-format:basic.
-
Click the Add button.
-
-
Click the Next button.
-
-
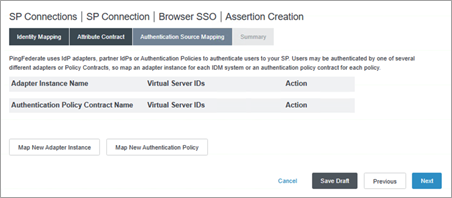
On the Authentication Source Mapping tab, click Map New Adapter Instance button.
-
On the IdP Adapter Mapping page, on the Adapter Instance tab, select the adapter you created in Step 4.1.1 and click the Next button. For example, "credentialsValidatorInstance".
-
On the Mapping Method tab, keep the value as-is (USE ONLY THE ADAPTER CONTRACT VALUES IN THE SAML ASSERTION) and click the Next button.
-
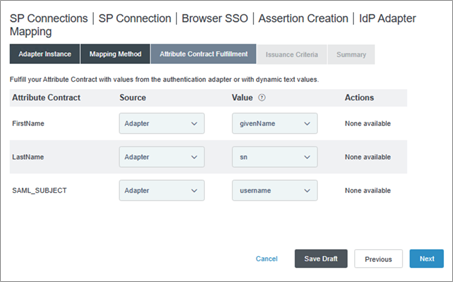
On the Attribute Contract Fulfillment tab, do the following:
-
Next to FirstName, do the following:
-
From the Source drop-down, select Adapter.
-
From the Value drop-down list, select givenName.
-
-
Next to LastName, do the following:
-
From the Source drop-down, select Adapter.
-
From the Value drop-down list, select sn.
-
-
Next to SAML_SUBJECT,
-
From the Source drop-down, select Adapter.
-
From the Value drop-down list, select username.
-
-
Click the Next button.
-
-
On the Issuance Criteria tab, click the Next button.
-
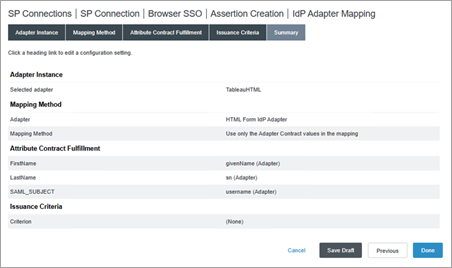
On the Summary tab, review the details and click the Done button.
-
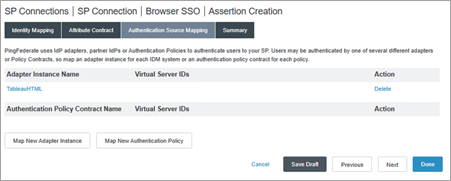
On the Assertion Creation tab, review the details and click the Done button.
-
On the Assertion Creation tab, click the Next button.
-
On the Protocol Settings page, click the Configure Protocol Settings button.
-
On the Protocol Settings page, on the Assertion Consumer Service URL tab, do the following:
-
Under Default, select the check box.
-
Under Binding, select POST.
-
Under Endpoint URL, enter the ACS URL from the SAML configuration in Tableau Cloud that you started in Step 2 and click the Add button. For example, "https://sso.online.tableau.com/public/sp/SSO/25db875a-cace-4769-8429-d7b210879ef2/36673dc4-e2c1-4970-976f-255bda6036cb".
-
Click the Next button.
-
-
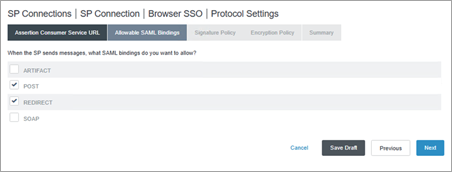
On the Allowable SAML Bindings tab, do the following:
-
Ensure the POST and REDIRECT check boxes are selected and remove selections for the other check boxes.
-
Click the Next button.
-
-
On the Signature Policy tab, click the Next button.
-
On the Encryption Policy tab, keep the selection as-is (None) and click the Next button.
-
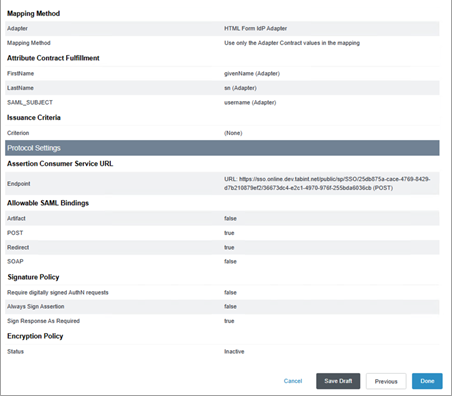
On the Summary tab, review the details and click the Done button.
-
On the Browser SSO page, on the Protocol Settings tab, click the Next button.
-
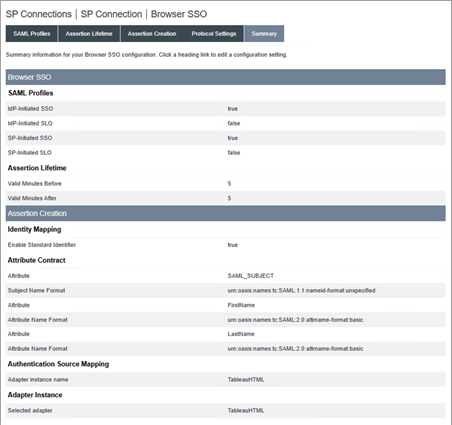
On the Summary tab, review the details and click the Done button.
-
On the SP Connection page, on the General Info tab, click the Next button.
-
On the Configure Browser SSO tab, click the Next button.
-
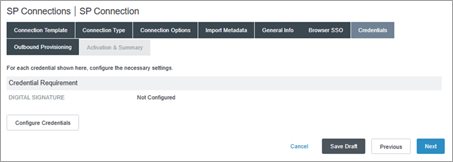
On the Credentials tab, click the Configure Credentials button.
-
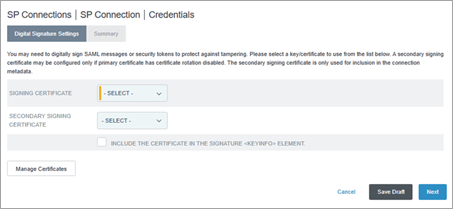
On the Digital Signature Settings tab, do one the following:
-
If you already have an existing, valid signing certificate, do the following:
-
From the SIGNING CERTIFICATE drop-down, select the existing certificate and click the Next button.
-
Skip to step 38.
-
-
If you don't have an existing, valid signing certificate, do the following:
-
Click the Manage Certificates button.
-
Continue to step 33.
-
-
-
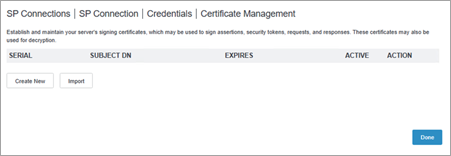
On the Certificate Management page, click the Create New button.
-
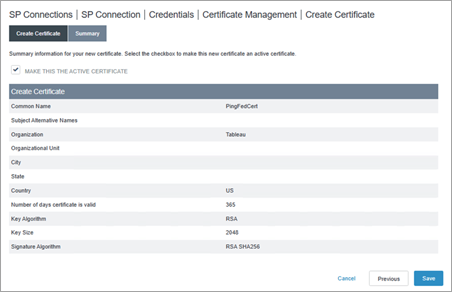
On the Create Certificate page, on the Create Certificate tab, do the following:
-
For COMMON NAME, enter a name. For example, "PingFedCert".
-
For ORGANIZATION, enter a name. For example, "Tableau".
-
For COUNTRY, enter a country name.
-
Click the Next button.
-
-
On the Summary tab, ensure that MAKE THIS ACTIVE CERTIFICATE check box is selected, and click the Save button.
-
On the Certificate Management page, click the Done button.
-
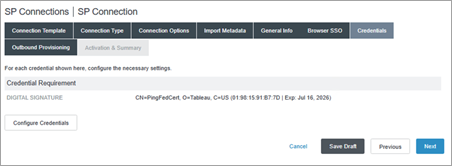
On the Credentials page, do the following:
-
From the SIGNING CERTIFICATE drop-down, select the newly created certificate.
-
Click the Next button.
-
-
On the Summary page, click the Done button.
-
On the SP Connection page, on the Outbound Provisioning tab, click the Next button.
-
On the Activation & Summary tab, review the details and click the Done button.
Step 5: Export metadata from PingFederate
To finish setting up SAML in Tableau Cloud, you'll need the SAML metadata file (.xml) from PingFederate to upload to Tableau Cloud.
-
On the PingFederate administrative console, select System > Protocol Metadata > Metadata Export.
-
On the Metadata Export page, on the Metadata Role tab, keep the selection as-is (I AM THE IDENTITY PROVIDER (IDP)) and click the Next button.
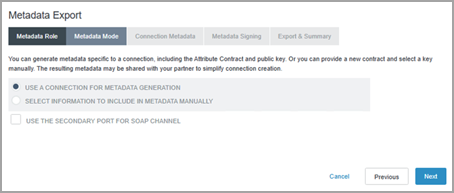
-
On the Metadata Mode tab, keep the selection as-is (USE A CONNECTION FOR METADATA GENERATION) and click the Next button.
-
On the Connection Metadata tab, from the drop-down, select the SP Connection that you created in Step 4.2, and click the Next button.
-
On the Metadata Signing tab, from the SIGNING CERTIFICATE drop-down list, select the certificate you created in Step 4.4, and then click the Next button.
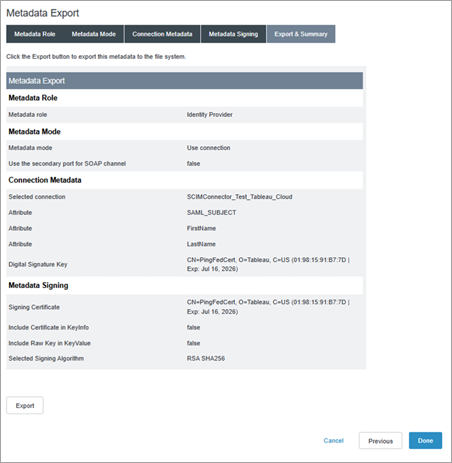
-
On the Export & Summary tab, click the Export button to download the PingFederate metadata file, and then click the Done button.
Step 6: Finish configuring SAML in Tableau Cloud
The following steps need to be performed in Tableau Cloud.
-
Back in Tableau Cloud, on the New Configuration page, under 2. Upload metadata to Tableau, click the Choose a file button and navigate to the SAML metadata file you saved from PingFederate in Step 5. This automatically fills the IdP entity ID and SSO Service URL values.
-
Map the attribute names (assertions) under 3. Map attributes to the corresponding attribute names in PingFederate.
-
Under 4. Choose default for embedding views (optional), select the experience you want to enable when users access embedded content. For more information, see the About enabling iFrame embedding section below.
-
Click the Save and Continue button.
About enabling iFrame embedding
Note: Applies to Tableau Cloud only.
When you enable SAML on your site, you need to specify how users sign in to access views embedded in web pages. These steps configure Okta to allow authentication using an inline frame (iFrame) for embedded visualization. Inline frame embedding may provide a more seamless user experience when signing on to view embedded visualizations. For example, if a user is already authenticated with your identity provider and iFrame embedding is enabled, the user would seamlessly authenticate with Tableau Cloud when browsing to pages that contain embedded visualizations.
Caution: Inline frames can be vulnerable to a clickjack attack. Clickjacking is a type of attack against web pages in which the attacker tries to lure users into clicking or entering content by displaying the page to attack in a transparent layer over an unrelated page. In the context of Tableau Cloud, an attacker might try to use a clickjack attack to capture user credentials or to get an authenticated user to change settings. For more information about clickjack attacks, see Clickjacking(Link opens in a new window) on the Open Web Application Security Project website.
Notes for SCIM support with PingFederate
-
Due to limitations in PingFederate, a siteRole update on a group will not initiate siteRole updates on the users within that group. This could result in a stale siteRole attribute assignment. To work around this issue, you can use a non-custom attribute update alongside the siteRole attribute update to initiate the siteRole update. This can be done manually or automatically using one of the following options:
- Manage siteRoles only on the user object.
- After a group update, manually update any of the attributes for that user. It doesn't have to be a SCIM supported attribute like the site role. It can be a description or name attribute.
- Set up an OGNL expression in PingFederate and perform group membership updates before the Ping Server has started. After you start Ping Server, it will trigger a siteRole attribute update.
- Set up an OGNL expression in PingFederate. Additionally, set up an inverted static group and cron job to trigger siteRole updates.
-
An OGNL expression in PingFederate will evaluate the attributes across the user and their group membership to determine their siteRole.