Set Up for Data-Driven Alerts
When data reaches important thresholds for your business, data-driven alerts automatically send email notifications to key people users specify. As a Tableau Cloud administrator, you set up data-driven alerts much like you do subscriptions. For information about how users create and manage these alerts, see Send Data-Driven Alerts in Tableau User Help.
Manage all data-driven alerts in a site
-
At the top of the browser window, click Tasks, and then click Alerts.
-
Select any alerts you want to update.
-
From the Actions menu, do any of the following:
-
Add or remove yourself as a recipient.
-
Edit alerts to change data thresholds, delivery schedules, and the full list of recipients.
-
Change alert ownership to different users, or delete alerts.
-
Disable data-driven alerts for a site
Data-driven alerts are supported for all sites by default, but administrators can disable them for specific ones.
-
While viewing a site, click Settings on the left-side navigation pane.
-
Under Data-Driven Alerts, uncheck Let users create alerts and receive alert emails.
-
Click Save.
Suspend data-driven alerts
Resume suspended alerts
If an alert fails enough times, you'll receive a notification email that your alert has been suspended. There are a few ways that administrators or alert owners can resume a suspended alert:
-
From the Tasks > Alerts area of Tableau web pages, an
 icon appears in the Last checked column to indicate that the alert is suspended. Select ... > Resume Alert to resume the alert.
 -
Click Resume Alert in the notification email to resume the alert. A notification will either allow you to resume the alert, or indicate that the view has changed and the alert should be deleted.
-
From the Alerts panel of the affected view or workbook. To resume the alert from a view or workbook, select Alert to open the Alerts panel. An icon appears next to the suspended alert. Select Actions > Resume Alert on the affected alert to resume.
Alert owners will receive an email notification when the alert is working again.
Identify and fix failing alerts
As an administrator, you can proactively identify failing alerts that users may be unaware of. To check:
-
Select Status in your site menu.
-
Select Background tasks for non-extracts.
-
From the Task dropdown menu, select Check if Data Alert is True.
-
In the far right, click Error to see a list of failing alerts.
-
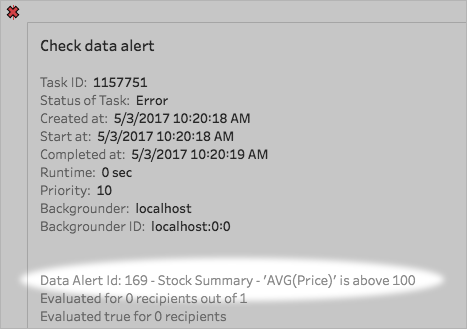
Hover over the red failure icon to display a tooltip with alert details.
To determine the alert owner, look for the alert ID number in the data_alerts table of the Tableau Cloud Repository. (In the alert management area of a site, you can also look for the alert name following the number, but be aware that multiple different alerts may use the same name.)
Note: Alert owners are automatically notified when an alert fails ten times. Administrators can customize when alert owners receive notifications.
Failing alerts are often caused by content changes on Tableau Cloud. Encourage users to recreate alerts if changes like the following occur:
- A workbook, view, or data field is removed or renamed.
- Database credentials embedded in workbooks expire.
- Data Driven Alerts require embedded credentials for Live Connections, the use of OAuth isn’t currently supported with Alerts.
-
A data source becomes inaccessible.