Set Up Amazon Redshift IAM OAuth
These instructions are for the older AWS IAM service. For IAM IDC integration see Set Up Amazon Redshift IAM Identity Center OAuth.
Depending on the identity provider, there are different steps needed to configure the integration. This is a high-level overview. Tableau cannot provide detailed instructions for how to configure AWS or the IDP, but the general approach is described below.
Note: Single use refresh tokens (sometimes called rolling refresh tokens or refresh token rotation) are not supported for OAuth connections using Tableau Bridge to Tableau Cloud. Support for these tokens are planned for a future release.
Step 1: Configure the IDP
-
Create OAuth clients on the IDP for Tableau Desktop, and Tableau Server or Tableau Cloud. The Desktop client should enable
PKCEand usehttp://localhostredirects. -
Add custom claims to use for authorization to roles. In particular, if you are using original IAM, you may want to add claims for
DbUserandDbGroups. These can be used in your IAM policies later. -
Create the Tableau OAuth config files. See documentation on GitHub(Link opens in a new window), and examples here(Link opens in a new window). We welcome examples for other IDPs.
-
Be sure to prefix the Tableau OAuth config IDs with “
custom_”.Note: Oauth config IDs have a maximum limit of 36 characters. IDs longer than this may not generate an error, but will not work.
-
If your IDP supports dynamic localhost port then disable
OAUTH_CAP_FIXED_PORT_IN_CALLBACK_URL. If your IDP does not support this, make sure to add several localhost callback URLs to the allowlist in the config file and on the IDP.
-
-
Install the new Tableau OAuth configuration files in the
OAuthConfigsfolder associated with each application on desktop hosts (Tableau Desktop, Tableau Prep Builder, Tableau Bridge), and on each Tableau Server and Tableau Cloud site that will be using OAuth.
Configure IDP on AWS
1. Create the IDP model on the AWS. See Amazon docs Web Identity Federation(Link opens in a new window) and Create OIDC Identity Provider(Link opens in a new window).
2. Create roles and policies specifically for the IDP. See Create Role for OIDC(Link opens in a new window) in the AWS docs.
Configure Roles for Redshift Users
Attach the policies needed for Redshift. You may use custom claims from the token to authorize to roles. There are several examples with SAML in the AWS documentation(Link opens in a new window). These can be easily adapted to OAuth. In the case of OAuth, the claims are just “DbUser”, “DbGroups”, etc.
Here is an example of the policy from the AWS documentation:
{
"Version": "2012-10-17",
"Statement": [
    {
        "Effect": "Allow",
        "Action": "redshift:GetClusterCredentials",
        "Resource": [
            "arn:aws:redshift:us-west-1:123456789012:dbname:cluster-identifier/dev",
            "arn:aws:redshift:us-west-1:123456789012:dbuser:cluster-identifier/${redshift:DbUser}",
            "arn:aws:redshift:us-west-1:123456789012:cluster:cluster-identifier"
        ],
        "Condition": {
            "StringEquals": {
                "aws:userid": "AROAJ2UCCR6DPCEXAMPLE:${redshift:DbUser}@example.com"
            }
        }
    },
    {
        "Effect": "Allow"
        "Action": "redshift:CreateClusterUser",
        "Resource": "arn:aws:redshift:us-west-1:12345:dbuser:cluster-identifier/${redshift:DbUser}"
    },
    {
        "Effect": "Allow",
        "Action": "redshift:JoinGroup",
        "Resource": "arn:aws:redshift:us-west-1:12345:dbgroup:cluster-identifier/my_dbgroup"
    },
    {
        "Effect": "Allow",
        "Action": [
            "redshift:DescribeClusters",
            "iam:ListRoles"
        ],
        "Resource": "*"
    }
]
}
Connect to Redshift
The user must specify the role ARN to assume, and select the OAuth config installed earlier.

When properly configured, the user will be redirected to the IDP to authenticate and authorize tokens for Tableau. Tableau will receive openid and refresh tokens. AWS is able to validate the token and signature from the IDP, extract the claims from the token, look up the mapping of claims to IAM role, and either permit or block Tableau from assuming the role on the user’s behalf. (in other words, AssumeRoleWithWebIdentity(Link opens in a new window)).
Tokens
By default Redshift OAuth IAM passes the ID token to the driver. For on-premise customers, including those using Tableau Bridge, you may use a TDC file to pass the access token instead.
<connection-customization class='redshift' enabled='true' version='10.0'>
	<vendor name='redshift' />
	<driver name='redshift' />
	<customizations>
		<customization name='CAP_OAUTH_FEDERATE_ACCESS_TOKEN' value='yes'/>
	</customizations>
</connection-customization>
For more information about configuring and installing .tdc files, see Customize and Tune a Connection(Link opens in a new window) and Using a .tdc File with Tableau Server(Link opens in a new window).
About Group Federation
When using OAuth authentication with an IAM Role, you can select whether or not you are using Group Federation. This will change how the connector interacts with the authentication API to interface with Redshift.
- When the Group Federation box (available in versions 2025.1 and beyond) is checked while connecting, the Redshift driver will use the
getClusterCredentialsWithIAM(Link opens in a new window)API for obtaining the credentials in provisioned clusters. - When the Group Federation box is not checked, the
getClusterCredentials(Link opens in a new window)API will be used instead.
These two APIs will return IAM tokens with slightly different properties. For more information, consult the AWS API documentation linked above, and ODBC driver options(Link opens in a new window).
Usage Notes
- For Tableau Desktop and Tableau Prep Builder before version 2024.3, this can be set in the advanced driver configuration field using 'group_federation=1'. It can also be configured by using a TDC file to define custom connection properties. For more information on using a TDC, see Customize and Tune a Connection.
- Starting in version 2024.3, there is a group_federation field in the connection dialog for on-premise (Tableau Desktop, Tableau Prep Builder, and Tableau Server). This will be available in Tableau Cloud starting in 2025.1 (Available in February 2025).
- To use Group Federation with Tableau Server, group_federation must be added to the ODBC extras allowlist. For more information, see Customize Connection String for Native Connectors.
Okta
If using Okta it’s better to use a “custom authorization server” rather than the “org authorization server.” The custom authorization servers are more flexible. There is a custom authorization server created by default, which is called “default”. The authorization URL should look like this:
https://${yourOktaDomain}/oauth2/{authServerName}/v1/authorize

Update Driver
For Redshift OAuth using the original IAM service, you may use either:
-
Redshift ODBC v1 driver starting with version 1.59, which can be downloaded from https://docs.aws.amazon.com/redshift/latest/mgmt/configure-odbc-connection.html(Link opens in a new window).
-
Redshift ODBC v2 driver starting with version 2.0.1.0, which can be downloaded from https://github.com/aws/amazon-redshift-odbc-driver/tags(Link opens in a new window). Note there is no v2 driver for OSX.
Troubleshooting
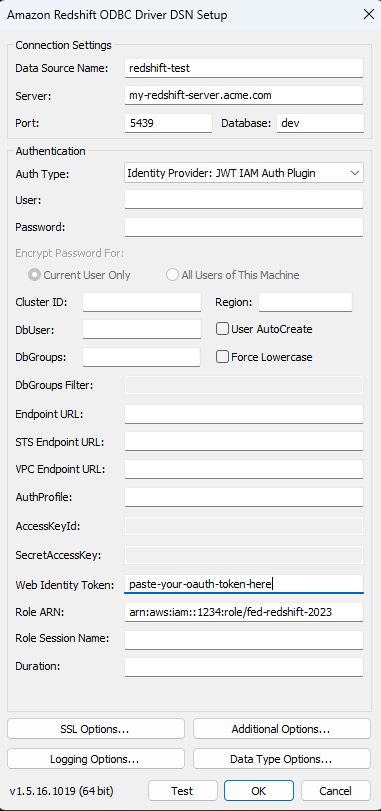
The best way to diagnose errors is to remove Tableau from the picture. You can instead test using the driver manager or a similar tool. This is just for troubleshooting - you shouldn't use a DSN or the "Other ODBC" connector for regular usage of this feature. To help ensure a valid test, the parameters should be the same as shown below, except for the cluster information, database, token, and namespace.
Note: Don't specify DbUser or DbGroups in the connection string of the DSN when testing because Tableau does not have access to these and cannot include them in the connection string. You may include it in the token claims.
If you see an error message about invalid/expired token coming from the driver on the first connection (it will have a SQLState error code like [28000] or [08001] in the error message), then Tableau successfully completed the OAuth flow, and failed in the driver. This means there is a misconfiguration on either the AWS side or the IDP side. There may also be permissions or authorization errors returned from the driver, which is also out of Tableau's control.
Before you begin testing, you first need to get an access token (the default for IAM IDC) or refresh token (if customized) to send to the driver.
Here is an example with Okta. Almost all IDPs have a way to do this which is quite similar. Note that to use this flow you need to have enabled resource owner password grant type. Substitute the IDP URL, client secret, client ID, username, and password.
curl -X POST "https://OKTA_URL/v1/token" \
-H 'accept: application/json' \
-H "Authorization: Basic $(echo -n 'CLIENTID:CLIENTSECRET' | base64)" \
-H "Content-Type: application/x-www-form-urlencoded" \
-d "grant_type=password&username=USER&password=PASSWORD&scope=openid"
Once you have the token, you can use a DSN to test. For Windows, you can use the ODBC driver manager. On Mac you can use the iODBC driver manager UI. On Linux you can use the isql command line tool that is included with Tableau Server in the customer-bin folder.
The plugins that use a fixed AWS profile won't work unless you want to use the same profile for all users for that connection. The other OAuth plugins require direct access to the system browser, which doesn't work on the server side.
Below is an example of using the ODBC driver manager on Windows.