SCIM
System for Cross-domain Identity Management (SCIM) is a protocol that standardizes the automation of users and groups provisioning for integration with cloud-based identity providers (IdPs), such as Microsoft Entra ID and Okta.
Starting in version 2025.3, Tableau Server supports SCIM, which enables identity providers (IdPs) to centrally manage user identities while streamlining the process of managing users and groups membership in Tableau Server. The IdP uses SCIM to manage a user's lifecycle in Tableau and Tableau Server is kept in sync with the provisioning assignments in the IdP. This type of integration improves security and reduces the manual work for server administrators in Tableau Server.
The SCIM capability on Tableau Server is designed to work at the site-level and supports the following authentication:
-
Site-specific SAML authentication (starting in Tableau Server 2025.3.0)
-
Authentication configured in TSM during Tableau Server setup (TSM configured) and authentication configured through identity pools (starting in Tableau Server 2025.3.1)
Configure SCIM integration with Tableau Server
Step 1: Perform prerequisites
Before enabling SCIM integration with Tableau Server, you’ll need to meet the following requirements:
- Have server administrator access to Tableau Server.
- Able to modify your IdP's SCIM settings for Tableau Server.
- Optionally, if using external token generation and management, you have the following:
Created and enabled a Tableau connected app. If you haven't done this, see Use Tableau Connected Apps for Application Integration.
A valid JWT that contains the following scopes:
tableau:users:*andtableau:groups:*
Note: Because of the Tableau Server firewall, you might need to set up an on-premises connector in your IdP for the SCIM capability to work. For example, in Okta you'll need to set up on-premises provisioning (OPP)(Link opens in a new window). In Microsoft Entra ID, you'll need to set up a provisioning agent(Link opens in a new window).
Step 2: Configure site-level SCIM
The procedure described in this section is performed at the site.
You can use a Tableau-generated SCIM token. Alternatively, you can bypass the SCIM token that Tableau generates and instead use an externally generated JWT (using a Tableau connected app) to support SCIM requests.
Enable SCIM - using a Tableau-generated token
-
Sign in to Tableau Server as a server administrator.
-
Go to the site and click Settings.
-
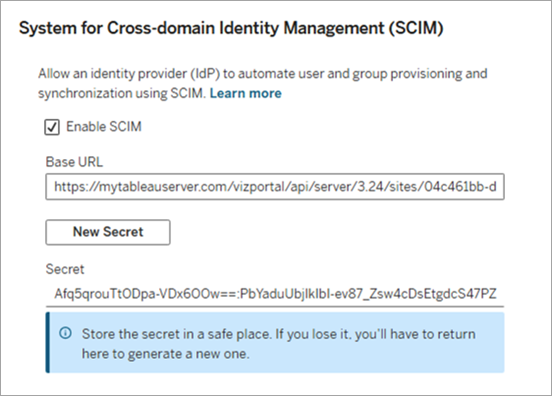
Under System for Cross-domain Identity Management (SCIM) heading, select the Enable SCIM checkbox. This populates the Base URL, New Secret button, and the Authentication drop-down.
-
Do the following:
-
Copy the Base URL to use in your IdP's SCIM settings.
-
Click the New Secret button.
-
Copy the secret and store it in a safe location so that you can add it to your IdP's SCIM settings.
Important: The secret is displayed only immediately after it is generated. If you lose it before you can apply it to your IdP, you can click New Secret again.
-
From the Authentication drop-down menu, select the authentication type to associate with SCIM.
-
Click the Save button at the top or bottom of the Settings page.
-
Enable SCIM - using an external token
To use an external token, 1) enable the external token capability for SCIM and then 2) enable SCIM.
Step 1: Turn on external token
Before enabling SCIM, enable the external token capability using TSM.
-
Open a command prompt as a server administrator on the initial node (where TSM is installed) in the cluster.
-
Run the following commands:
-
tsm configuration set -k features.JWTSupportForSCIM -v true -
tsm pending-changes applyFor more information, see features.JWTSupportForSCIM.
-
Step 2: Enable SCIM
When enabling the SCIM, associate an authentication type that provisioned users will use to sign in to Tableau Server. The authentication types available depend on the authentication configured on Tableau Server or the site.
-
Sign in to Tableau Server as a server administrator.
-
Navigate to the site and click Settings.
-
Under System for Cross-domain Identity Management (SCIM) heading, select the Enable SCIM checkbox. This populates the Base URL, New Secret button, and the Authentication drop-down.
-
Do the following:
-
Copy the Base URL to use in your IdP's SCIM settings.
-
Ignore the New Secret button.
-
From the Authentication drop-down menu, select the authentication type to associate with SCIM.
-
Click the Save button at the top or bottom of the Settings page.
-
Step 3: Enable SCIM with the IdP
After enabling SCIM in Tableau Server, use the steps in your IdP's documentation to enable SCIM support with your identity provider (IdP).
Step 4: Provision users and groups
Follow your IdP’s documentation to provision users and groups after enabling SCIM support on the site.
After users and groups are provisioned through SCIM, you should not directly update a user's details, like authentication or site role, through Tableau Server (or Tableau REST API), with the exceptions stated in step 5, below.
Step 5: Update users for local or Mutual SSL
If you've associated SCIM with authentication that was configured in TSM during Tableau Server setup, also referred to as "Server default (TSM configured)" in the SCIM setting's authentication drop-down, take the additional steps described below to ensure users can successfully sign in to Tableau Server.
-
For local authentication: You must update the provisioned users with their passwords in Tableau Server before they can successfully sign in. To update a user, see Change passwords for users of a single site .
-
For mutual SSL: Ensure that Tableau Server correctly maps the client certificate to users. For more information, see Mapping a Client Certificate to a User During Mutual Authentication.
About changing authentication associated with SCIM
If the authentication type associated with SCIM is changed, Tableau Server immediately revokes and deletes the secret. As a result, provisioning will fail and users and groups in Tableau Server can be out of sync with the identity provider (IdP).
To avoid any syncing issues, ensure that the following steps are taken in the exact order: 1) select the new authentication type, 2) generate a new secret, and then 3) add the new secret to the IdP's SCIM settings.
Important: When SCIM's authentication type is changed, only new users provisioned after the change will use the updated authentication type. Existing users will continue to be able to authenticate with the previous authentication method. Users who no longer exist in the IdP after the authentication change in SCIM will no longer be able to sign in.
Additional considerations
There are certain implications to be aware of after enabling SCIM depending on the authentication type SCIM is associated with.
Site-specific SAML authentication
Site-specific SAML can't be disabled if a SCIM configuration is associated with it. If you need to disable site-specific SAML, you must associate a different authentication type with SCIM or disable SCIM.
Authentication configured through identity pools
No additional considerations.
Note: If an identity pool is disabled or deleted, a different authentication type must be associated with SCIM. The previously generated secret will no longer be valid and will cause users and groups provisioning to fail.
Authentication configured in TSM
If SCIM is configured to use authentication configured in TSM during Tableau Server setup, changing the TSM configured authentication can cause syncing issues and sign-in failures for users.
For example, if changing TSM authentication from local to SAML, existing users will need to be added to the IdP and enabled for Tableau Server single sign-on (SSO). If changing TSM authentication from SAML to local, users will need to be updated to include their passwords.