Print Views from Tableau Desktop
Before printing, specify how you want the printed page to look using the Page Setup dialog box. Then print to a printer or PDF.
Set up the page
You can apply different page setup options for each worksheet in a workbook, For example, worksheets can print with titles showing or hidden, with unique page orientation, and more.
To begin, select File > Page Setup.
General settings (available for individual sheets, not dashboards)
-
Show - Show or hide the title, view, caption, color legend, shape legend, size legend, and map legend.
-
Headers and Breaks - Control the appearance of these table elements.
-
Repeat headers and legends on each page - adds table row and column headers at the top of each printed page when a view breaks across several pages.
-
Break pages on pane boundaries - prevents page breaks in the middle of a table cell.
-
-
Pages Shelf - If the view uses the Pages Shelf, specify whether to print the current page or all pages.
Layout settings
-
Legend Layout - If you include one or more legends, select how you want the legends to appear on the printed page.
-
Margins - Specify top, bottom, left, and right margins by typing values into the text boxes.
-
Centering - Optionally, select whether to center the view horizontally or vertically—or both—on the page.
Print Scaling settings
These settings affect only printed documents, not exported images or PDFs. However, the page orientation settings are used as the default when you publish the workbook to Tableau Cloud or Tableau Server.
-
Print Scaling - Scale a view to fit within a single page or print across multiple pages. Select from the following options:
-
Automatic – Scales the view automatically based on the paper size.
-
Scale to – Scales the view to the specified percentage of its original size.
-
Fit to – Scales the view to fit within the specified area. Select the number of printed pages across and down. For example, if you have a really wide view that is not very tall, you can specify three pages across by one page down.
-
-
Page Orientation - Specify how you want the view oriented on the printed page. Select from the following options:
-
Use Printer Setting – Use the page orientation that is already specified by the printer.
-
Portrait – Presents the view so that it is oriented vertically on the printed page.
-
Landscape – Presents the view so that it is oriented horizontally on the printed page.
The following diagram shows the difference between portrait and landscape page orientations.

-
Print a view
After you have configured the Page Setup settings, select File > Print. The following options in the Print dialog box are unique to Tableau.
Show Selections
When this option is selected any selections you’ve made in the views will be maintained while printing.
Change the Print Range
When you print from a workbook with multiple worksheets, each worksheet represents one or more printed pages, depending on the page setup.
Select from the following print ranges:
-
Entire Workbook - Prints all the worksheets in the workbook.
-
Active Sheet - Prints only the sheet currently displayed in the workbook.
-
Selected Sheets - Prints the selected sheets.
You can select multiple worksheets in a workbook by holding down the CTRL or Shift keys (or the z key on a Mac) while clicking the worksheet tabs that you want to select.
Print to PDF
Note: If you're using Tableau Cloud or Tableau Server, instead see Download Views and Workbooks and Link to a PNG, PDF, or CSV of a View.
In Tableau Desktop, you can save views as PDF files rather than printing them as hard copies. You do not need to have Adobe Acrobat installed on your computer.
When you print an individual sheet to PDF, filters in the view are not included. To show filters, create a dashboard containing the sheet and export the dashboard to PDF.
Print to PDF using a Windows computer
-
Specify page setup options for each sheet in your workbook.
-
Select .

-
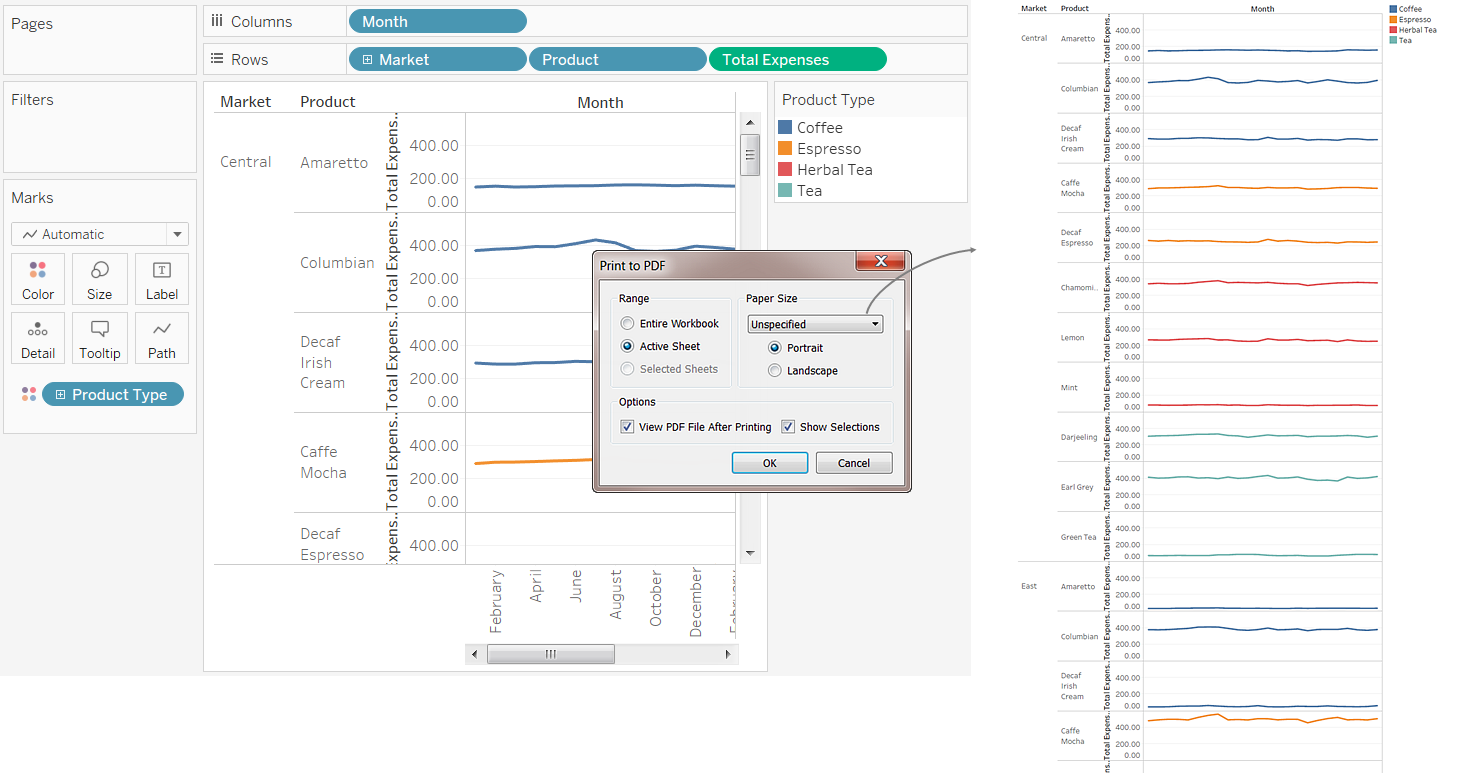
In the Print to PDF dialog box, select the print Range:
-
Entire Workbook - Publishes all the sheets in the workbook.
-
Active Sheet - Publishes only the sheet currently displayed in the workbook.
-
Selected Sheets - Publishes the selected sheets. To select multiple sheets in a Tableau workbook, hold down the Ctrl key as you select sheet tabs along the bottom of the Tableau workbook.
-
-
Select a Paper Size. If you select Unspecified, the paper size will expand to the necessary size to fit the entire view on a single page.
-
Select View PDF File After Printing if you want to automatically open the PDF after creating it. This option is only available if you have Adobe Acrobat Reader or Adobe Acrobat installed on your computer.
-
Select whether to Show Selections. When this option is selected the selections in the views are maintained in the PDF.
-
Click OK and specify where you want to save the PDF. Then click Save.
Print to PDF using a Mac computer
-
Specify page setup options for each sheet in your workbook.
-
Select .
-
In the Print dialog box, click Show Details to select a print range:
-
Entire Workbook - Publishes all the sheets in the workbook.
-
Active Sheet - Publishes only the sheet currently displayed in the workbook.
-
Selected Sheets - Publishes the selected sheets. To select multiple sheets in a Tableau workbook, hold down the Command key as you select sheet tabs along the bottom of the Tableau workbook.
-
-
Click PDF > Save as PDF.

-
Specify where you want to save the PDF, then click Save.