Build a Histogram
A histogram is a chart that displays the shape of a distribution. A histogram looks like a bar chart but groups values for a continuous measure into ranges, or bins.
The basic building blocks for a histogram are as follows:
- Mark type: Automatic
- Rows shelf: Continuous measure (aggregated by Count or Count Distinct)
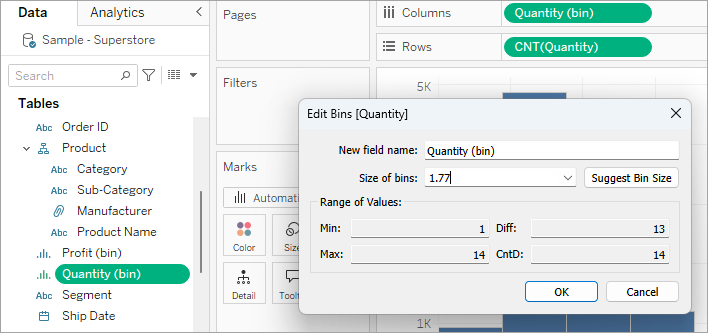
- Columns shelf: Bin (continuous or discrete). Note: This bin should be created from the continuous measure on the Rows shelf. For more information on how to create a bin from a continuous measure, see Create Bins from a Continuous Measure(Link opens in a new window).
In Tableau you can create a histogram using Show Me.
- Connect to the Sample - Superstore data source (if necessary, you can download it from the Tableau Public sample data page(Link opens in a new window)).
- Drag Quantity to Columns.
- Click Show Me on the toolbar, then select the histogram chart type. The histogram chart type is available in Show Me when the view contains a single measure and no dimensions.

Three things happen after you click the histogram icon in Show Me:
- The view changes to show vertical bars, with a continuous x-axis (1 - 14) and a continuous y-axis (0 - 5,000).
- The Quantity measure you placed on the Columns shelf, which had been aggregated as SUM, is replaced by a continuous Quantity (bin) dimension. (The green colour of the field on the Columns shelf indicates that the field is continuous.)
- The Quantity measure moves to the Rows shelf and the aggregation changes from SUM to CNT (Count).

The Quantity measure captures the number of items in a particular order. The histogram shows that about 4,800 orders contained two items (the second bar), about 2,400 orders contained 4 items (the third bar), and so on. The bin size is 1.77, so the bars don't align with the axis tick marks. (To see or change the bin size, in the Data pane, right-click the bin and select Edit....)
Let's take this view one step further and add Segment to Colour to see if we can detect a relationship between the customer segment (consumer, corporate or home office) and the quantity of items per order.
- Drag Segment to Colour.

The colours don't show a clear trend. Let's show the percentage of each bar that belongs to each segment.
- Hold down the Ctrl key and drag the CNT(Quantity) field from the Rows shelf to Label.
Holding down the Ctrl key copies the field to the new location without removing it from the original location.
- Right-click (Control-click on a Mac) the CNT(Quantity) field on the Marks card and select Quick Table Calculation > Percent of Total.
Now each coloured section of each bar shows its respective percentage of the total quantity:

But we want the percentages to be on a per-bar basis.
- Right-click the CNT(Quantity) field on the Marks card again and select Edit Table Calculation.
- In the Table Calculation dialog box, change the value of the Compute Using field to Cell.

Now we have the view that we want:

There’s still no evidence that the percentages by customer segment show any trend as the number of items in an order increases.