Build and Organize your Flow
Note: Starting in version 2020.4.1, you can now create and edit flows in Tableau Server and Tableau Cloud. The content in this topic applies to all platforms, unless specifically noted. For more information about authoring flows on the web, see Tableau Prep on the Web in the Tableau Server(Link opens in a new window) and Tableau Cloud(Link opens in a new window) help.
After you connect to the data that you want to include in your flow, you can begin cleaning and shaping your data by adding new steps to the flow or inserting steps in between existing steps.
To organize your flow, you can change the default step colors, add descriptions to provide context for your steps or cleaning actions, or reorganize your flow layout to make complex flows easier to follow.
Add or insert steps
As you build out your flow, you can add different step types to perform the actions that you need. For example add a Clean Step to do things like split fields, apply filters, or perform a variety of other operations to clean dirty data. Use a Join or Union step type to combine data tables or add a Script step type to incorporate R or Python scripts into your flow.
As your flow begins to takes shape, you may need to go back to earlier steps in your flow and insert different step types to perform various actions like adding an additional cleaning step or aggregating your data to use the same level of detail as a later step.
Note: The menu options that you see will vary depending on your Tableau Prep Builder version and whether you are adding a step to build out the next step in the flow versus inserting a step between existing steps. If you are using Tableau Prep Builder version 2019.3.1 or earlier, refer to that section to see your menu options.
You can't add input steps using these menu's. Instead you'll need to drag tables from the Connections pane to the Flow pane. For more information, see Connect to Data.
Add steps
After you connect to your data and drag a table onto the canvas, click the plus ![]() button to select a step type from the menu, or click on the suggested clean step (Tableau Prep Builder version 2020.3.3 and later and on the web) to automatically add a cleaning step to your flow.
button to select a step type from the menu, or click on the suggested clean step (Tableau Prep Builder version 2020.3.3 and later and on the web) to automatically add a cleaning step to your flow.
|
|

|

Select a step type:
-
Clean Step: Add a cleaning step to perform a variety of cleaning actions. For more information about the different cleaning actions that are available, see Clean and Shape Data.
Note: In Tableau Prep Builder version 2019.4.2, the Add Branch option was replaced with the Clean Step option. To split your flow into different branches, click the plus
 button between two existing steps and select a step type from the Add menu.
 -
New Rows: Generate new rows to fill gaps in your sequential data set. For more information, see Fill Gaps in Sequential Data.
Aggregate: Create an Aggregation step to select fields and change their level of detail. For more information, see Aggregate and group values.
-
Pivot: Create a Pivot step to perform a variety of pivot options such as converting column data to rows, or row data to columns. You can also set up a wildcard pivot to automatically add new data to your pivot. For more information, see Pivot Your Data.
-
Join: Create a Join step to combine data tables. When you create a join from the menu option, you must manually add the other input to the join and add your join clauses. As an alternative, you can drag and drop a step (shown below) to join files automatically. For more information about creating a join, see Join your data.

If you connect to databases that include tables with relationship data, you can also create a join from the menu in the Flow pane. For more information about joining tables using this method, see Join data in the Input step (Link opens in a new window).
-
Union: Create a Union step. Add tables to the union by dragging them to the step and dropping them on the Add option that displays. As an alternative, you can drag and drop a step onto another step to union files. For more information about creating a union, see Union your data.
-
Script (Tableau Prep Builder version 2019.3.1 and later and on the web): Create a Script step to include R and Python scripts in your flow. Script steps are not currently supported in Tableau Cloud. For more information, see Use R and Python scripts in your flow.
- Prediction: Use Einstein Discovery-powered models to bulk score predictions for the data in your flow. For more information, see Add Einstein Discovery Predictions to your flow.
-
Output: Create an Output step to save the output to an extract file (.hyper), a .csv file, publish the output as a data source to a server, or write your flow output to a database.
Saving Output steps to a file is not currently supported on the web. For more information about output types, see Save and Share Your Work.
- Paste: Add copied steps from the same flow. For more information about copying and pasting steps in the same flow, see Clean and Shape Data.
-
Insert Flow (Tableau Prep Builder version 2019.3.2 and later and on the web): Add flow steps that were saved from another flow into your current flow. You can add them to the end of a step or insert them between existing steps. For more information about using saved flow steps in your flow, see Create reusable flow steps
Note: This option was added to this menu in Tableau Prep Builder version 2019.4.2. In prior versions, you could add flow steps using right-click or Ctrl-click (MacOS) in the white space of the flow pane.
Insert steps
Insert a step between existing steps. Input and Output step types aren't available from this menu. The options vary depending on your product version. If you are using an earlier version of Tableau Prep Builder, refer to the Version 2019.3.1 and earlier section below.
-
Hover in the middle of the flow line where you want to insert a step until the plus
 icon appears. Then click the icon and select a step type.
Note: Your options may look different depending on your product version. For example Insert Flow was added to this menu in Tableau Prep Builder version 2019.4.2.

-
Select a step type:
-
Clean Step: Insert a cleaning step between existing steps to perform a variety of cleaning actions. For more information about the various cleaning actions you can use, see Clean and Shape Data.
- New Rows: Generate new rows to fill gaps in your sequential data set. For more information, see Fill Gaps in Sequential Data.
-
Aggregate: Insert an Aggregation step between existing steps to select fields and change their level of detail. For more information, see Aggregate and group values.
-
Pivot: Insert a Pivot step between existing steps to perform a variety of pivot options such as converting column data to rows, or row data to columns. You can also set up a wildcard pivot to automatically add new data to your pivot. For more information, see Pivot Your Data.
-
Join: Insert a Join step between existing steps . When you create a join from the menu option, you must manually add the other input to the join and add your join clauses. As an alternative, you can drag and drop a step (shown below) to join files automatically.
For more information about creating a join, see Join your data.
If you connect to databases that include tables with relationship data you can also create a join from the menu in the Flow pane. For more information about joining tables using this method, see Join data in the Input step (Link opens in a new window).
-
Union: Insert a Union step. Add tables to the union by dragging them to the step and dropping them on the Add option that displays. As an alternative, you can drag and drop a step onto another step to union files. For more information about creating a union, see Union your data.
- Script (Tableau Prep Builder version 2019.3.1 and later and on the web): Insert a Script step to include R and Python scripts in your flow. Script steps are not currently supported in Tableau Cloud. For more information, see Use R and Python scripts in your flow.
- Prediction: Use Einstein Discovery-powered models to bulk score predictions for the data in your flow. For more information, see Add Einstein Discovery Predictions to your flow.
- Paste: Insert copied steps from the same flow between existing steps. For more information about copying and pasting steps in the same flow, see Clean and Shape Data.
-
Insert Flow (Tableau Prep Builder version 2019.3.2 and later and on the web): Insert flow steps that were saved from another flow into your current flow. You can add them to the end of a step or insert them between existing steps. For more information about using saved flow steps in your flow, see Create reusable flow steps .
Note: This option was added to this menu in Tableau Prep Builder version 2019.4.2. In prior versions, you could insert flow steps using right-click or Ctrl-click (MacOS) in the white space of the flow pane.
-
-
Hover over a step until the plus
icon appears then click the icon and select a step type. Insert Step inserts a cleaning step between steps. All other options will create a branch from the flow.
-
Select from the following options:
-
Add Branch: Split your flow into different branches.
-
Insert Step: Insert a cleaning step between existing steps to perform a variety of cleaning actions. For more information about the various cleaning actions you can use, see Clean and Shape Data.
-
Add Aggregate: Create an Aggregation step where you can select the fields that you want to aggregate or group. For more information, see Aggregate and group values.
-
Add Pivot: Create a Pivot step where you can perform a variety of pivot options to convert column data to rows, or row data to columns. For more information, see Pivot Your Data.
-
Add Join: Create a Join step where you can manually add the other input to the join and add the join clauses. As an alternative, you can drag and drop a step to join files. The following example shows dragging the Orders_Central Input step and dropping it on Join:
For more information about creating a join, see Join your data.
In Tableau Prep Builder version 2019.1.3 and later, if you connect to databases that include tables with relationship data you can also create a join from the menu in the Flow pane. For more information about joining tables using this method, see Join data in the Input step (Link opens in a new window).
-
Add Union: Create a Union step. Add tables to the union by dragging them to the step and dropping them on the Add option that displays. As an alternative, you can drag and drop a step onto another step to union files. For more information about creating a union, see Union your data.
- Add Script(version 2019.3.1 and later): Create a Script step to include R and Python scripts in your flow. For more information, see Use R and Python scripts in your flow.
- Add Output: Select this option to save the output to an extract file (.hyper), a .csv file, or publish the output as a data source to a server.
-
Group steps
Supported in Tableau Prep Builder version 2020.3.3 and later and on Tableau Server or Tableau Cloud starting in version 2020.4.
Use the Group option to compartmentalize sections of large complex flows into folders to make it easier to follow, troubleshoot, or share your flow with others. You can change the color of the group, add a description, copy and paste the grouped steps to other areas of your flow, or in Tableau Prep Builder, even save the grouped steps to a file on your server to reuse them in other flows.

Requirements to group steps
- Steps must be directly connected with a flow line.
- Steps can only be included in one group at a time.
- Groups can't be nested.
- You can add or remove steps from a group at any time, as long as you maintain the flow line connections between steps in the group. This also applies to removing steps from a flow that are already included in a group. In that scenario, the group is automatically ungrouped.
Create a group
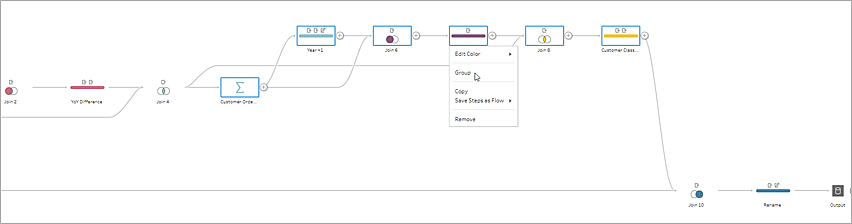
Select a set of connected steps in your flow (you can also drag to select multiple steps in one click), then right-click or Cntrl-click (MacOS) on the selected steps and select Group from the menu.
After you create the group, you can do any of the following:
- Click the double arrows to expand
 or collapse
  the group at any time.
 - Add more steps to the group by dragging a connected step and dropping it onto the collapsed folder.
-
Remove steps from the group. In the expanded state, right-click or Cntrl-click (Mac OS) a step and select Remove from Group.
Note: This option isn't available if you try to remove a step that breaks the continuity of the group.
-
In the collapsed state, right-click or Cntrl-click (MacOS) to open the menu and select from the following options:

- Rename: Change the group name.
- Add Description: Enter a description for the group
- Edit Color: Change the color of the group folder. This won't change the color of the individual steps in the group.
- Expand Group: Show all the steps in the group. You can also click the double arrows to expand the group.
- Ungroup: Remove all the steps from the group and delete the group.
- Copy: Copies the group and all of the steps in the group to your clipboard to paste elsewhere in your flow. For more information about using copy and paste, see Copy and paste steps.
- Save Steps as Flow (Tableau Prep Builder only): Save your grouped steps locally to a file on your computer or publish it to Tableau Server or Tableau Cloud to share with others or use it in other flows. For more information about saving steps for reuse, see Create reusable flow steps .
- Remove: Removes the group and all the steps in the group from the flow.
-
(version 2021.1.2 and later) In the expanded state, right-click or Cntrl-click (MacOS) in the expanded group area to open the menu to collapse the group or ungroup the steps.

Change the flow color scheme
Tableau Prep assigns each step in your flow a color by default. This color scheme is applied throughout the flow to help you keep track of your data throughout the flow as you apply cleaning steps, join, union or aggregate the data so you know which files are impacted by your operations.
To select a different color scheme for your steps do the following:
-
Select one or more steps.
-
Right-click or Ctrl-click (MacOS) on a selected step and select Edit Color.

-
Click on a color in the color palette to apply it.
To reset the step color back to the default color, do one the following:
-
Click Undo from the top menu.
-
Cntrl+Z or Command-Shift-Z (MacOS).
-
Select the steps you changed, right-click on a selected step and select Edit Color, then select Reset Color from the bottom of the color palette.
Remove steps from the flow
At any point in the flow, you can remove steps or the flow lines between steps.
Note: You can't remove flow lines coming into or out of a collapsed step group. You must either expand the group or ungroup the steps first.
-
To remove a step or flow line, select the step or line you want to remove, right-click the element, and then select Remove.
-
To remove multiple steps or flow lines, do one of the following:
-
Use your mouse to drag and select a whole section of the flow. Then right-click or Ctrl-click (Mac OS) on one of the selected steps and select Remove.
-
Press Ctrl+A or Cmd+A (MacOS) to select all elements in the flow, or press Ctrl+click or Cmd+Click (MacOS) to select specific elements, and then press the Delete key.
-
Add descriptions to flow steps and cleaning actions
As you build your flow and perform various cleaning operations, you might want to add a description to help others who might later look at or work with your flow to better understand your steps. You can add a description to any individual step in your flow directly on the Flow pane, any step group, or to any cleaning action in the Changes pane to provide additional context for your changes. The description can be up to 200 characters long.
For more information about viewing changes in the Changes pane, see View your changes(Link opens in a new window).
Add a description to flow steps
When you add a description, a message ![]() icon is added underneath the step. Click the icon to show or hide the description text in the Flow pane.
icon is added underneath the step. Click the icon to show or hide the description text in the Flow pane.
-
In the Flow pane, select a step.
-
Do one of the following:
-
Right-click or Ctrl-click (MacOS) on the step and select Add Description from the menu.

-
Double-click in the name field for the step, then click on Add a description.

-
-
Type your description in the text box.

-
Click outside the text box or press Enter to apply your changes. By default, the description displays underneath the step. To hide the description click the message
 icon.
icon. -
To edit or delete the description, right-click or Ctrl-click (MacOS) on the step or description. Then from the menu, select Edit Description or Delete Description.

Add a description to a change entry
You can add a description to an entry in the Changes pane starting Tableau Prep Builder version 2019.1.1 and on the web.
-
Select a step in the flow pane.
-
Open the Changes pane or Changes tab.
-
Right-click or Ctrl-click (MacOS) on an entry in the Changes pane and select Add Description.

-
Enter a description for the change action.

The description appears below the generated text for the change with a comment
icon.
- To edit or delete the description, right-click or Ctrl-click (MacOS) on the change item, and select Edit Description or Delete Description.
Reorganize the layout of your flow
Supported in Tableau Prep Builder version 2019.2.2 and later and on Tableau Server or Tableau Cloud starting in version 2020.4.
As you build a flow, Tableau Prep Builder uses a default layout. Each flow is laid out and processed from left to right, with Input steps beginning on the far left of the canvas and Output steps ending on the right side of the canvas. However if you build large, complex flows, they can quickly become hard to follow.
You can clean up the layout of your flow by selecting and moving steps so the flow layout is organized in a way that makes sense to you. For example, you can fix crossed flow lines, move your flow steps to clean up extra white space, or rearrange your flow steps to show a clear sequence of events.
For example. the following flow is confusing and hard to follow:

To clean up this flow select and drag steps up, down, left or right and drop them to a new location in the canvas. Flow steps can't be moved to a position that disrupts the left-to-right process flow. For example, you can't drag a union step that is positioned before a join step, to a position that is after that join step in the flow.
When dragging flow steps to an allowed location, an orange box displays. If the location isn't allowed, no orange box displays and the steps return to their original location when you try to drop them.
To move steps in your flow, do the following:
-
In the Flow pane, select the steps that you want to move. You can click on a specific step, drag to select multiple steps, or Ctrl-click or Cmd-click (MacOS) to select steps that aren't next to each other.
-
Drag and drop the steps to the new location.
Note: If you don't like the reorganization moves that you make you can click Undo in the top menu to reverse them. However, if you perform cleaning actions in between moving steps, you may undo those actions as well. The Undo option reverses your actions in the order that you performed them.
Watch "Reorganize flow steps" in action
The following example shows rearranging a flow using drag and drop.
Use the flow navigator tool
When working with large flows, scrolling back and forth to search for a particular area of the flow that you need to go back to can be difficult. The flow navigator tool makes this easier. The flow navigator is a miniature version of your flow that appears in the lower right corner of the canvas.

Click in any area of the graphic to jump to that area of your flow or use the following toolbar  options to navigate:
| Toolbar option | Description |
|---|---|

|
Collapse the flow navigator graphic. In the collapsed state, you may only see the percentage indicator. Simply hover on this to expand the toolbar and click the up arrow  to expand the graphic again. to expand the graphic again. |
|
|
Expand the flow navigator graphic. |

|
Change the size of your flow to fit on your screen. |

|
Zoom in and out of your flow. You can click on the percentage indicator to restore the view to 100 percent. |